
Introduction
This user manual provides essential information for the safe and proper use, assembly, and maintenance of your Kinderkraft MOOV2 AIR Pram 3-in-1 Set. Please read this manual thoroughly before first use and retain it for future reference.
The Kinderkraft MOOV2 AIR is a versatile 3-in-1 travel system designed for newborns up to 27 kg, featuring a convertible 2-in-1 seat (carrycot to stroller), large inflatable wheels for all-terrain use, and includes the MINK PRO I-SIZE 40-75 cm car seat.
Safety Information
Always ensure all locking mechanisms are engaged before placing a child in the pram or car seat. Do not leave your child unattended. Regularly inspect the product for any signs of wear or damage. Refer to the specific safety guidelines provided with the MINK PRO I-SIZE car seat for detailed instructions on car installation and use.
- Ensure the parking brake is engaged when stopping.
- Always use the 5-point harness when the child is in the stroller or car seat.
- Do not overload the storage basket (maximum 5 kg).
- Keep children away from moving parts during adjustment.
What's Included
Your Kinderkraft MOOV2 AIR Pram 3-in-1 Set includes the following components:
- Pram frame with inflatable wheels
- 2-in-1 convertible seat (carrycot/stroller)
- MINK PRO I-SIZE 40-75 cm car seat
- Car seat adapters
- Cup holder
- Leg warmer
- Mosquito net
- Rain cover
- Handle bag

Image: Overview of the Kinderkraft MOOV2 AIR Pram 3-in-1 Set, showcasing the main pram unit, the MINK PRO I-SIZE car seat, and various accessories such as the cup holder, leg warmer, mosquito net, rain cover, handle bag, and car seat adapters.
Setup and Assembly
1. Attaching the Wheels
The large foam wheels are designed for easy attachment and provide excellent shock absorption for a smooth ride on various terrains.
- Unfold the pram frame.
- Insert the wheel axles into the designated slots on the frame until they click securely into place.
- Ensure all wheels are firmly attached by gently pulling on them.
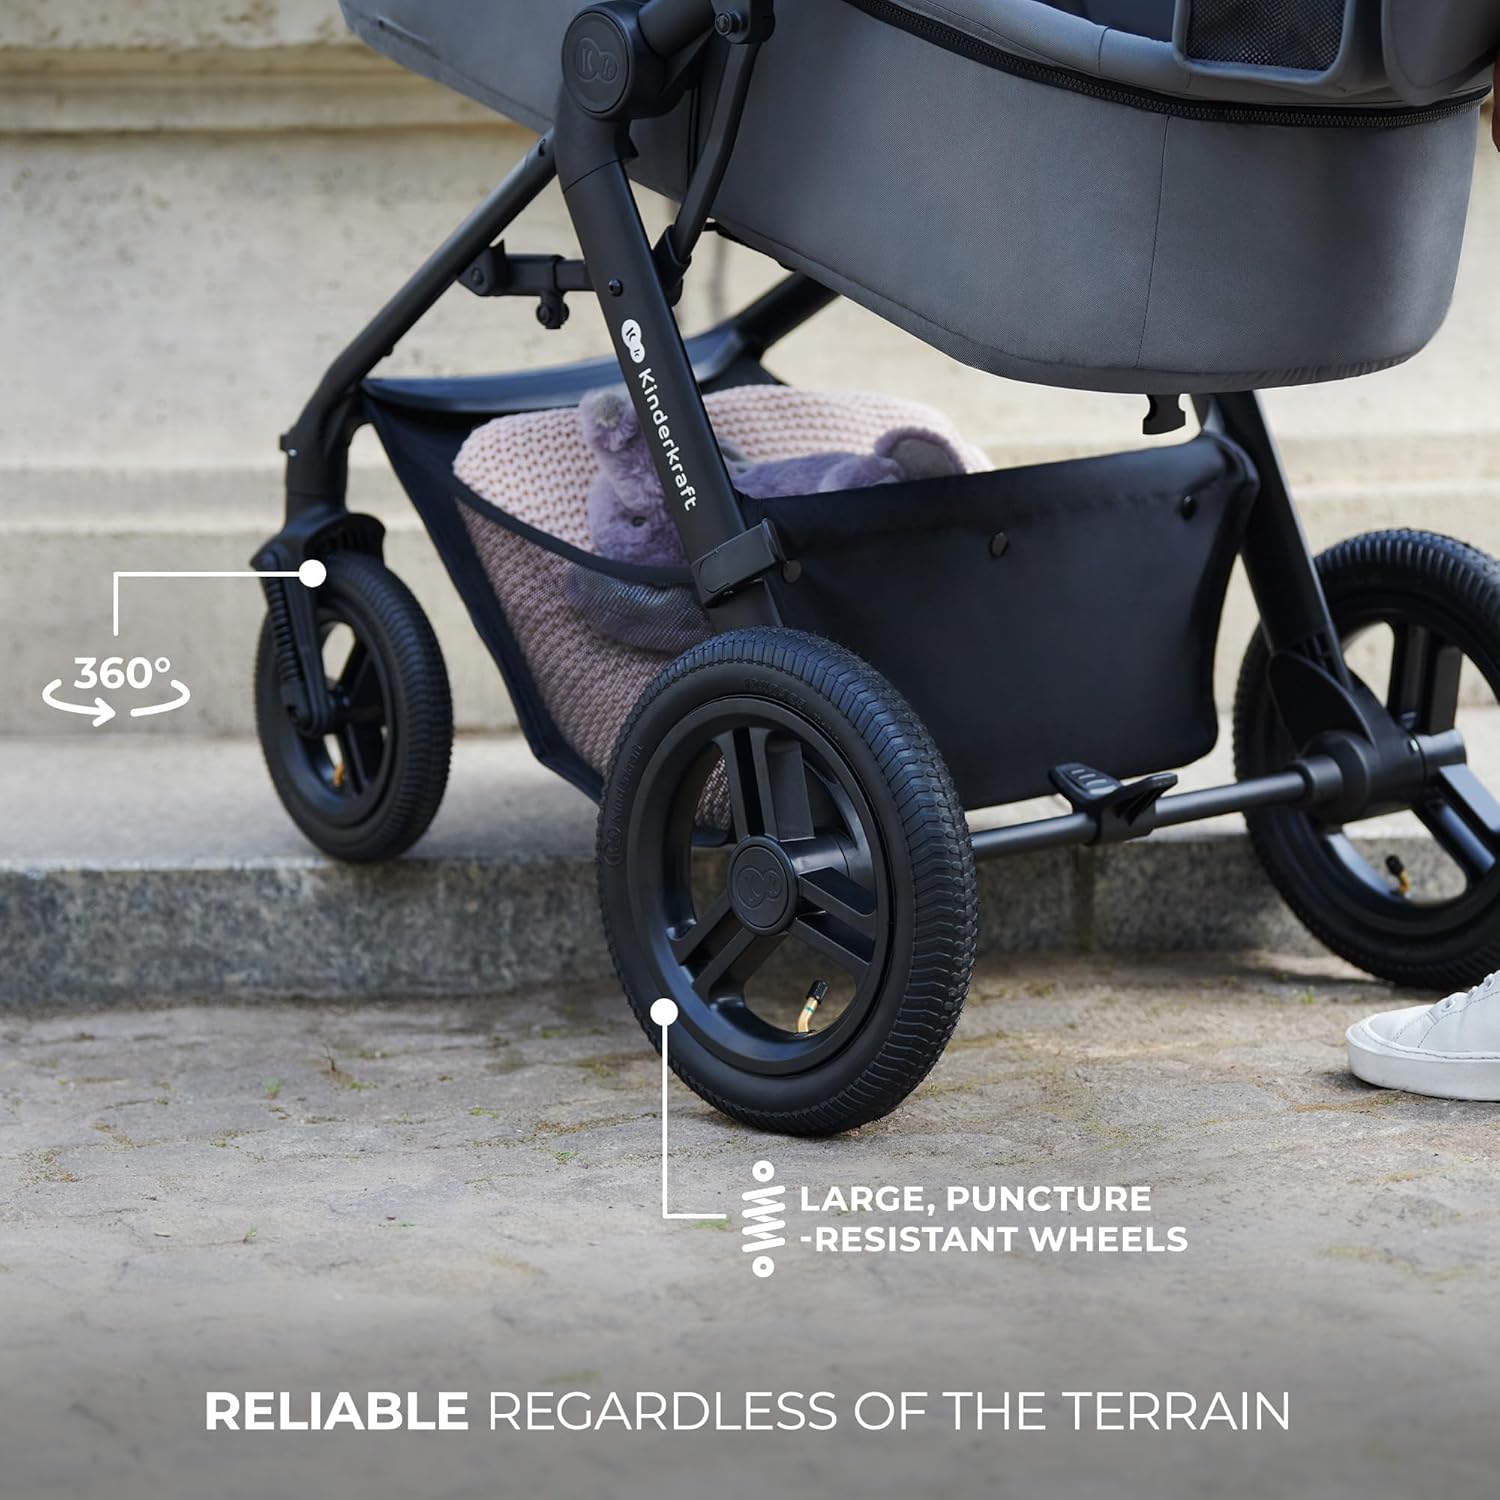
Image: Detail of the large, puncture-resistant wheels, emphasizing their robust construction and suitability for various terrains.
2. Converting the 2-in-1 Seat (Carrycot to Stroller)
The innovative 2-in-1 seat transforms from a comfortable carrycot for newborns into a functional stroller seat for older infants and toddlers in three simple steps.
- To convert from carrycot to stroller, locate the adjustment straps or levers underneath the seat unit.
- Adjust the straps/levers to flatten the base and raise the backrest, forming the stroller seat.
- Ensure all buckles and fasteners are secured for the stroller configuration.

Image: A parent converting the 2-in-1 seat from carrycot mode to stroller mode, illustrating the ease of transformation.

Image: Visual representation of the pram's adaptability, showing its use with the car seat, as a carrycot, and as a forward-facing stroller, accommodating growth from birth up to approximately 4 years.
3. Installing the MINK PRO I-SIZE Car Seat
The MINK PRO I-SIZE car seat is designed for infants from 40-75 cm and can be easily attached to the pram frame using the included adapters, forming a convenient travel system. It mounts rear-facing (RWF) using the car's seat belt.
- Attach the car seat adapters to the pram frame until they click into place.
- Align the MINK PRO I-SIZE car seat with the adapters and lower it until it locks securely.
- To install in a vehicle, place the car seat rear-facing on the vehicle seat. Follow the car seat's specific instructions for routing and tightening the vehicle's seat belt.
- Always ensure the car seat is securely fastened and does not move excessively.

Image: A parent demonstrating the travel system, attaching the car seat to the pram frame and preparing it for vehicle installation.

Image: Close-up of the MINK PRO I-SIZE car seat, emphasizing its design for safety and comfort, including crash test approval and i-Size compliance.
Operating Instructions
1. Adjusting the Handle and Seat
The pram features an adjustable parent handle and a multi-position seat to ensure comfort for both the parent and child.
- Handle Adjustment: Locate the adjustment buttons on the side of the handle. Press and hold to extend or retract the handle to your desired height. Release the buttons to lock.
- Seat Adjustment: The seat offers multiple recline positions. Use the lever or strap mechanism at the back of the seat to adjust the recline angle. Ensure the child is safely secured with the 5-point harness.
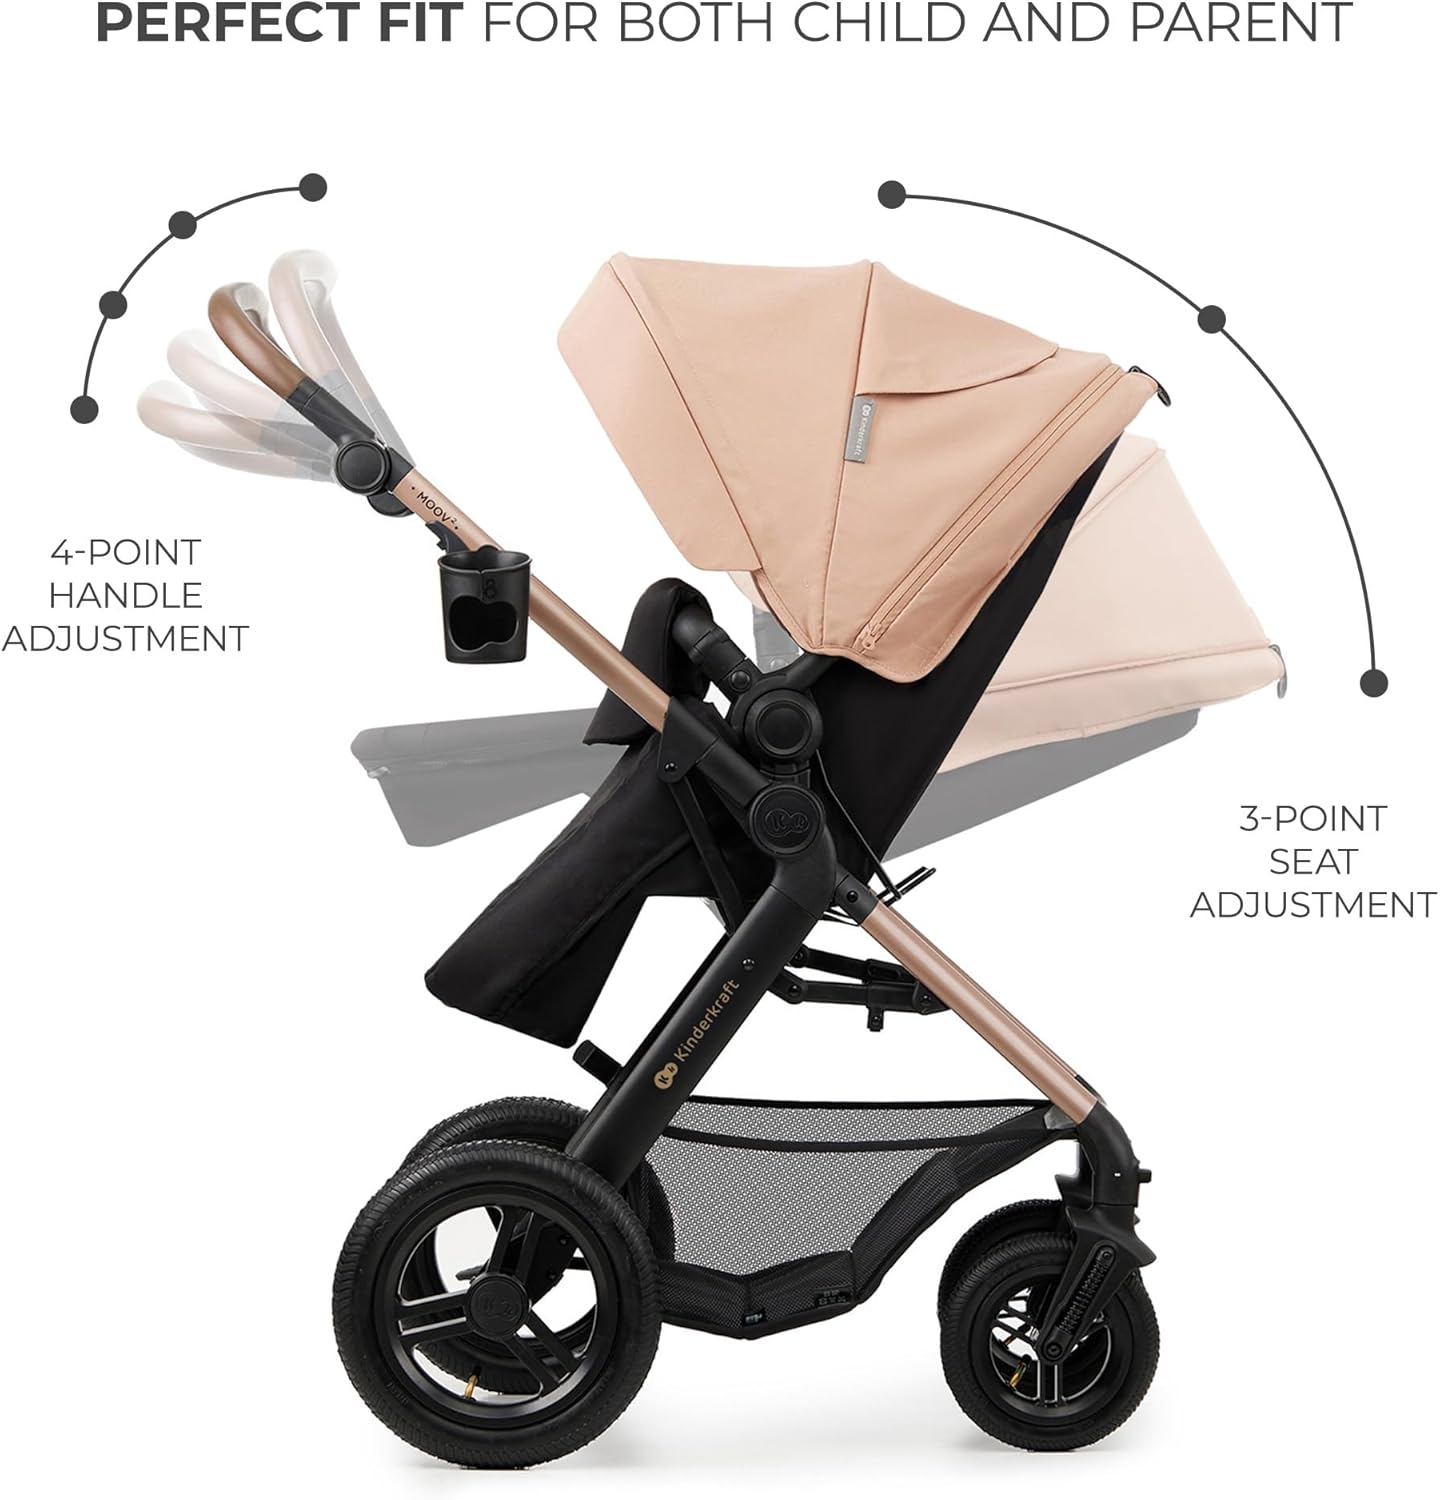
Image: Illustration detailing the adjustable handle (4 points) and seat (3 points) for optimal comfort and fit.
2. Using the 5-Point Harness and Swivel Guard Rail
The 5-point harness provides maximum safety, and the swivel guard rail allows for easy placement and removal of your child.
- Harness: Place the child in the seat. Bring the shoulder straps over the child's shoulders and the waist straps around their hips. Connect the buckles and insert them into the central buckle until they click. Adjust the straps for a snug fit.
- Swivel Guard Rail: To open, press the release button on one side of the guard rail and swing it open. This provides ample space to place or remove the child. Swing it back and click it into place to secure.

Image: A child seated in the stroller, demonstrating the secure 5-point harness and the convenient swivel guard rail.
3. Folding the Pram
The MOOV2 AIR features a quick and easy folding frame for convenient storage and transport.
- Ensure the seat is in the forward-facing position and fully upright or reclined as per folding instructions (refer to specific model instructions for optimal folding position).
- Locate the folding mechanisms on the frame (usually near the handle or side).
- Engage the mechanisms and push the handle forward/downward to collapse the frame.
- Secure the folding lock if available.

Image: The pram in its folded state being placed into a car boot, illustrating its compact size for transport.
Maintenance and Care
- Cleaning: Wipe the frame with a damp cloth and mild soap. Fabric components can typically be spot cleaned or removed for hand washing (check care labels). Do not use harsh abrasives or solvents.
- Wheels: Regularly check the inflatable wheels for proper inflation and wear. Keep them free of debris.
- Moving Parts: Periodically lubricate moving parts (e.g., folding mechanisms, wheel axles) with a silicone-based lubricant to ensure smooth operation.
- Storage: Store the pram in a dry place, away from direct sunlight and extreme temperatures, to prevent material degradation.
Troubleshooting
| Problem | Possible Cause | Solution |
|---|---|---|
| Pram does not fold easily. | Folding mechanisms are stiff or obstructed. | Ensure all components are correctly aligned. Lubricate moving parts. Check for debris. |
| Wheels squeak or are difficult to turn. | Lack of lubrication or debris in axles. | Clean wheels and axles. Apply silicone lubricant. Check tire pressure if inflatable. |
| Seat adjustment is difficult. | Mechanism is stiff or obstructed. | Ensure no fabric is caught in the mechanism. Apply lubricant if necessary. |
| Car seat does not click onto adapters. | Incorrect alignment or obstruction. | Ensure adapters are correctly installed on the frame. Align the car seat precisely with the adapters. |
Specifications
| Feature | Detail |
|---|---|
| Model Number | KSMOOV02BEG00BS |
| Product Dimensions (unfolded) | 86.51 x 59.99 x 105.99 cm |
| Item Weight | 12.5 kg |
| Maximum Weight Recommendation | 22 Kilograms (Pram), up to 27 kg* (overall system) |
| Material Type | Aluminium (Frame), Foam (Tires) |
| Harness Type | 5 Point |
| Folded Size | 61 cm x 105 cm |
| Car Seat Compatibility | MINK PRO I-SIZE 40-75 cm |
| Age Range (description) | From Birth |
*Note: The product description states "from birth to 27 kg*", while specifications list "Maximum Weight Recommendation: 22 Kilograms". Please refer to the most current product labeling for precise weight limits.

Image: Detailed dimensional drawing of the Kinderkraft MOOV2 AIR pram, including height, width, length, and folded dimensions.
Warranty and Support
Kinderkraft products are designed for durability and safety. For specific warranty information, please refer to the warranty card included with your product or visit the official Kinderkraft website. Keep your proof of purchase for warranty claims.
For customer support, spare parts, or further assistance, please contact Kinderkraft customer service through their official channels. You can often find contact information on the brand's website or through the retailer where you purchased the product.
Visit the Kinderkraft Store on Amazon for more information and products.


