1. Important Safeguards
When using electrical appliances, basic safety precautions should always be followed to reduce the risk of fire, electric shock, and/or injury to persons, including the following:
- Read all instructions before operating the roaster oven.
- Do not touch hot surfaces. Use handles or knobs.
- To protect against electrical shock, do not immerse cord, plugs, or the main unit in water or other liquid.
- Close supervision is necessary when any appliance is used by or near children.
- Unplug from outlet when not in use and before cleaning. Allow to cool before putting on or taking off parts.
- Do not operate any appliance with a damaged cord or plug, or after the appliance malfunctions or has been damaged in any manner.
- The use of accessory attachments not recommended by the appliance manufacturer may cause injuries.
- Do not use outdoors.
- Do not let cord hang over edge of table or counter, or touch hot surfaces.
- Do not place on or near a hot gas or electric burner, or in a heated oven.
- Extreme caution must be used when moving an appliance containing hot oil or other hot liquids.
- Always attach plug to appliance first, then plug cord into the wall outlet. To disconnect, turn any control to 'OFF', then remove plug from wall outlet.
- Do not use appliance for other than intended use.
2. Product Components
The Royalcraft 18qt Electric Roaster Oven includes the following main components:
- Main Roaster Unit: The outer housing with heating elements and control knob.
- Removable Roasting Pan: Non-stick interior for easy cooking and cleaning.
- Self-Basting Lid: Features a domed design to accommodate larger items and promote self-basting.
- Roasting Rack: Designed to elevate food for even cooking and easy removal.

Image: Royalcraft 18qt Electric Roaster Oven with self-basting lid, removable pan, and roasting rack.
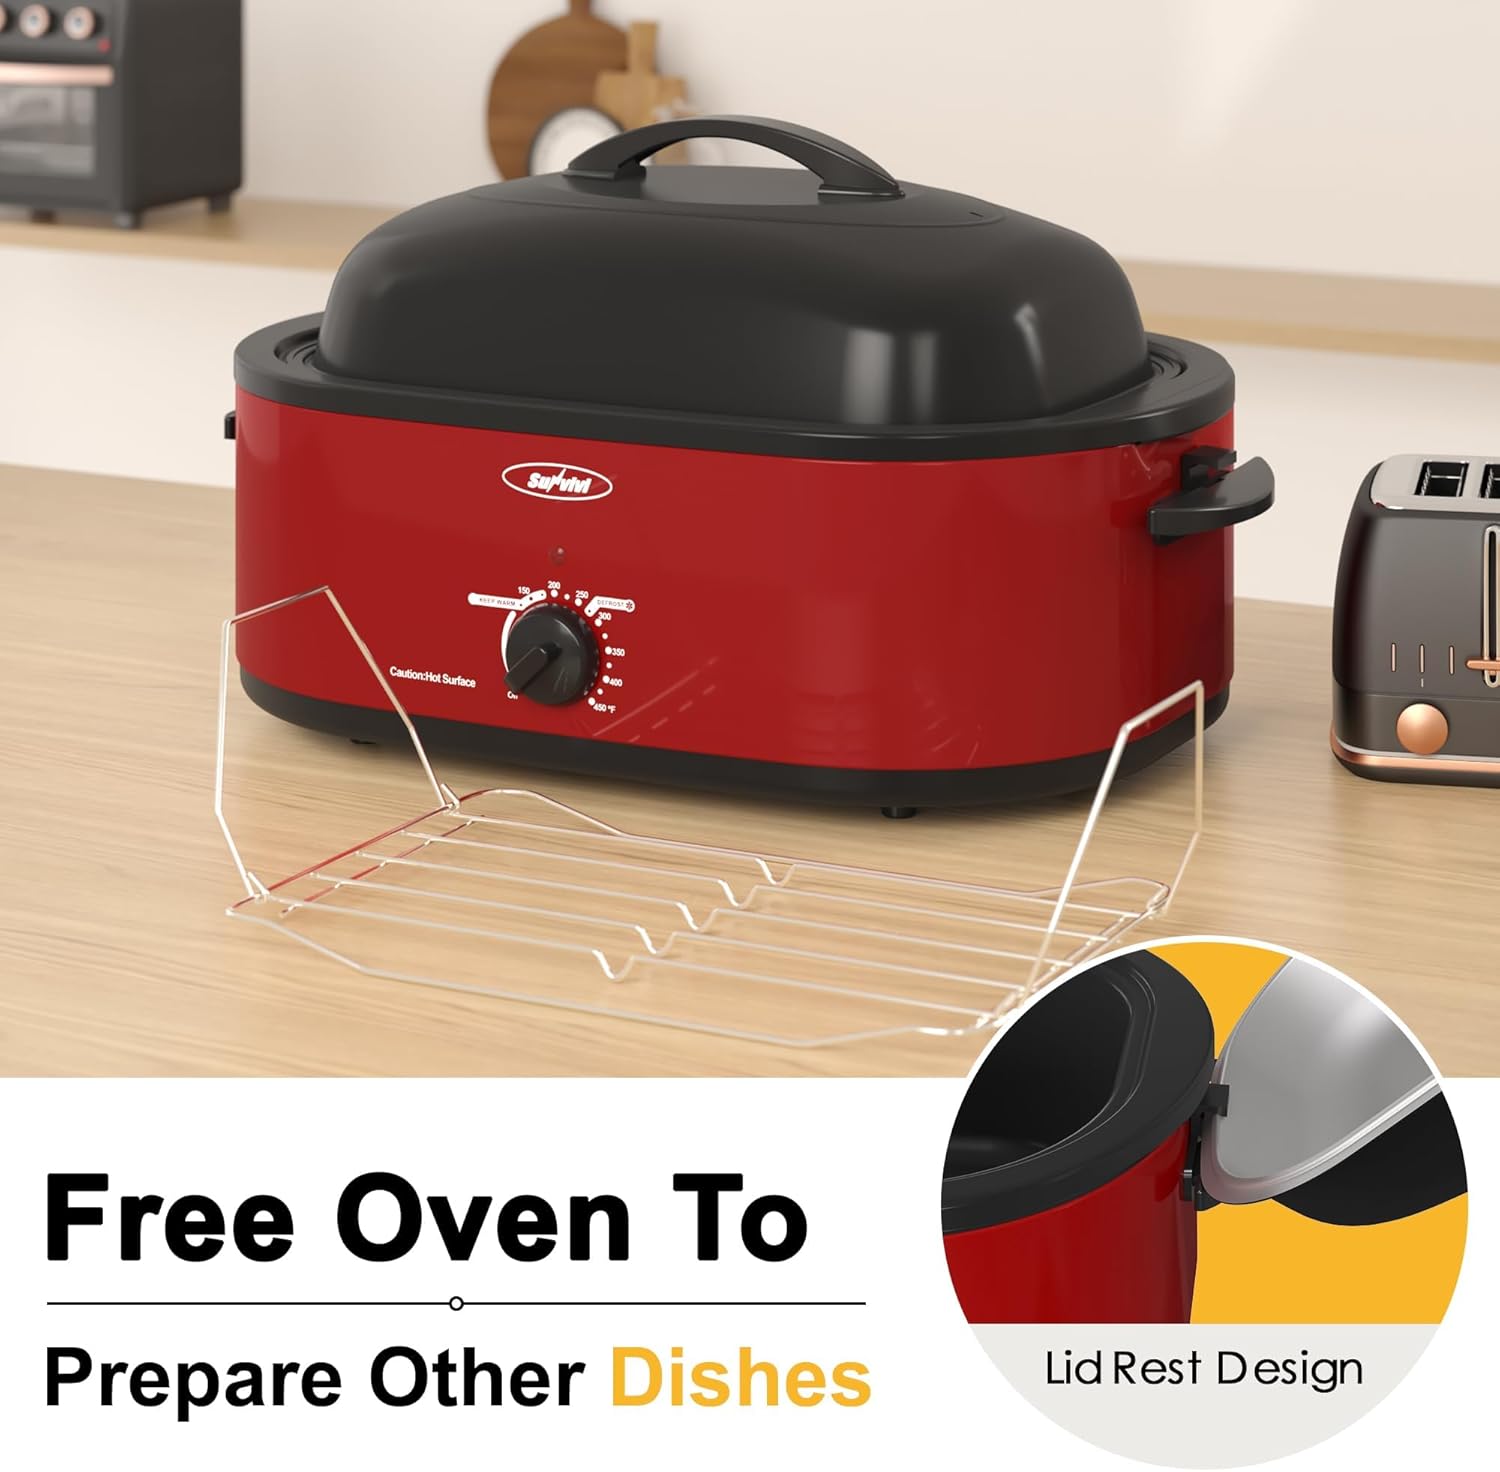
Image: The roaster oven features a convenient lid rest design, allowing you to place the lid securely while checking food or serving.
3. Setup
- Unpack: Carefully remove all packaging materials, including any protective films or inserts.
- Initial Cleaning: Before first use, wash the removable roasting pan and roasting rack in warm, soapy water. Rinse thoroughly and dry completely. Wipe the exterior of the main unit with a damp cloth. Do not immerse the main unit in water.
- Placement: Place the roaster oven on a stable, heat-resistant surface, away from walls and other appliances to ensure proper ventilation. Ensure there is adequate space around the unit.
- Assemble: Place the clean roasting pan inside the main roaster unit, then insert the roasting rack into the pan.
4. Operating Instructions
4.1 Pre-use Burn-off
It is recommended to perform an initial burn-off to eliminate any manufacturing odors. Place the empty roasting pan and rack inside the unit, close the lid, and set the temperature to 350°F (175°C) for approximately 30 minutes. Ensure the area is well-ventilated during this process. A slight odor or smoke is normal during the first use.
4.2 Roasting
- Prepare Food: Place your food (e.g., turkey, chicken, roast) on the roasting rack within the removable pan.
- Preheat: Place the lid on the roaster and plug the unit into a standard electrical outlet. Turn the temperature control knob to the desired roasting temperature (range 150-450°F). Allow the roaster to preheat for 15-20 minutes. The indicator light will turn off when the set temperature is reached.
- Cook: Carefully place the food into the preheated roaster. Close the lid. The self-basting lid design helps to keep food moist by circulating moisture.
- Monitor: Periodically check the food's progress. The domed lid allows for ample space for larger items.
- Finish: Once cooking is complete, turn the temperature control knob to 'OFF' and unplug the unit. Carefully remove the food using oven mitts.

Image: The roaster oven's design ensures efficient heat circulation, maintaining a consistent internal temperature for optimal cooking.

Image: Example of a roasted turkey prepared in the roaster oven.
4.3 Defrost and Warm Function
This roaster oven includes dedicated settings for defrosting and keeping food warm.
- Defrost: To defrost frozen items, place them in the roasting pan and set the control knob to the 'DEFROST' setting. Monitor the food closely to ensure even thawing.
- Keep Warm: After cooking, you can use the 'KEEP WARM' setting (around 150-200°F) to maintain the food's temperature without overcooking. This is ideal for buffet-style serving.
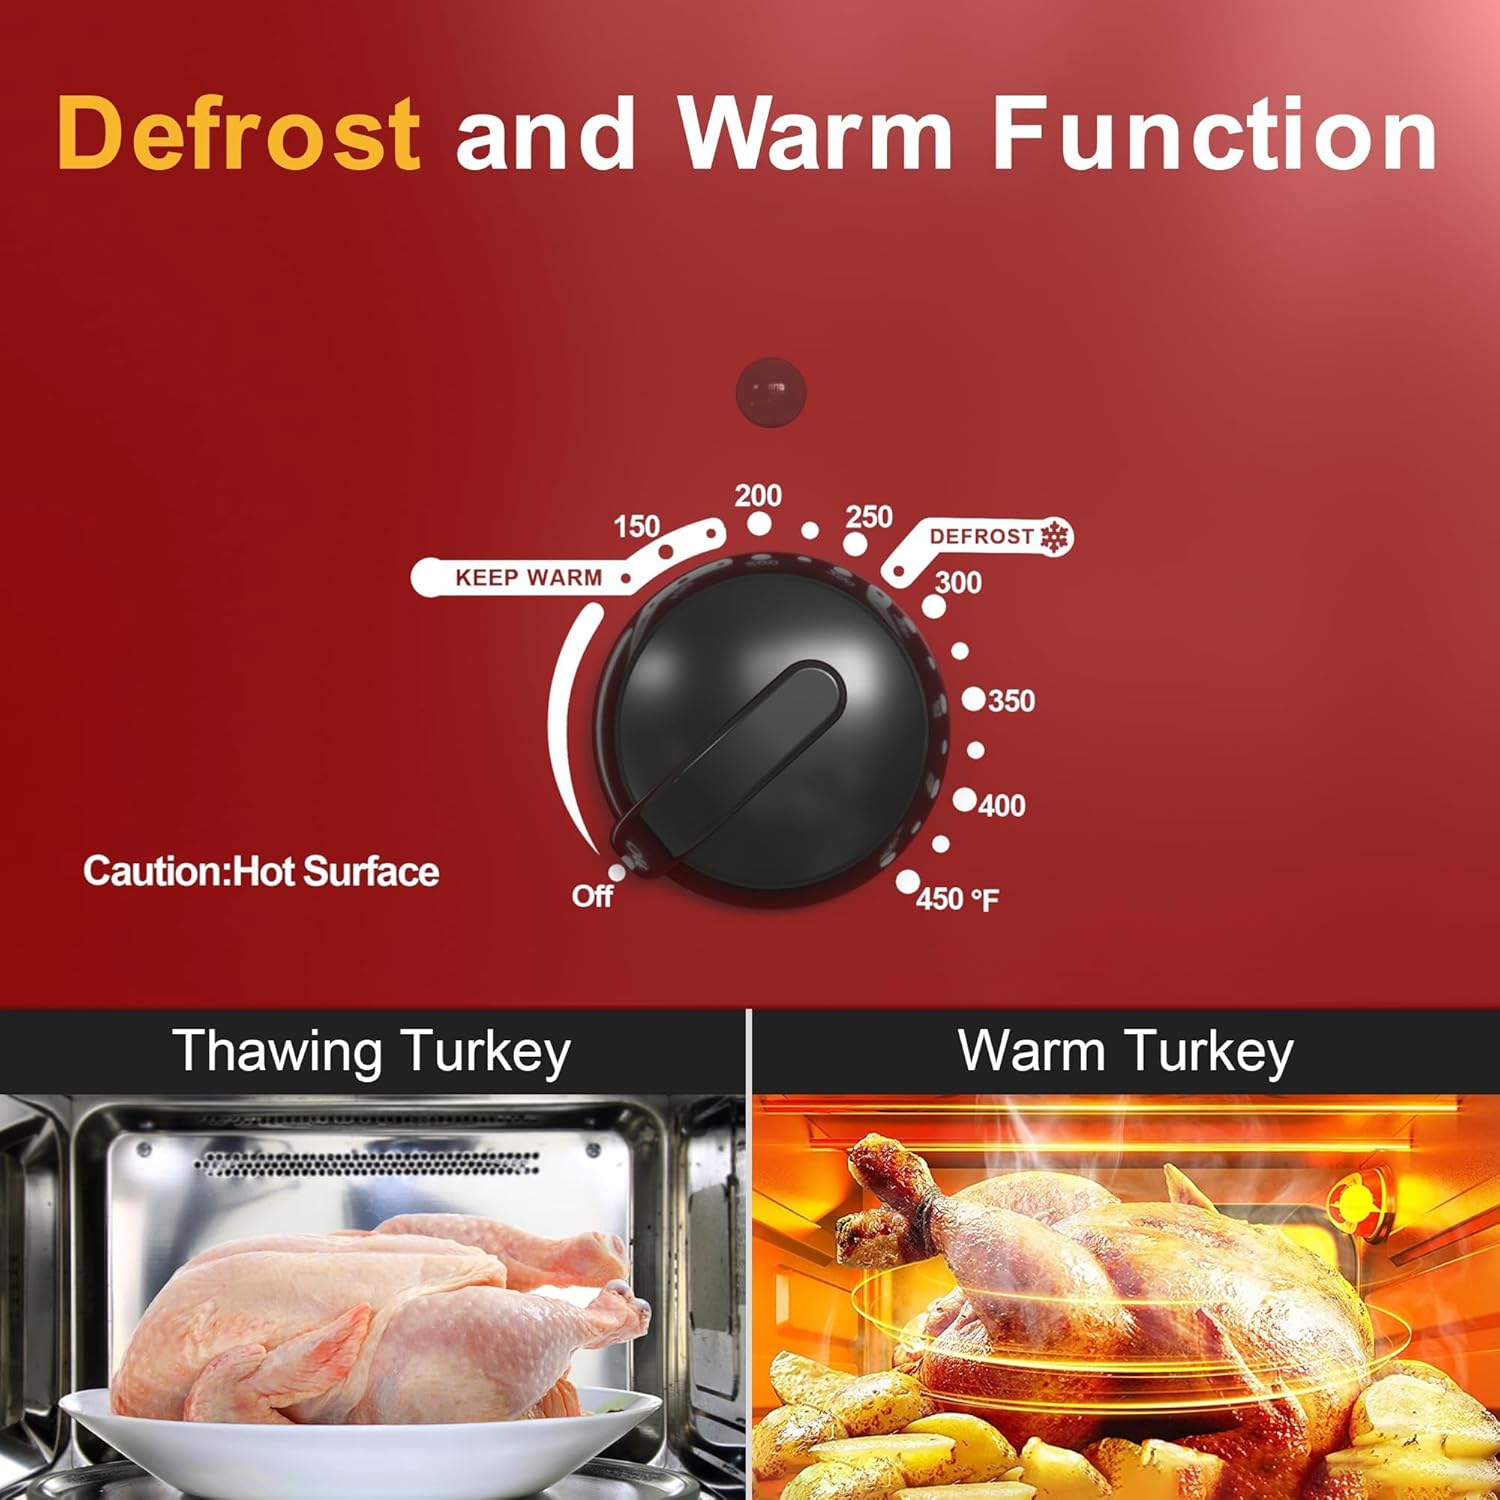
Image: The control panel highlights the 'Defrost' and 'Keep Warm' functions for versatile use.
4.4 Other Functions
The versatile design of this roaster oven allows for multiple cooking methods:
- Baking: Use for baking bread, casseroles, or other dishes that typically require an oven.
- Broiling: Achieve a crispy finish on meats or vegetables.
- Slow Cooking: Ideal for stews, pot roasts, and other dishes requiring long, low-temperature cooking.
- Food Warmer/Buffet Server: Keep multiple dishes warm for extended periods, perfect for entertaining.
5. Care and Maintenance
5.1 Cleaning
- Unplug and Cool: Always unplug the roaster oven from the power outlet and allow it to cool completely before cleaning.
- Removable Parts: The roasting pan and roasting rack are dishwasher safe or can be washed by hand in warm, soapy water. The non-stick surface makes cleaning easy. Avoid abrasive cleaners or scouring pads that could damage the finish.
- Main Unit: Wipe the exterior of the main unit with a damp cloth. Do not immerse the main unit in water or any other liquid.
- Lid: Wash the self-basting lid with warm, soapy water and rinse thoroughly.
- Dry: Ensure all parts are completely dry before reassembling or storing.
5.2 Storage
Store the clean and dry roaster oven in a cool, dry place. The roasting rack can be stored inside the roasting pan, and the lid placed on top for compact storage.
6. Troubleshooting
| Problem | Possible Cause | Solution |
|---|---|---|
| Roaster does not turn on. | Unit not plugged in; power outlet malfunction; temperature knob not set. | Ensure the unit is securely plugged into a working outlet. Check the circuit breaker. Turn the temperature knob to a desired setting. |
| Food cooks unevenly. | Improper food placement; lid not sealed properly; insufficient preheating. | Ensure food is centered on the rack. Verify the lid is seated correctly. Allow adequate preheating time before adding food. |
| Odor or smoke during first use. | Manufacturing residues burning off. | This is normal. Ensure good ventilation. The odor will dissipate after initial use. |
| Lid does not fit securely. | Lid or pan misalignment. | Ensure the roasting pan is correctly seated in the main unit and the lid is aligned with the pan's rim. |
7. Specifications
- Brand: RoyalCraft
- Model Name: Electric Roaster
- Model Number: ZER001RD
- Capacity: 18 Quarts
- Color: Red
- Material: Stainless Steel
- Product Dimensions: 15.47"D x 23.35"W x 12.52"H
- Item Weight: 15.19 pounds
- Control Type: Touch (Dial)
- Temperature Range: 150-450°F
- Power Source: AC
- Included Components: Main Unit, Removable Roasting Pan, Self-Basting Lid, Roasting Rack
- UPC: 765037195562
8. Warranty and Support
This Royalcraft product is covered by a standard manufacturer's warranty against defects in materials and workmanship. Please refer to your purchase documentation for specific warranty terms and duration. For customer support, service, or warranty claims, please contact the retailer or manufacturer directly using the contact information provided at the time of purchase.
For general inquiries or to register your product, visit the official RoyalCraft website or contact their customer service department.


