1. Introduction
This manual provides detailed instructions for the assembly, installation, and maintenance of your Mars Gaming MCELITE High Performance Metal Micro-ATX PC Case. Please read this manual thoroughly before beginning installation to ensure proper setup and optimal performance of your system.

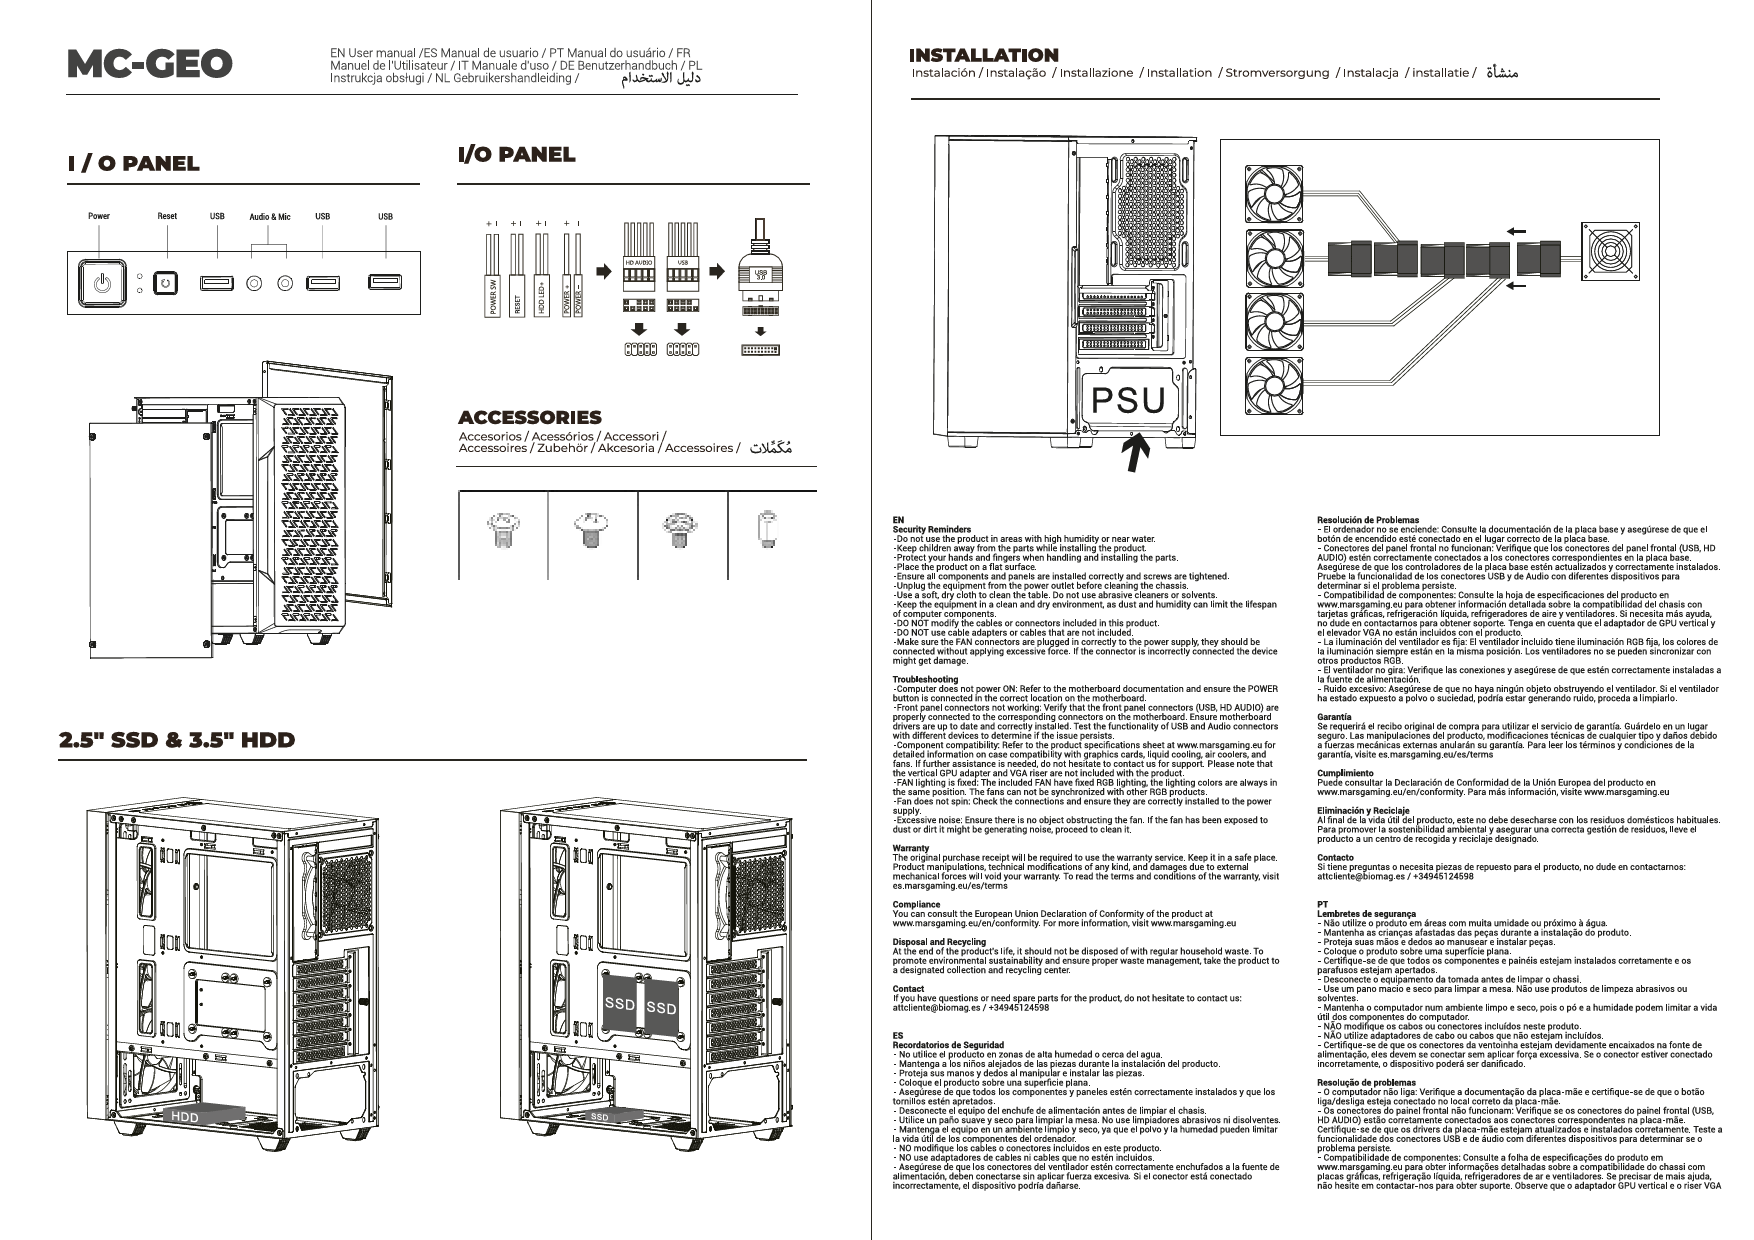
Image 1.1: Front-side view of the Mars Gaming MCELITE PC Case, showcasing its compact design and front panel connectivity.
2. Product Features
- Aluminum Handles and Feet: The MCELITE PC case features sturdy polished aluminum handles and feet, providing both ergonomic grip for transport and enhanced stability.
- Mesh Technology and FDB Fans: Equipped with mesh panels on the side and top for optimized airflow and aesthetics. It includes 3 pre-installed FDB (Fluid Dynamic Bearing) fans for efficient and quiet cooling.
- Dual PSU Support: This compact mini-tower case supports both SFX and ATX power supplies, offering flexibility for various hardware configurations.
- Compact Design: Optimized structure for Micro-ATX and Mini-ITX motherboards, allowing seamless integration into smaller spaces while maintaining performance.
- Advanced Connectivity: The front panel includes one USB-C port, two USB 3.0 ports for high-speed data transfer, and one USB 2.0 port.

Image 2.1: Detail of the front panel, highlighting the USB ports and power button, along with the aluminum feet.

Image 2.2: View of the case demonstrating the side and top mesh design for improved ventilation.

Image 2.3: Internal view of the case, illustrating the placement of the three pre-installed FDB fans.
3. Specifications
| Feature | Specification |
|---|---|
| Brand | Mars Gaming |
| Model | MCELITE |
| Product Dimensions | 34 x 21 x 41 cm |
| Weight | 3 kg |
| Color | Black |
| Motherboard Compatibility | Micro-ATX, Mini-ITX |
| Case Type | Mini-tower |
| Material | Aluminum |
| Power Supply Mounting | SFX or ATX |
| Cooling Method | Air |
| Pre-installed Fans | 3x FDB Fans |
| Front I/O Ports | 1x USB-C, 2x USB 3.0, 1x USB 2.0 |
4. Package Contents
Please verify that all items are present in the package:
- Mars Gaming MCELITE PC Case
- 3x Pre-installed FDB Fans
- Accessory Box (containing screws, cable ties, and other small parts)
- Instruction Manual (this document)
5. Installation Guide
Follow these steps for proper component installation. Refer to the clearance diagram for maximum component sizes.

Image 5.1: Component clearance diagram, detailing CPU cooler height, GPU length/width, and fan/radiator mounting points.
5.1. Preparing the Case
- Place the case on a stable, flat surface.
- Remove the side panels by unscrewing the thumb screws at the rear of the case and sliding the panels off.
5.2. Motherboard Installation
- Install the I/O shield (if not pre-attached to your motherboard) into the rear opening of the case.
- Align your Micro-ATX or Mini-ITX motherboard with the standoffs inside the case.
- Secure the motherboard using the provided screws. Do not overtighten.
5.3. Power Supply Unit (PSU) Installation
The MCELITE supports both ATX and SFX power supplies.

Image 5.2: Illustrates the installation of both ATX and SFX power supplies, showing how they fit within the case structure.
- Determine the appropriate mounting bracket for your PSU type (ATX or SFX).
- Attach the PSU to the bracket, then slide the assembly into the designated PSU bay.
- Secure the PSU with the screws provided in the accessory box.
5.4. Storage Drive Installation
Refer to your motherboard manual for specific drive mounting locations and methods. The case typically supports 2.5" SSDs and 3.5" HDDs in designated bays or mounting points.
- Locate the drive bays or mounting points within the case.
- Secure your SSDs or HDDs using the appropriate screws.
5.5. Graphics Card (GPU) Installation
- Remove the necessary PCIe slot covers from the rear of the case.
- Insert your graphics card into the primary PCIe slot on your motherboard until it clicks into place.
- Secure the graphics card to the case with screws.
5.6. Fan and Radiator Installation
The case comes with 3 pre-installed FDB fans. Additional fans or radiators can be installed based on the clearance diagram (Image 5.1).
- Identify available mounting points for additional fans (e.g., side, top, rear).
- Mount fans or radiators using the appropriate screws. Ensure correct airflow direction.
5.7. Cable Management
Utilize the cable routing cutouts and tie-down points behind the motherboard tray to manage cables. This improves airflow and aesthetics.
- Connect all necessary power cables from the PSU to your components (motherboard, GPU, drives).
- Connect front panel cables (USB, audio, power/reset switches) to the motherboard headers.
- Route cables neatly using cable ties to prevent obstruction of airflow.
6. Connectivity
The front I/O panel provides convenient access to essential ports:
- Power Button: To power on/off your system.
- USB-C Port: For modern devices requiring USB-C connectivity.
- USB 3.0 Ports (x2): For high-speed data transfer with compatible devices.
- USB 2.0 Port (x1): For standard USB devices.
- Audio Jacks: For headphones and microphone.
7. Operating Instructions
- Once all components are installed and cables are connected, replace the side panels.
- Connect your monitor, keyboard, mouse, and power cable to the rear of your PC.
- Press the power button on the front panel to start your system.
- The pre-installed FDB fans will operate automatically to maintain optimal cooling.
8. Maintenance
Regular maintenance helps ensure the longevity and performance of your PC components.
- Dust Cleaning: Periodically clean dust filters and internal components using compressed air. Ensure the system is powered off and unplugged before cleaning.
- Fan Inspection: Check fans for dust buildup and ensure they are spinning freely.
- Cable Management: Re-evaluate cable routing if you notice any airflow issues or component overheating.
9. Troubleshooting
If you encounter issues during or after assembly, consider the following common troubleshooting steps:
- No Power: Ensure the PSU is switched on, the power cable is securely connected, and all internal power cables (24-pin ATX, 8-pin CPU, GPU power) are properly seated.
- No Display: Verify that the monitor cable is connected to the graphics card (not the motherboard I/O, unless using integrated graphics) and that the graphics card is fully seated in its PCIe slot.
- Fans Not Spinning: Check fan connections to the motherboard or fan controller. Ensure the PSU is providing power.
- System Instability: Double-check all component installations, especially RAM and CPU. Ensure adequate cooling.
10. Warranty and Support
For warranty information or technical support, please refer to the official Mars Gaming website or contact your retailer. Keep your proof of purchase for warranty claims.