
1. Introduction
This instruction manual provides essential information for the proper installation, operation, and maintenance of your Qotom Q1015GE-1U Rackmount Server. Please read this manual thoroughly before using the device to ensure optimal performance and to prevent damage.
1.1 Product Overview
The Qotom Q1015GE-1U is a high-performance 1U rackmount server designed for advanced networking applications. Featuring an Intel Celeron 5205U processor and eight 2.5 Gigabit Ethernet ports, it offers a flexible x86 architecture suitable for operating systems like pfSense, OPNsense, OpenWrt, Linux, or Windows. Its rackmount design makes it ideal for professional homelab or small office deployments.
1.2 Key Features
- High-Performance Processor: Powered by a 10th Gen Celeron 5205U processor (15W TDP) for robust computing power.
- Multiple 2.5GbE Ports: Equipped with 8 Intel I225V 2.5 Gigabit Ethernet ports for low latency and high throughput.
- x86 Architecture: Supports full operating systems for extensive customization and advanced networking functions.
- 1U Rackmount Design: Space-saving form factor for standard server racks.
- Upgradeable: Easily upgradable RAM and storage for future scalability.
2. Safety Information
Always observe the following safety precautions to reduce the risk of fire, electric shock, and injury.
- Ensure the power supply voltage matches the requirements specified for the device.
- Do not open the device casing unless instructed by qualified personnel.
- Keep the device away from water, moisture, and extreme temperatures.
- Ensure adequate ventilation around the device to prevent overheating.
- Disconnect power before performing any maintenance or installation procedures.
3. Hardware Overview
3.1 Front Panel
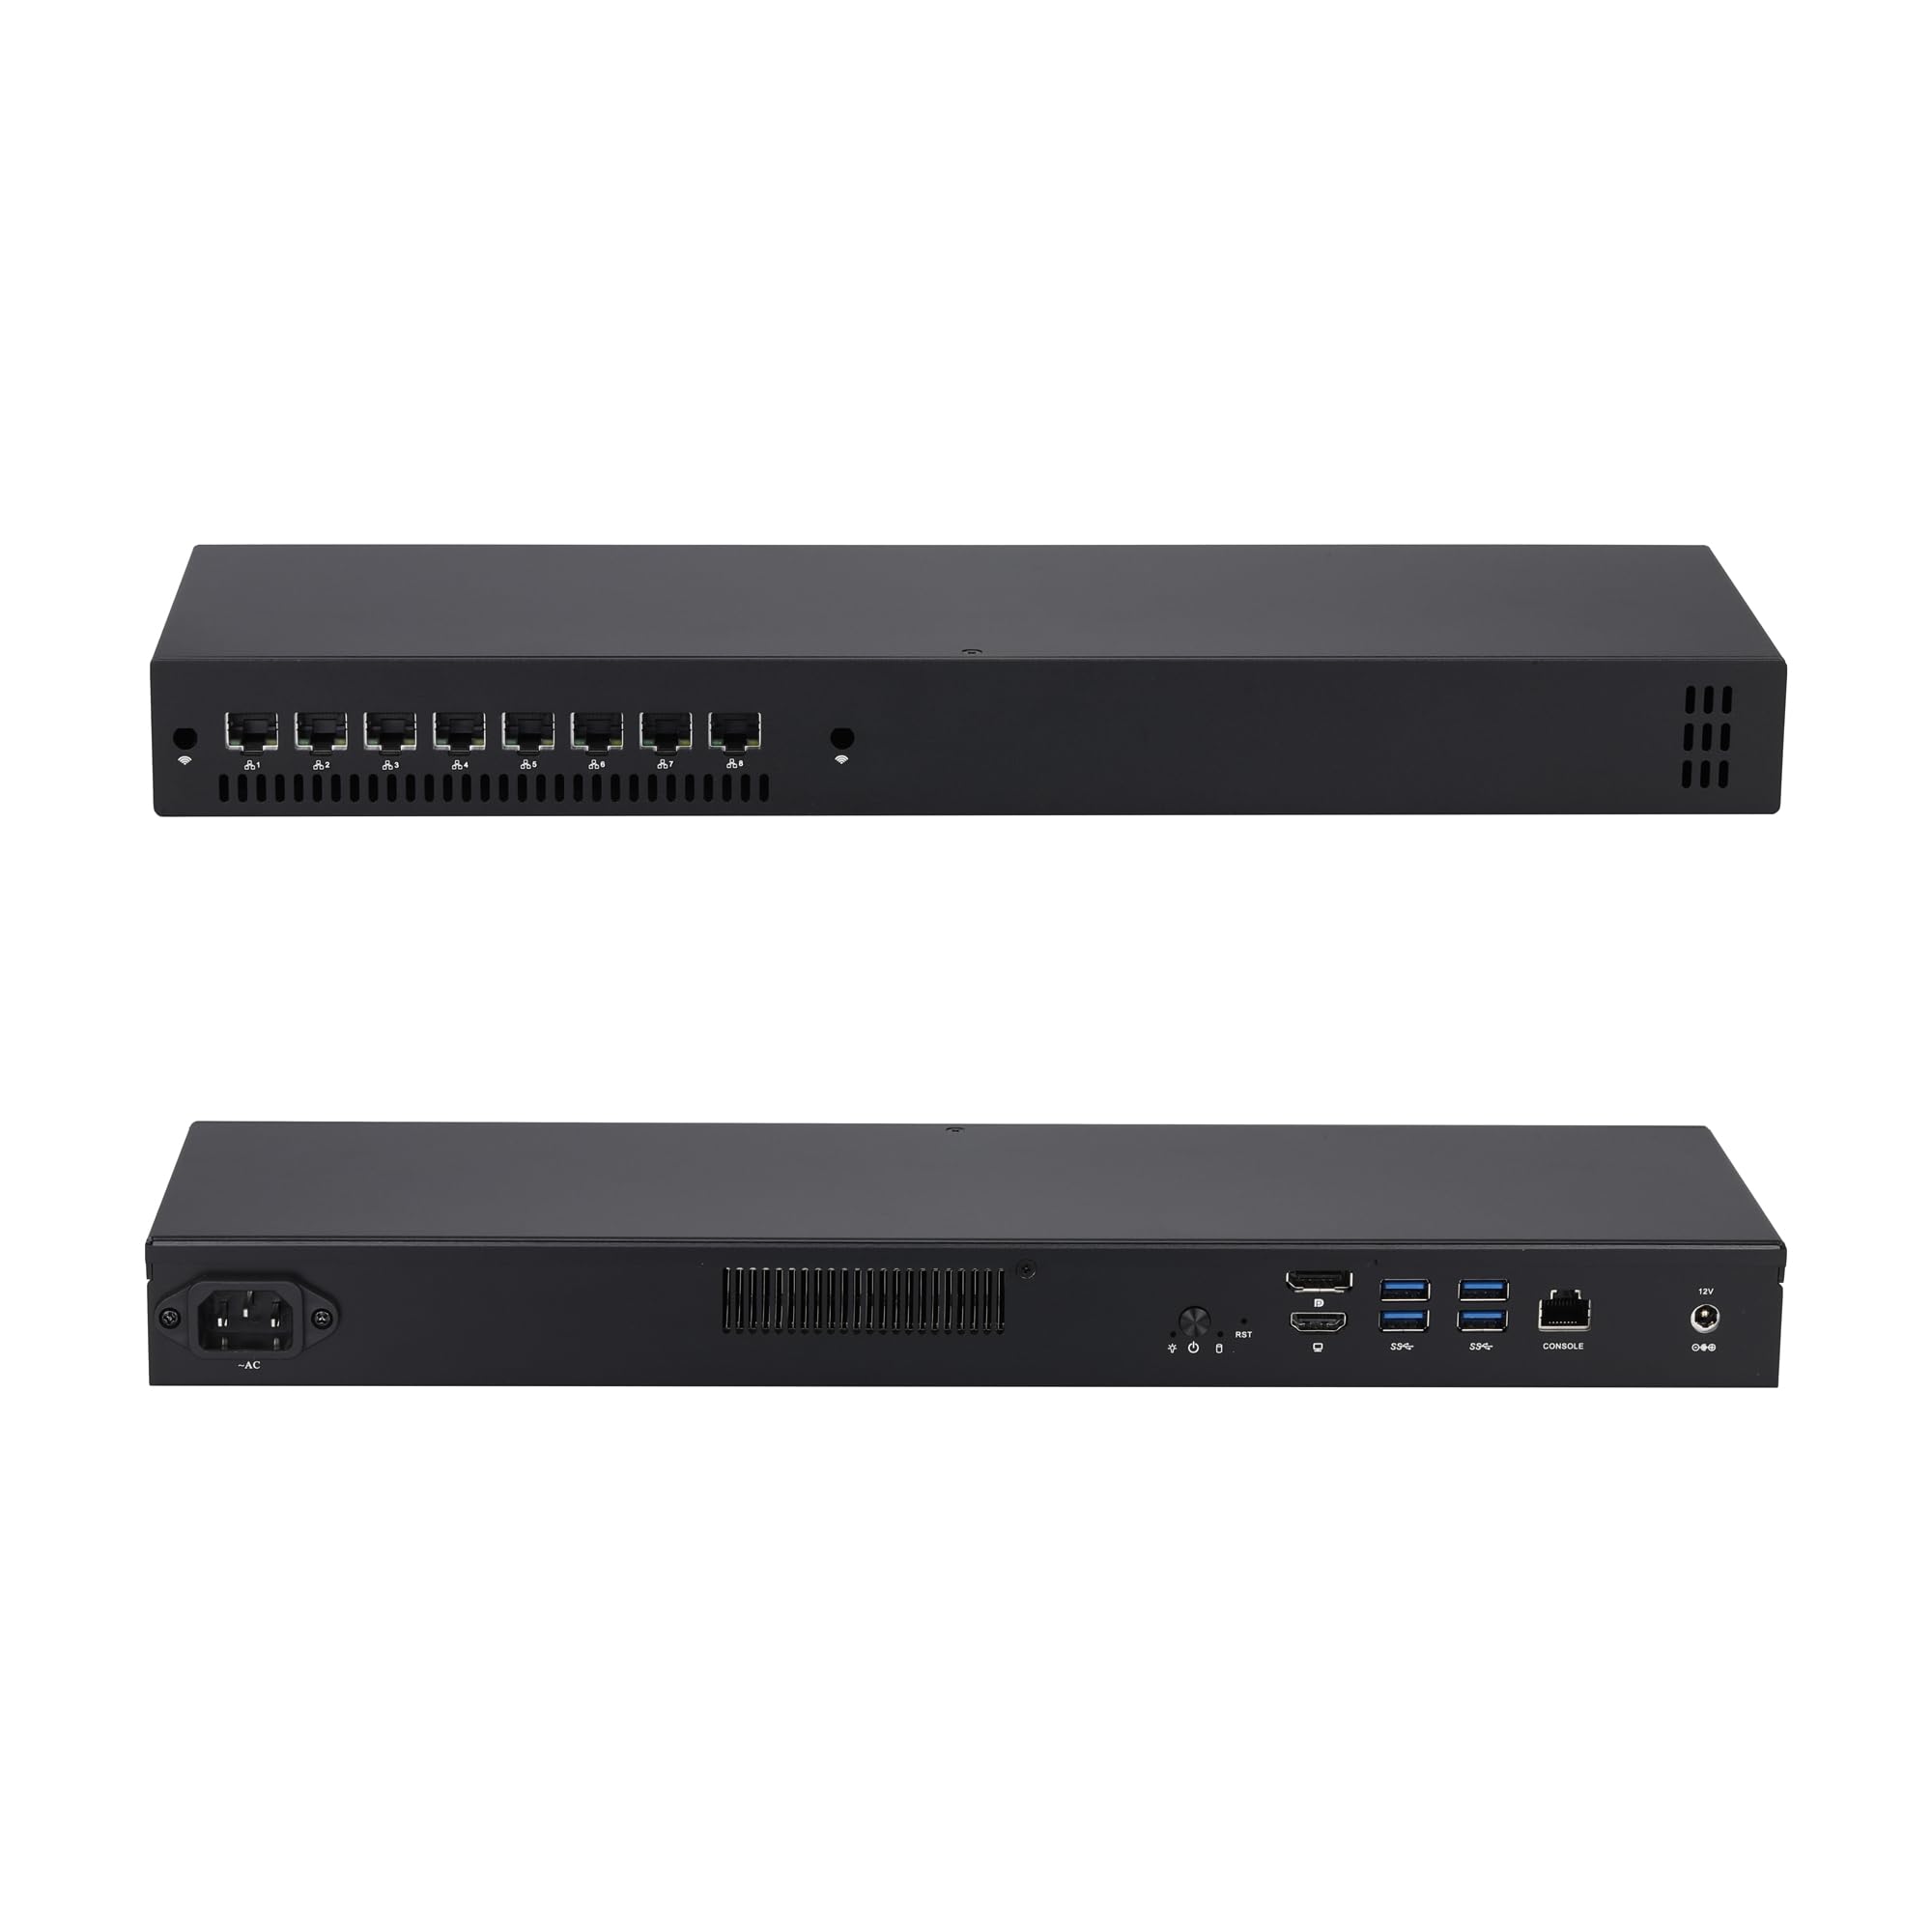
Image 3.1: Front view of the Qotom Q1015GE-1U Rackmount Server, showing the eight 2.5GbE Ethernet ports, power button, and status LEDs.
The front panel features eight 2.5 Gigabit Ethernet ports, a power button, and LED indicators for power and network activity. These ports are labeled for easy identification.
3.2 Rear Panel

Image 3.2: Rear view of the Qotom Q1015GE-1U Rackmount Server, displaying the power input, USB ports, HDMI, DisplayPort, and console port.
The rear panel includes the AC power input, four USB 3.0 ports, HDMI and DisplayPort outputs for display connectivity, and an RJ45 console port for serial management.
3.3 Internal Components
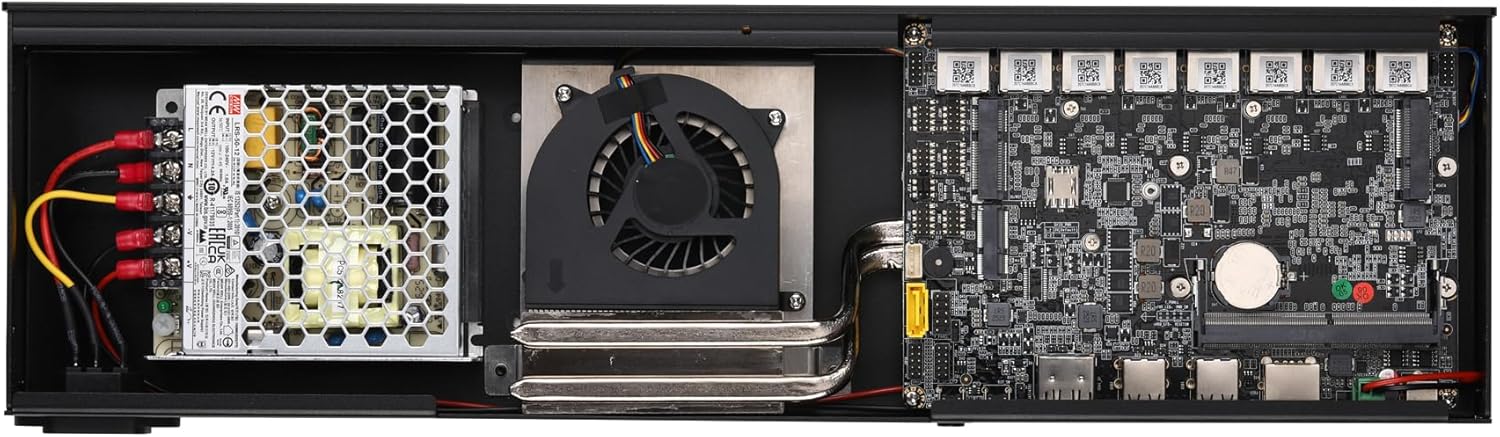
Image 3.3: Internal view of the Qotom Q1015GE-1U Rackmount Server, showing the power supply unit, cooling fan, and motherboard with various components.
Inside the chassis, you will find the motherboard, power supply unit, and a cooling fan. The motherboard houses the CPU, RAM slots, and M.2/mSATA slots for storage. The cooling fan ensures optimal operating temperatures for the internal components.

Image 3.4: Detailed view of the Qotom Q1015GE-1U motherboard, highlighting the RAM slot, M.2/mSATA slot, and various connectors.
This image provides a closer look at the motherboard, indicating the location of the SODIMM RAM slot and the M.2/mSATA slot for storage expansion. These components are user-upgradable.
4. Setup Guide
4.1 Unpacking
- Carefully remove the server from its packaging.
- Inspect the server for any signs of damage during transit. If damage is found, contact your vendor immediately.
- Ensure all accessories are present.
4.2 Rack Mounting
The Q1015GE-1U is designed for standard 19-inch server racks. Use appropriate rack rails and screws (not included) to securely mount the server in your rack. Ensure sufficient space for airflow around the unit.
4.3 Connecting Peripherals
- Display: Connect a monitor to the HDMI or DisplayPort on the rear panel.
- USB Devices: Connect a keyboard and mouse to the USB 3.0 ports on the rear panel.
- Console: For serial management, connect a console cable to the RJ45 console port.
4.4 Network Connections
Connect your network cables to the 2.5 Gigabit Ethernet ports on the front panel. These ports can be configured for various network roles depending on your operating system and application requirements (e.g., WAN, LAN, DMZ).
4.5 Power Connection
Connect the provided AC power cord to the power input on the rear panel of the server, then plug the other end into a grounded electrical outlet. The server is designed for 24/7 operation and supports auto power-on after a power loss (may require a jumper setting on the motherboard, refer to advanced documentation).
4.6 Initial Boot
Press the power button on the front panel. The power LED should illuminate. The server will begin its boot sequence. If no operating system is pre-installed, you will need to proceed with OS installation.
5. Operating System Installation
The Qotom Q1015GE-1U supports a wide range of x86-compatible operating systems. Common choices include pfSense, OPNsense, OpenWrt, various Linux distributions, and Windows.
- Prepare Installation Media: Create a bootable USB drive with your chosen operating system's installation image.
- Connect Media: Insert the bootable USB drive into one of the USB ports.
- Access BIOS/UEFI: During startup, repeatedly press the DEL or F2 key (key may vary, check on-screen prompts) to enter the BIOS/UEFI setup.
- Configure Boot Order: Navigate to the Boot menu and set the USB drive as the primary boot device. Save changes and exit.
- Install OS: Follow the on-screen instructions of your chosen operating system to complete the installation.
- Driver Installation: After OS installation, ensure all necessary drivers (especially for the Intel I225V Ethernet controllers) are installed for full functionality.
6. Basic Operation
6.1 Power On/Off
- Power On: Press the power button on the front panel.
- Normal Shutdown: Perform a graceful shutdown through your operating system.
- Forced Shutdown: Press and hold the power button for 5-7 seconds. Use this only when a graceful shutdown is not possible.
6.2 LED Indicators
- Power LED: Indicates the power status of the device.
- Network Activity LEDs: Located on each Ethernet port, these LEDs indicate link status and data activity.
7. Maintenance
7.1 Cleaning
Regularly clean the exterior of the server with a soft, dry cloth. Ensure ventilation openings are free from dust and obstructions to maintain proper airflow and cooling.
7.2 Firmware Updates
Periodically check the Qotom official website or your vendor for BIOS/UEFI firmware updates. Firmware updates can improve stability, performance, and compatibility. Follow the provided instructions carefully when performing updates.
7.3 RAM/SSD Upgrade
The server's RAM and SSD are upgradable. Refer to Image 3.4 for component locations. Ensure the server is powered off and disconnected from the power source before opening the chassis. Use compatible DDR4 SO-DIMM RAM and M.2/mSATA SSDs. Consult the product specifications for maximum supported capacities.
8. Troubleshooting
| Problem | Possible Cause | Solution |
|---|---|---|
| No power | Power cable loose; Power outlet faulty; Power supply unit failure | Check power cable connections; Try a different power outlet; Contact support if PSU is suspected faulty. |
| No display output | Monitor cable loose; Incorrect input selected on monitor; RAM not properly seated | Check display cable connections; Ensure monitor is on correct input; Reseat RAM modules (if applicable). |
| Network connectivity issues | Ethernet cable faulty; Incorrect network configuration; Driver issues | Check Ethernet cables; Verify network settings in OS; Reinstall or update network drivers. |
| System unstable/crashes | Overheating; Faulty RAM/SSD; OS issues | Ensure proper ventilation; Run memory/storage diagnostics; Reinstall OS if necessary. |
9. Specifications
| Feature | Detail |
|---|---|
| Processor | Intel Celeron 5205U (1.9 GHz) |
| RAM | 8 GB DDR4 SODIMM (Upgradeable) |
| Storage | 128 GB SSD (Upgradeable) |
| Graphics Coprocessor | Intel UHD Graphics |
| Ethernet Ports | 8x Intel I225V 2.5 Gigabit Ethernet |
| USB Ports | 4x USB 3.0 |
| Video Output | HDMI, DisplayPort |
| Console Port | RJ45 Serial Console |
| Hardware Platform | PC |
| Operating System (Pre-installed) | None (Supports Windows 10, Linux, pfSense, OPNsense, OpenWrt) |
| Dimensions (LxWxH) | 17.32 x 4.45 x 1.73 inches |
| Item Weight | 6.6 pounds |
| Color | Black |
| Power Source | DC |
10. Warranty and Support
For warranty information, please refer to the documentation provided with your purchase or contact your vendor directly. Qotom products typically come with a manufacturer's warranty covering defects in materials and workmanship.
For technical support, driver downloads, or further assistance, please visit the official Qotom website or contact your authorized reseller. Keep your product model number (Q1015GE-1U) and purchase details readily available when seeking support.
Additional protection plans may be available for purchase from your retailer.