Introduction
Thank you for choosing the Ruko 1661 Remote Control Excavator. This 1:18 scale RC construction vehicle is designed to provide a realistic and engaging play experience with its 11 full-function channels, metal shovel, and simulated lights. Please read this manual thoroughly before operating the excavator to ensure proper setup, safe operation, and optimal performance.
What's in the Box
- 1 x Ruko 1661 Excavator
- 1 x 2.4GHz Remote Control
- 2 x Rechargeable Batteries
- 2 x Charging Cables
Setup
1. Battery Installation
The Ruko 1661 Excavator requires one rechargeable Lithium Ion battery (included) for the vehicle and two AA batteries (not included) for the remote control.
Excavator Battery Installation:
- Locate the battery compartment on the top rear of the excavator.
- Use a screwdriver to open the battery compartment cover.
- Connect one of the rechargeable batteries to the excavator's power connector.
- Carefully place the battery inside the compartment.
- Close the battery compartment cover and secure it with the screw.

Image: Installing the rechargeable battery into the excavator.
Remote Control Battery Installation:
- Locate the battery compartment on the back of the remote control.
- Use a screwdriver to open the battery compartment cover.
- Insert two new AA batteries, ensuring correct polarity (+/-).
- Close the battery compartment cover and secure it with the screw.

Image: Installing AA batteries into the remote control.
2. Charging the Batteries
Use the provided charging cables to charge the excavator's rechargeable batteries. Connect the charging cable to a USB power source (e.g., computer, USB wall adapter). The indicator light on the charging cable will show the charging status. A full charge typically takes approximately 2-3 hours. Always ensure batteries are fully charged before use for optimal playtime.

Image: Rechargeable batteries and charging cables for the excavator.
3. Pairing the Remote Control
To pair the remote control with the excavator:
- Ensure both the excavator and the remote control have fresh or fully charged batteries installed.
- Turn on the excavator using the power switch.
- Turn on the remote control using its power switch.
- The remote control and excavator should automatically pair. If not, turn both off and repeat the process.
Unboxing and Initial Setup Video
Video: This video demonstrates the unboxing process and initial setup steps for the Ruko 1661 RC Excavator, including battery installation.
Operating Instructions
The Ruko 1661 Excavator features 11 full-function channels for realistic control. Familiarize yourself with the remote control layout and functions:
Remote Control Functions:

Image: Remote control diagram showing various functions.
- Left Joystick (Forward/Backward): Controls forward and backward movement of the excavator.
- Right Joystick (Left/Right): Controls left and right turning of the excavator.
- Bucket Decline: Lowers the excavator bucket.
- Bucket Up: Raises the excavator bucket.
- Lights On: Activates the simulated LED lights.
- Lights Off: Deactivates the simulated LED lights.
- Turntable Turn Left: Rotates the excavator cab to the left.
- Turntable Turn Right: Rotates the excavator cab to the right.
- Auto Demo: Initiates an automatic demonstration sequence of the excavator's functions.
- Power Switch: Turns the remote control on/off.
Basic Movement:
Use the left joystick to move the excavator forward and backward. Use the right joystick to steer left and right. The tracks are designed for all-terrain movement, including sand, soil, and grass.

Image: The excavator demonstrating all-terrain capability.
Excavator Arm and Bucket Control:
The excavator arm and metal bucket can be controlled for realistic digging actions. Use the designated buttons to raise and lower the bucket, and rotate the cab 680 degrees for comprehensive digging and dumping operations.
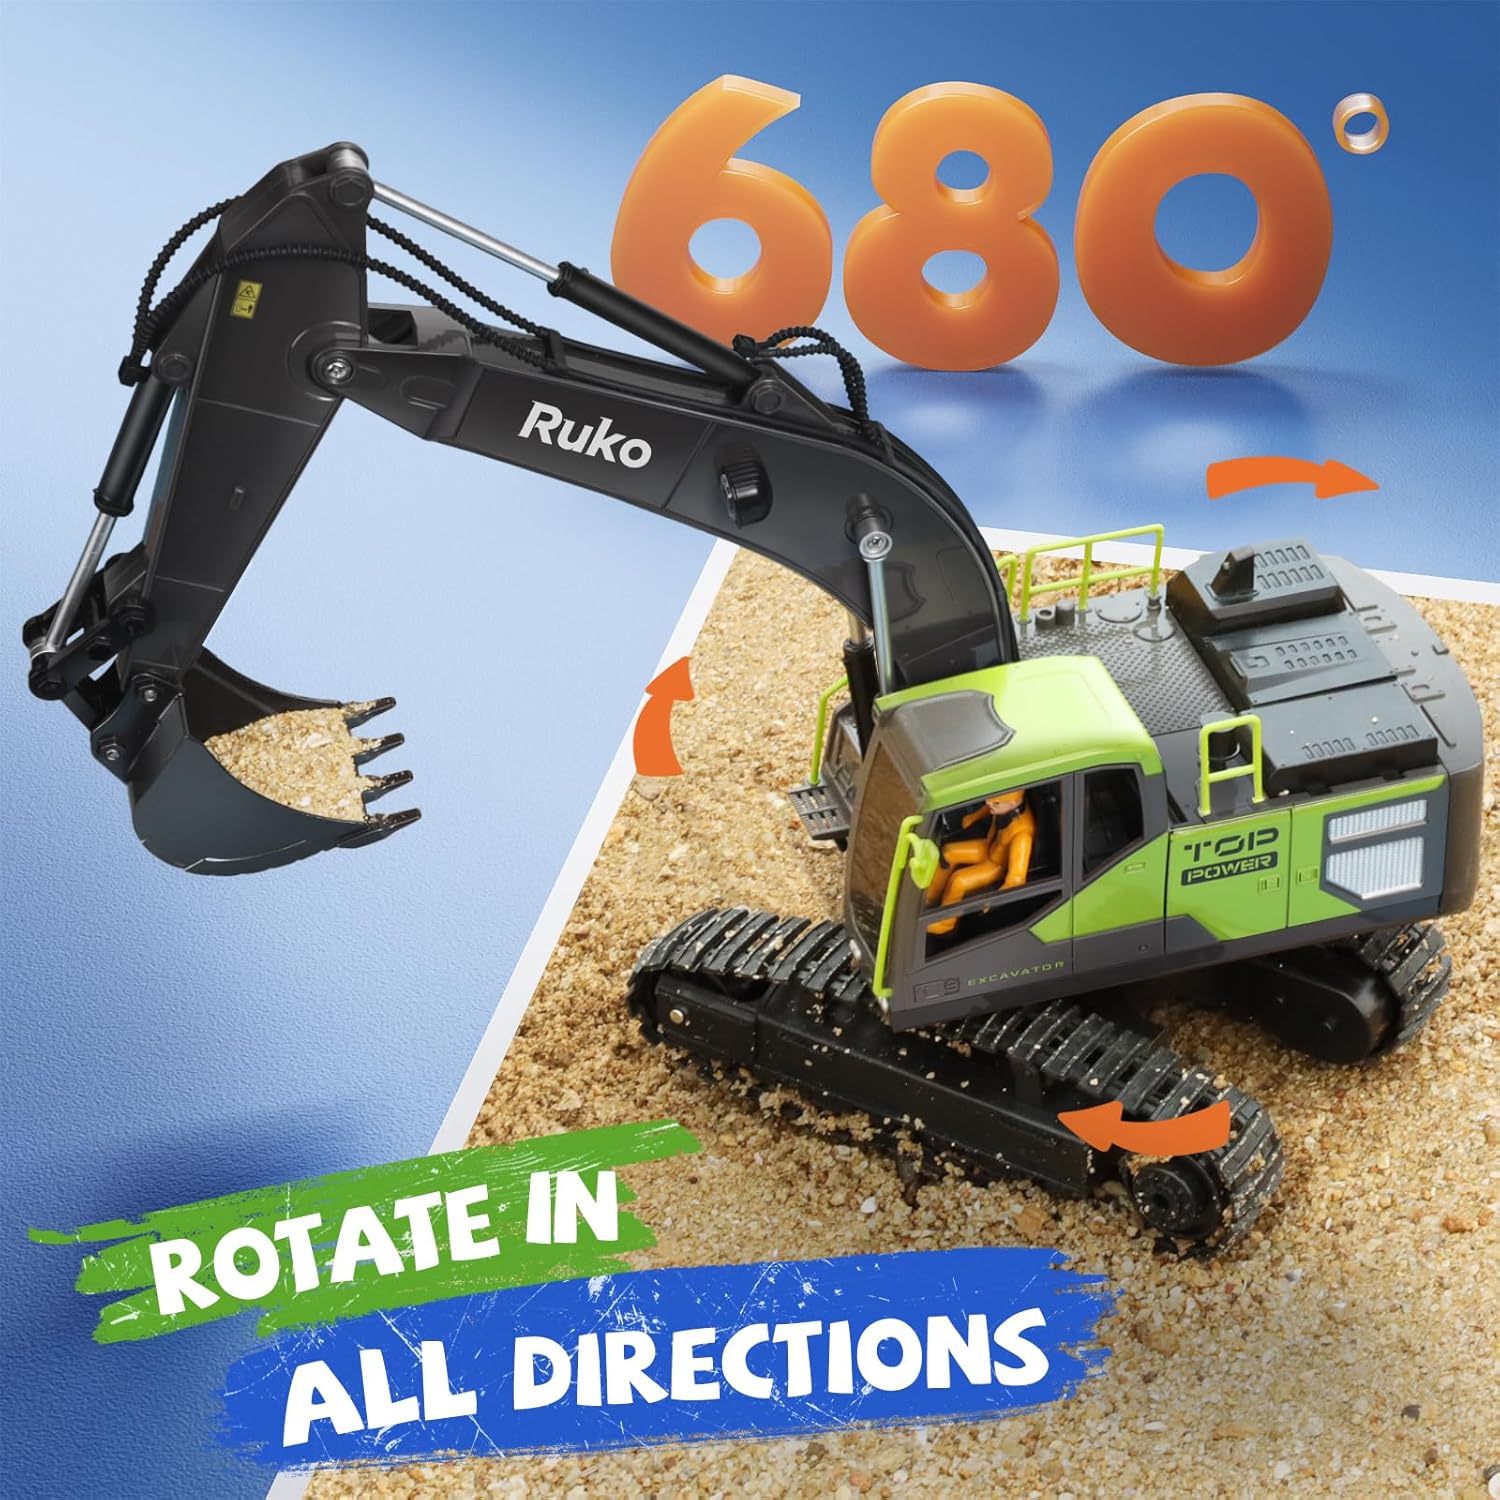
Image: Ruko 1661 RC Excavator demonstrating digging with its metal shovel.
Image: Detailed view of the heavy-duty alloy bucket.

Image: The excavator's cab rotating 680 degrees.
Simulated Lights:
Activate the LED headlights for enhanced realism, especially during low-light conditions or evening play.
Function Demonstration Video
Video: This video showcases the various functions and movements of the Ruko 1661 RC Excavator, including digging, rotation, and driving.
Construction Vehicle Collaboration Video
Video: This video demonstrates the Ruko 1661 RC Excavator working alongside other Ruko construction vehicles, highlighting its functional capabilities.
Maintenance
To ensure the longevity and optimal performance of your Ruko 1661 Excavator, follow these maintenance guidelines:
- Cleaning: After each use, especially when playing in dirt or sand, gently wipe down the excavator with a soft, dry cloth to remove any debris. Avoid using water or harsh chemicals, as this can damage electronic components.
- Battery Care: Always remove batteries from both the excavator and the remote control when not in use for extended periods. Store batteries in a cool, dry place. Do not overcharge or completely discharge the rechargeable batteries.
- Storage: Store the excavator in a cool, dry environment, away from direct sunlight and extreme temperatures.
- Inspection: Periodically inspect the tracks, arm, and bucket for any signs of wear or damage. Ensure all connections are secure.
Troubleshooting
If you encounter any issues with your Ruko 1661 Excavator, please refer to the following common troubleshooting steps:
| Problem | Possible Cause | Solution |
|---|---|---|
| Excavator does not respond to remote control. | Low batteries in excavator or remote control. Not properly paired. Interference. | Replace or recharge batteries. Re-pair the remote control and excavator (refer to Setup section). Move to an area with less interference. |
| Excavator moves slowly or has weak digging power. | Low battery in excavator. Obstruction in tracks or arm mechanism. | Recharge excavator battery. Check for and remove any debris or obstructions. |
| Lights are not working. | Lights are turned off. Low battery. | Press the "Lights On" button on the remote control. Recharge excavator battery. |
Specifications
- Model: 1661
- Scale: 1:18
- Channels: 11 Full-Function
- Control Frequency: 2.4GHz
- Control Range: Up to 100 feet (approx. 30 meters)
- Excavator Battery: 1 Lithium Ion (included)
- Remote Control Batteries: 2 AA (not included)
- Playtime: Up to 60 minutes (with two batteries)
- Features: Metal Shovel, Simulated LED Lights, 680° Cab Rotation, Durable Rubber Tracks
- Product Dimensions: 18.11 x 4.92 x 11.81 inches
- Item Weight: 2.38 pounds
- Recommended Age: 8 years and up
Warranty and Support
Ruko products are designed for quality and durability. For any questions, technical support, or warranty inquiries, please contact Ruko customer service:
- Phone: +1 (888) 892-0155
- Email: service@rukotoy.com
- Operating Hours: Mon-Fri: 8 AM to 2 AM (PST), Sat-Sun: 8 AM to 5 PM (PST)
Please refer to your purchase receipt for specific warranty terms and conditions.

Image: Ruko Customer Support contact details.


