
1. Introduction
This manual provides detailed instructions for the proper setup, operation, and maintenance of your Doslnlya MIX8 Professional 8-Channel Portable Recording Mixer. Please read this manual thoroughly before using the device to ensure optimal performance and safety. The MIX8 is designed for various audio applications, including home studios, live performances, karaoke, and DJ mixing, offering 8 channels, integrated DSP effects, and versatile connectivity options.
2. Safety Information
- Power Supply: Use only the specified power adapter. Ensure the voltage matches your local power supply (110 Volts). Disconnect power during electrical storms or when unused for extended periods.
- Moisture: Do not expose the mixer to rain, moisture, or excessive humidity. Avoid placing liquid-filled objects on the unit.
- Ventilation: Ensure adequate ventilation. Do not block ventilation openings.
- Heat: Keep the unit away from heat sources such as radiators, heat registers, stoves, or other heat-producing appliances.
- Servicing: Do not attempt to service this product yourself. Refer all servicing to qualified service personnel.
- Placement: Place the mixer on a stable, level surface to prevent accidental falls.
3. Package Contents
Verify that all items are present in the package:
- Doslnlya MIX8 Professional 8-Channel Portable Recording Mixer
- Power Adapter
- User Manual
4. Product Overview
The Doslnlya MIX8 features an intuitive layout for easy control over your audio. Below is an overview of the main components and their functions.

Key Features:
- 8 Channels: Each with XLR and Line input, gain adjustment, switchable high-pass filter, and 48V phantom power.
- 99 DSP Digital Effects: Integrated effects processor with various presets for reverb, delay, echo, chorus, flanger, tremolo, wah-wah, pitch shifter, and multi-FX.
- 7-Band Stereo Graphic Equalizer: For precise frequency adjustments on the main output.
- USB Playback & Recording: Supports U-DISK MP3 input and direct recording.
- Bluetooth Connectivity: For wireless audio streaming from mobile devices.
- Headphone Monitoring: Dedicated output for monitoring audio.
5. Setup
5.1 Power Connection
- Ensure the mixer's power switch is in the OFF position.
- Connect the provided power adapter to the mixer's power input.
- Plug the power adapter into a suitable 110V AC power outlet.
- Turn the mixer's power switch ON.
5.2 Connecting Microphones and Instruments
- XLR Inputs (Channels 1-8): Connect microphones using XLR cables. For condenser microphones requiring phantom power, activate the +48V phantom power switch.
- Line Inputs (Channels 1-8): Connect instruments or line-level devices using 1/4-inch TS/TRS cables.
5.3 Connecting Output Devices
- Main Output: Connect to your main PA system, powered speakers, or recording interface using XLR or 1/4-inch cables.
- Headphone Output: Connect headphones to the 1/4-inch PHONE jack for monitoring.
- Auxiliary Output: Connect to external effects processors or monitor speakers.
5.4 USB Connection

Insert a USB flash drive into the USB port for MP3 playback or recording.
5.5 Bluetooth Pairing

- Press the 'BT' button on the mixer's MP3/USB section to activate Bluetooth mode. The display will indicate Bluetooth readiness.
- On your mobile device, search for available Bluetooth devices and select 'MIX8' (or similar name).
- Once paired, audio from your device will stream to the mixer.
6. Operating Instructions
6.1 Channel Controls
- GAIN Knob: Adjusts the input sensitivity for each channel. Set it so the 'PEAK' LED flashes only occasionally.
- EQ (High, Mid, Low) Knobs: Adjust the treble, midrange, and bass frequencies for each channel.
- FX Knob: Controls the amount of effect sent from the channel to the internal DSP effects processor.
- PAN Knob: Adjusts the stereo position (left/right) of the channel.
- Channel Fader: Controls the output volume of the individual channel.
6.2 DSP Digital Effects

The MIX8 features 99 built-in DSP effects. Use the 'PROGRAM' knob to select an effect preset (01-99) and the 'FX' fader to control the overall effect level sent to the main mix.
- 01-27: Reverb
- 28-53: Early Reflection Delay
- 54-63: Echo
- 64-72: Chorus/Flange
- 73-75: Tremolo
- 76-78: Wah-Wah
- 79-81: Radio Voice
- 82-89: Pitch Shifter
- 90-95: Distortion/Overdrive
- 96-99: Multi FX
6.3 USB Playback and Recording

- Playback: Insert a USB drive with MP3 files. Use the MP3 control buttons (Play/Pause, Next, Previous) to navigate and play tracks. Adjust the 'MP3' volume fader.
- Recording: Press the 'REC' button in the MP3/USB section to start recording the main mix to the connected USB drive. Press 'REC' again to stop.
6.4 7-Band Stereo Graphic Equalizer
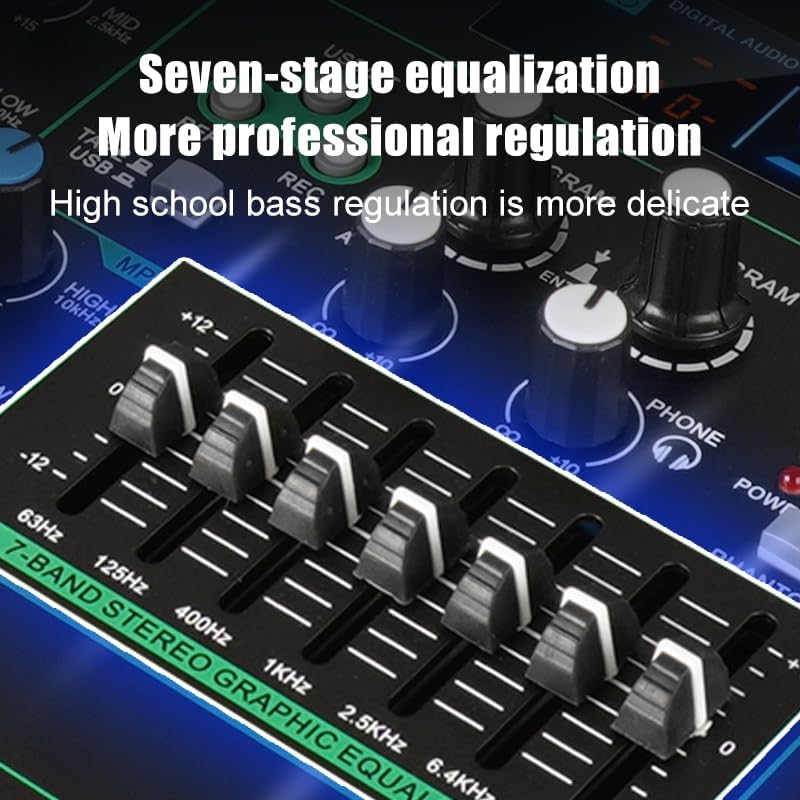
The 7-band graphic equalizer allows you to fine-tune the overall frequency response of the main output. Adjust the faders for each frequency band (63Hz, 125Hz, 250Hz, 400Hz, 1KHz, 2.5KHz, 6.4KHz) to shape your sound.
7. Maintenance
- Cleaning: Use a soft, dry cloth to clean the mixer's surface. Do not use liquid cleaners or solvents.
- Storage: Store the mixer in a cool, dry place away from direct sunlight and extreme temperatures.
- Dust Protection: When not in use, cover the mixer to prevent dust accumulation, which can affect faders and knobs.
8. Troubleshooting
| Problem | Possible Cause | Solution |
|---|---|---|
| No sound output | Power off; main fader down; channel fader down; incorrect input/output connection; mute engaged. | Check power, raise main and channel faders, verify all cable connections, ensure no mute buttons are active. |
| Distorted sound | Input gain too high; output level too high; faulty cable. | Reduce input GAIN, lower main output fader, check and replace cables if necessary. |
| Microphone not working | No phantom power (for condenser mics); gain too low; faulty mic/cable. | Activate +48V phantom power, increase GAIN, test with a different microphone or cable. |
| Bluetooth not connecting | Mixer not in Bluetooth mode; device too far; interference. | Ensure mixer is in BT mode, bring device closer, restart both devices. |
9. Specifications
- Model: MIX8
- Number of Channels: 8
- Product Dimensions: 15.3 x 11.8 x 3.1 inches (38.86 x 29.97 x 7.87 cm)
- Power Source: Corded Electric
- Voltage: 110 Volts
- Connectivity Technology: Bluetooth, USB
- DSP Effects: 99 presets (Reverb, Delay, Echo, Chorus, Flange, Tremolo, Wah-Wah, Pitch Shifter, Distortion, Multi FX)
- Equalization: 3-band per channel, 7-band stereo graphic equalizer on main output
- Phantom Power: +48V switchable
10. Warranty and Support
For warranty information or technical support, please refer to the documentation included with your purchase or contact Doslnlya customer service through their official website or the retailer where the product was purchased. Keep your proof of purchase for any warranty claims.