
1. Introduction
Thank you for choosing the Doslnlya GH7 Bluetooth Compatible Professional Mixer. This 7-channel audio mixer is designed for various audio applications, including live performances, recording, karaoke, and DJing. It features Bluetooth connectivity, USB playback and recording capabilities, 48V phantom power, and built-in reverb effects to enhance your audio experience. Please read this manual thoroughly to understand the mixer's functions and ensure proper operation.
2. Safety Information
- Power Supply: Use only the specified power adapter. Ensure the voltage matches your local power supply.
- Water and Moisture: Do not expose the mixer to water or excessive moisture. Avoid operating it in damp environments.
- Ventilation: Ensure adequate ventilation around the mixer to prevent overheating. Do not block ventilation openings.
- Cleaning: Disconnect power before cleaning. Use a dry, soft cloth. Do not use liquid cleaners or aerosols.
- Servicing: Do not attempt to service the mixer yourself. Refer all servicing to qualified personnel.
- Placement: Place the mixer on a stable, flat surface. Avoid placing it near heat sources or in direct sunlight.
3. Product Overview
The Doslnlya GH7 mixer provides a comprehensive set of controls for managing audio inputs, outputs, and effects. Familiarize yourself with the layout and functions of each component.

Figure 3.1: Front view of the Doslnlya GH7 Professional Mixer, showing all input channels, main output, and control knobs.

Figure 3.2: Detailed diagram illustrating the various functions and controls of the Doslnlya GH7 mixer, including microphone inputs, gain controls, EQ, effects, and output sections.

Figure 3.3: Panel instructions for the GH7 mixer, highlighting specific controls such as microphone input, gain, EQ, echo adjustment, and volume sliders.
Key Components:
- MIC/LINE Inputs (Channels 1-7): XLR and 6.5mm combination jacks for microphones and line-level instruments.
- GAIN Control: Adjusts the input sensitivity for each channel.
- HIGH, MID, LOW EQ: Three-band equalizer for tone shaping on each channel.
- PAN Control: Adjusts the stereo positioning of the channel signal.
- Channel Faders: Individual volume control for each input channel.
- MAIN OUTPUT (L/R): RCA outputs for connecting to main speakers or recording devices.
- PHONE Jack: 6.5mm stereo output for headphone monitoring.
- +48V PHANTOM Power: Switchable power for condenser microphones.
- USB Interface: For connecting USB drives for MP3 playback or connecting to a computer for recording/playback.
- Bluetooth Module: For wireless audio streaming from compatible devices.
- EFFECT Section: Controls for built-in reverb and delay effects.
- MAIN Fader: Overall volume control for the main output.
4. Setup
4.1 Power Connection
- Ensure the mixer's power switch is in the OFF position.
- Connect the provided power adapter to the mixer's power input.
- Plug the power adapter into a suitable 110V AC power outlet.
4.2 Input Connections
The GH7 mixer features combination XLR and 6.5mm (1/4-inch) input jacks for versatile connectivity.

Figure 4.1: Close-up view of the combination XLR and 6.5mm input jacks on the mixer, allowing connection of various microphones and instruments.
- Microphones: Connect dynamic or condenser microphones using XLR cables to the MIC inputs.
- Instruments/Line-Level Devices: Connect instruments (e.g., guitars, keyboards) or other line-level audio sources (e.g., CD players) using 6.5mm (1/4-inch) cables to the LINE inputs.
4.3 Output Connections
- Main Speakers: Connect the MAIN OUTPUT (L/R RCA jacks) to your powered speakers or power amplifier.
- Headphones: Plug your headphones into the PHONE 6.5mm jack for monitoring.
5. Operating Instructions
5.1 Powering On
After all connections are made, switch the power button to the ON position. The power indicator light will illuminate.
5.2 Input Gain Adjustment
Use the GAIN knob for each channel to set the input level. Adjust it so that the PEAK indicator light only flashes occasionally during the loudest parts of the signal. Avoid constant illumination of the PEAK light, as this indicates clipping.
5.3 Equalization (EQ)
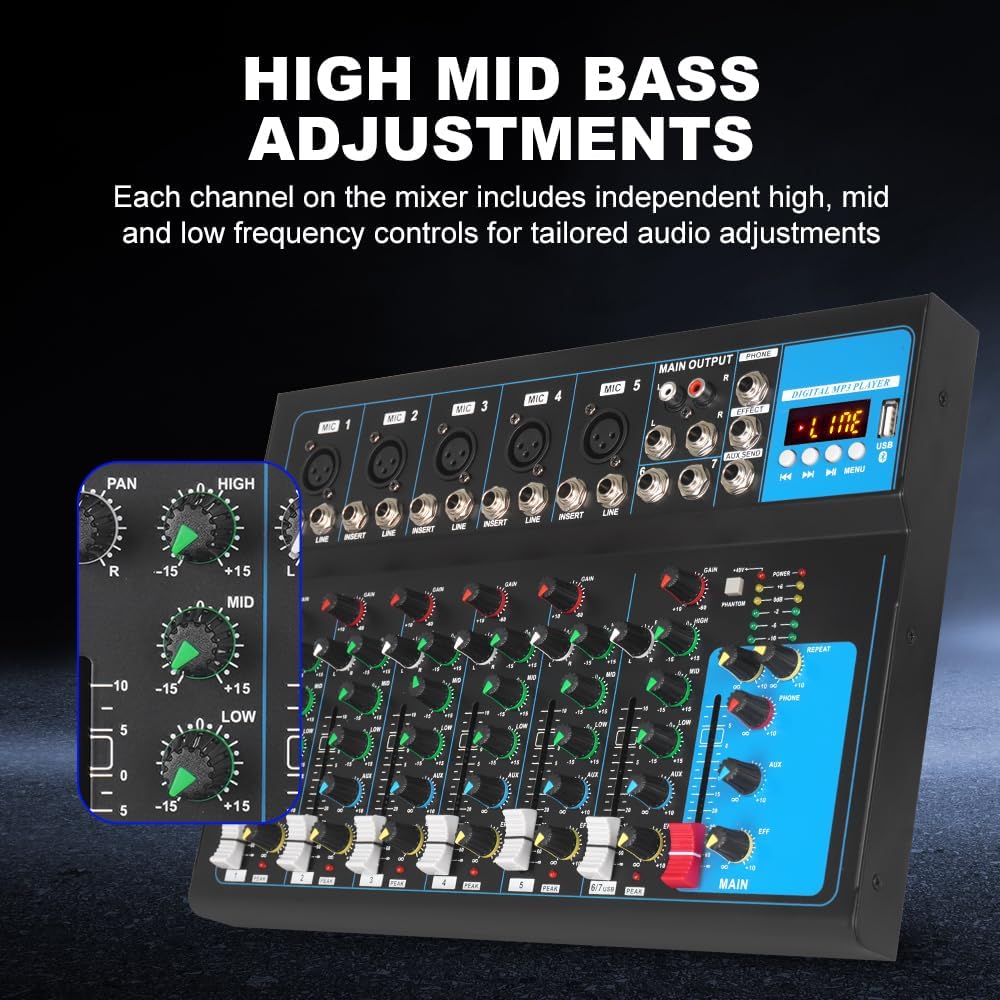
Figure 5.1: Close-up of the High, Mid, and Low frequency adjustment knobs for individual channels, allowing precise tone shaping.
Each channel features three EQ knobs:
- HIGH: Adjusts the treble frequencies.
- MID: Adjusts the midrange frequencies.
- LOW: Adjusts the bass frequencies.
Use these controls to shape the tone of each input source. The center position (0) is flat.
5.4 Channel and Main Volume
- Channel Faders: Use the individual faders (sliders) for each channel to control its volume within the mix.
- MAIN Fader: Adjusts the overall output volume of the mixer.
5.5 Bluetooth Connection

Figure 5.2: Illustration of connecting a smartphone via Bluetooth to the mixer, showing the Bluetooth mode selection on the mixer's digital display.
- Press the mode button on the digital MP3 player section until 'BT' or 'Bluetooth' is displayed.
- On your Bluetooth-enabled device (e.g., smartphone, tablet), search for available Bluetooth devices.
- Select 'GH7' (or similar name) from the list to pair.
- Once paired, you can stream audio wirelessly to the mixer.
5.6 USB Playback and Recording

Figure 5.3: Demonstrates the USB playback function, showing a USB flash drive inserted into the mixer and a computer connected via USB for recording or playback.
- USB Drive Playback: Insert a USB flash drive containing MP3 files into the USB port. Use the controls on the digital MP3 player section to play, pause, and skip tracks.
- Computer Connection (Recording/Playback): Connect the mixer to your computer via a USB cable. The mixer will function as an audio interface, allowing you to record the mixed audio to your computer or play audio from your computer through the mixer.
5.7 +48V Phantom Power

Figure 5.4: A hand activating the +48V phantom power switch on the mixer, indicated by an illuminated LED, essential for condenser microphones.
If you are using condenser microphones, they require +48V phantom power. Locate the PHANTOM power switch and activate it. An indicator light will confirm that phantom power is active. Ensure dynamic microphones are not connected when activating phantom power, as it can potentially damage some dynamic microphones.
5.8 Reverb and Delay Effects
The mixer includes built-in reverb and delay effects. Use the dedicated knobs in the EFFECT section to adjust the parameters:
- DELAY: Controls the delay time.
- REPEAT: Controls the number of repetitions for the delay effect.
- EFF: Controls the amount of effect applied to the main mix.
5.9 Monitoring

Figure 5.5: A user wearing headphones connected to the mixer's PHONE jack, illustrating real-time audio monitoring.
Connect headphones to the PHONE jack to monitor the main mix. Use the PHONE volume knob to adjust the headphone listening level.
6. Compatible Devices
The Doslnlya GH7 mixer is compatible with a wide range of audio equipment, making it suitable for various setups.

Figure 6.1: Visual representation of various devices compatible with the GH7 mixer, including wired and wireless microphones, power amplifiers, laptops, karaoke machines, guitars, keyboards, drum kits, speakers, and TVs.
- Wired Microphones
- Wireless Microphones
- Power Amplifiers
- Laptops/Computers
- Karaoke Machines
- Guitars
- Keyboards
- Drum Kits
- Speakers
- Mobile Phones (via Bluetooth)
- Televisions
7. Troubleshooting
7.1 No Power
- Ensure the power adapter is securely connected to both the mixer and a working power outlet.
- Check if the power switch on the mixer is in the ON position.
- Verify the power outlet is functional by plugging in another device.
7.2 No Sound Output
- Check that the MAIN fader is raised.
- Ensure individual channel faders are raised and GAIN knobs are set appropriately.
- Verify that your speakers or amplifier are powered on and connected correctly to the MAIN OUTPUT.
- Check all input cables for secure connections.
- If using a microphone, ensure +48V phantom power is activated for condenser microphones.
7.3 Bluetooth Connection Issues
- Ensure the mixer is in Bluetooth mode (display shows 'BT').
- Make sure Bluetooth is enabled on your transmitting device.
- Move your device closer to the mixer to ensure it's within range.
- Try unpairing and re-pairing the device.
7.4 Distorted Sound
- Reduce the GAIN knob for the affected channel if the PEAK light is constantly on.
- Lower the channel fader or MAIN fader.
- Check the input source for distortion before it reaches the mixer.
8. Specifications
| Feature | Specification |
|---|---|
| Model Number | GH7 |
| Product Dimensions | 9.37"D x 8.34"W x 1.45"H (23.8 cm D x 21.2 cm W x 3.7 cm H) |
| Number of Channels | 7 |
| Connectivity Technology | Bluetooth, USB |
| Power Source | Corded Electric |
| Voltage | 110 Volts |
| Phantom Power | +48V |
| Effects | Reverb, Delay |
9. Maintenance
- Cleaning: Regularly wipe the mixer's surface with a soft, dry cloth. Avoid using abrasive cleaners or solvents.
- Storage: When not in use for extended periods, store the mixer in a cool, dry place, away from direct sunlight and extreme temperatures.
- Dust Protection: Consider using a dust cover to protect the mixer from dust accumulation, especially on faders and knobs.
10. Warranty and Support
The Doslnlya GH7 mixer comes with a standard manufacturer's warranty. For specific warranty details, please refer to the documentation included with your purchase or contact Doslnlya customer support. If you encounter any issues not covered in this manual, please reach out to our support team for assistance.