
1. Introduction
The VICTOR 15+ is a handheld, battery-operated multi-function calibrator designed for precise measurement and sourcing of various electrical and physical parameters. It is an essential tool for calibrating 2-wire pressure transmitters, pressure switches, and for working with voltage, current, resistance, frequency, pulse, thermocouples (TC), and Resistance Temperature Detectors (RTD).
Key features include:
- High basic accuracy of 0.02%.
- Large digital LCD for clear display of measurements.
- Simultaneous display of TC/RTD measurements with mV/Ω and mA with mA%.
- Functions for sourcing DC voltage, DC current, resistance, frequency, and pulse.
- Ability to simulate transmitters, thermocouples, and RTDs.
- Automatic shut-down feature to conserve battery life.
- Data retention (HOLD) function.
- USB communication for data transfer.
- Backlight function for visibility in low-light conditions.

Figure 1: VICTOR 15+ Calibrator with approximate dimensions (205mm height, 95mm width).
2. Package Contents
Carefully unpack the calibrator and check for any damage. Retain the packaging for future transport. The package should contain the following items:
- VICTOR 15+ Multi-Function Calibrator
- Operation Guide / Product Manual
- Alligator Clips / Test Pens
- Industrial Test Leads
- Test Report
- Backup Fuse
- AAA Batteries (pre-installed or separate)
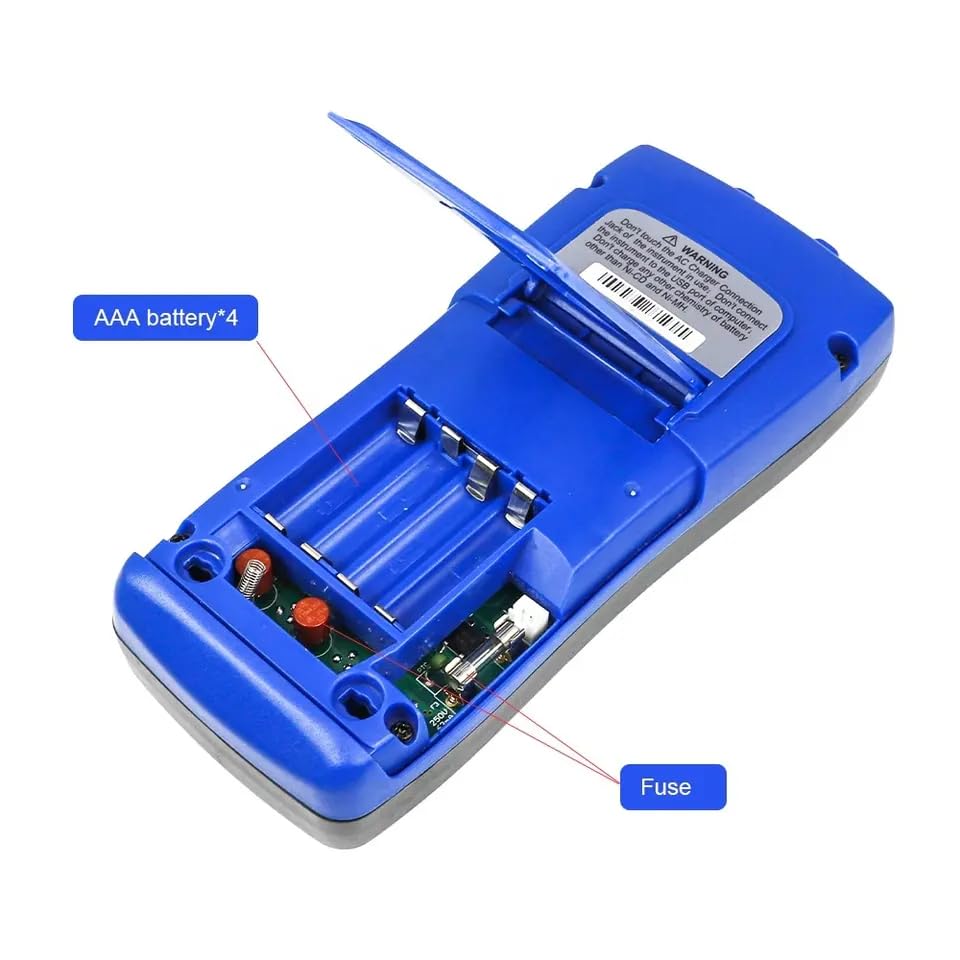
Figure 2: Contents of the VICTOR 15+ package, including the calibrator, manual, test leads, and other accessories.
3. Setup
3.1 Battery Installation
The VICTOR 15+ calibrator operates on four AAA batteries. To install or replace batteries:
- Locate the battery compartment on the rear of the calibrator.
- Open the battery compartment cover.
- Insert four AAA batteries, ensuring correct polarity (+/-).
- Close the battery compartment cover securely.

Figure 3: Rear view of the VICTOR 15+ showing the battery compartment for four AAA batteries and the fuse location.
3.2 Initial Power-On
Press the POWER button (usually green) to turn on the calibrator. The LCD will illuminate, and the device will perform a self-test before entering the default operating mode.
4. Operating Instructions
The VICTOR 15+ features a clear LCD and an intuitive button layout for various measurement and sourcing tasks. Refer to the diagram below for button identification.
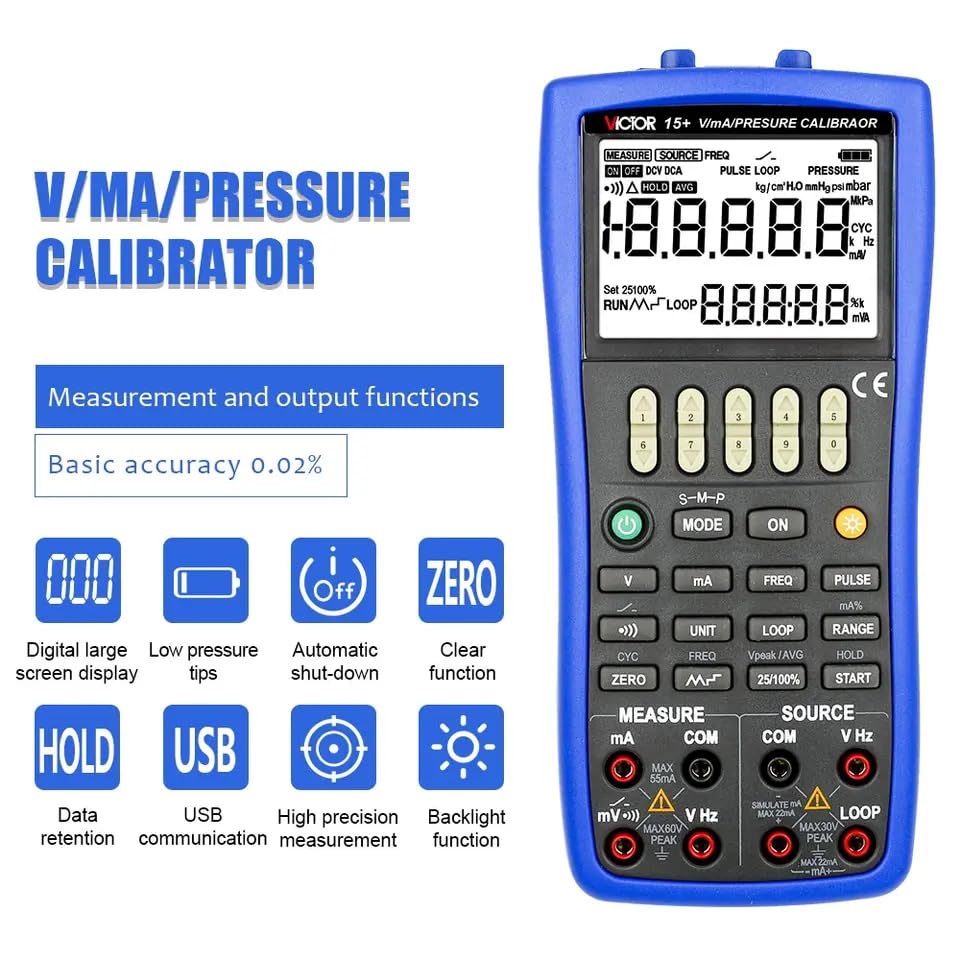
Figure 4: Labeled diagram of the VICTOR 15+ control panel, indicating buttons and display areas.
4.1 Control Panel Overview
- Pressure Module Adapter Interface: For connecting external pressure modules.
- LCD Display: Shows measurement and source values, units, and status.
- Output Setting Key: Adjusts output values.
- Working Mode Conversion: Switches between different operating modes.
- Power Button: Turns the device on/off.
- Input/Output mA Button: Selects mA measurement or source.
- Input/Output DCV Button: Selects DC voltage measurement or source.
- Pressure Unit: Changes pressure units.
- On/Off Beep/Calibrate Pressure Switch: Toggles beep and calibrates pressure switch.
- Waveform Output/Frequency Setting: Configures waveform output or frequency.
- Clear Function: Resets certain settings or clears display.
- Common (-) Terminal for All Inputs: Negative input terminal.
- Input Signal (+): DCmA: Positive input terminal for DC current.
- Input Signal (+): DCV, FREQ: Positive input terminal for DC voltage and frequency.
- Input Signal (+): DCmA: Another positive input terminal for DC current.
- Enable or Disable Input/Output: Toggles input/output functions.
- Backlit Keys: Illuminates the keypad.
- Input/Output FREQ Function: Selects frequency measurement or source.
- Input/Output PULSE Function: Selects pulse measurement or source.
- Turns 24V Loop Power On or Off: Controls the 24V loop power supply.
- Input or Output Range: Selects the measurement or source range.
- Manual Stepping mA Output: Manually adjusts mA output.
- Enable or Disable the Number of Pulses/mA Output: Controls pulse count or mA output.
- Common (-) (Return) Terminal for Output: Negative output terminal.
- Output Signal (+): DCV, PULSE: Positive output terminal for DC voltage and pulse.
- Output Signal (-): DCmA: Negative output terminal for DC current.
- Output Signal (+): DCmA, Loop: Positive output terminal for DC current and loop power.
4.2 Measurement Functions
To perform a measurement:
- Connect the test leads to the appropriate input terminals (e.g., V, mA, COM).
- Press the corresponding function button (e.g., V for voltage, mA for current, FREQ for frequency).
- Select the desired range using the RANGE button if necessary.
- Read the measurement value on the LCD.
4.3 Sourcing Functions
To source a signal:
- Connect the test leads to the appropriate output terminals (e.g., V Hz, mA, COM).
- Press the corresponding function button (e.g., V for voltage, mA for current, FREQ for frequency).
- Use the numeric keypad and output setting keys to set the desired output value.
- Press START to initiate the output.
4.4 Special Functions
- HOLD: Press the HOLD button to freeze the current display reading. Press again to release.
- Backlight: Press the backlight button (often combined with another function or a dedicated button) to turn the LCD backlight on or off.
- USB Communication: Connect the calibrator to a computer using a USB cable for data logging or remote control, if supported by software.
5. Maintenance
5.1 Cleaning
To clean the calibrator, wipe the exterior with a clean, damp cloth. Do not use abrasive cleaners or solvents. Ensure the device is powered off and disconnected from any circuits before cleaning.
5.2 Fuse Replacement
If the calibrator fails to power on or experiences issues with current measurement/sourcing, the internal fuse may need replacement. Refer to Figure 3 for the fuse location within the battery compartment. Use only fuses of the specified type and rating.
5.3 Battery Care
Remove batteries if the calibrator will not be used for an extended period to prevent leakage. Replace all four AAA batteries simultaneously with new ones when the low battery indicator appears on the display.
6. Troubleshooting
This section provides solutions to common issues you might encounter with your VICTOR 15+ calibrator.
- Device does not power on:
- Check if batteries are correctly installed and have sufficient charge.
- Ensure the power button is fully pressed.
- Inspect the fuse for damage and replace if necessary.
- Inaccurate readings:
- Verify that test leads are properly connected to the correct terminals.
- Ensure the correct measurement function and range are selected.
- Check for external interference or environmental factors affecting accuracy.
- Consider professional calibration if accuracy issues persist.
- No output signal:
- Confirm that the output terminals are correctly connected.
- Ensure the output function is enabled and the desired value is set.
- Check for any error messages on the display.
For issues not covered here, please contact customer support.
7. Specifications
The following tables detail the technical specifications of the VICTOR 15+ Multi-Function Calibrator.
7.1 General Specifications
- Model: E-VICTOR 15+
- Brand: VICTOR
- Display Type: LCD
- Special Feature: Ultra Clear Screen
- Color: Orange
- Power Source: Battery Powered (4 x AAA batteries)
- Connectivity Technology: Bluetooth (for data transfer/remote control, if applicable)
- Item Weight: 1 Kilogram
- Product Care: Wipe Clean
- Certifications: CE, RoHS, UL
- Upper Temperature Range: 60 °C
- Response Time: 1 second
- Reusability: Reusable
7.2 Measurement Parameters
| Project | Parameter | VICTOR 15+ |
|---|---|---|
| DC Millivolt | Range | -20 ~ 220mV |
| Accuracy | 0.02% + 0.02% | |
| Resolution | 0.01mV | |
| DC Voltage | Range | -5 ~ 55V |
| Accuracy | 0.02% + 0.01% | |
| Resolution | 0.1mV / 1mV | |
| DC Current | Range | -4 ~ 55mA |
| Accuracy | 0.02% + 0.02% | |
| Resolution | 1µA | |
| Resistance | Range | 0 ~ 5.5KΩ |
| Accuracy | 0.05% + 0.02% | |
| Resolution | 0.01Ω / 0.1Ω | |
| Frequency | Range | 3 ~ 50KHz |
| Accuracy | ±2 words | |
| Resolution | 0.01Hz / 0.1Hz / 1Hz | |
| Switch | Range | CLOSE / OPEN |
| Threshold | 200 ~ 300Ω | |
| Pressure | Range | Depends on the pressure module |
| Accuracy | Depends on the pressure module | |
| Resolution | 5 digit display | |
| Loop Power Supply | Range | 24V |
| Maximum Current | 22mA | |
| Thermocouple | Types | 10 types (R/S/K/E/J/T/B/N/L/U) |
| Accuracy | 0.7 °C | |
| Resolution | 0.1 °C / 1 °C | |
| RTD | Types | 6 types (Pt100/Pt200/Pt500/Pt1000/Cu10/Cu50) |
| Accuracy | 0.5 °C | |
| Resolution | 0.1 °C | |
| Continuity Beeper | Range | ≤ 250Ω Sound |
| Accuracy | 0.01Ω |

Figure 5: Detailed table of measurement parameters for the VICTOR 15+ calibrator.
7.3 Source Parameters
| Project | Parameter | VICTOR 15+ |
|---|---|---|
| DC Millivolt | Range | -10 ~ 1100mV |
| Accuracy | 0.02% + 0.01% | |
| Resolution | 0.01mV | |
| DC Voltage | Range | -1 ~ 11V |
| Accuracy | 0.02% + 0.01% | |
| Resolution | 0.1mV | |
| DC Current | Range | 0 ~ 22mA |
| Accuracy | 0.02% + 0.02% | |
| Resolution | 1µA | |
| Sink Current | Range | 0 ~ 22mA |
| Accuracy | 0.02% + 0.02% | |
| Resolution | 1µA | |
| External Power Supply | 5 ~ 28V | |
| Resistance | Range | 0 ~ 40KΩ |
| Accuracy | 0.02% + 0.02% | |
| Resolution | 0.01Ω / 0.1Ω / 1Ω | |
| Frequency | Range | 1Hz ~ 100KHz |
| Accuracy | ±2 words | |
| Resolution | 0.01Hz / 1Hz / 0.1KHz / 2KHz | |
| Pulse | Range | 1Hz ~ 10KHz |
| Accuracy | ±2 words | |
| Resolution | 1cyc |

Figure 6: Detailed table of source parameters for the VICTOR 15+ calibrator.
8. Warranty and Support
8.1 Warranty Information
The VICTOR 15+ Multi-Function Calibrator comes with a ONE YEAR warranty from the date of purchase. This warranty covers defects in materials and workmanship under normal use. Please retain your proof of purchase for warranty claims.
EU spare part availability duration: 1 Year.
8.2 Manufacturer
This product is manufactured by: Xi'an Beicheng Electronics Co.Ltd (VICTOR and Ruoshui).
8.3 Customer Support
For technical assistance, troubleshooting, or warranty inquiries, please contact your local distributor or the manufacturer directly. Refer to the contact information provided with your purchase documentation.


