
STANLEY BC40BS
STANLEY BC40BS Battery Charger User Manual
Model: BC40BS
Brand: STANLEY
Introduction
This user manual provides detailed instructions for the safe and effective operation of your STANLEY BC40BS 40 Amp Battery Charger. This versatile unit is designed for charging 12V Lithium or 12V Lead Acid batteries and features Engine Start, Rapid Charge, Maintainer, Voltage and Alternator Check, and Battery Reconditioner functions.
Please read this manual thoroughly before first use and retain it for future reference.
Important Safety Instructions
Always observe the following safety precautions when operating the battery charger:
- Read all instructions before using the product.
- Do not expose the charger to rain or wet conditions.
- Use of an attachment not recommended or sold by the manufacturer may result in a risk of fire, electric shock, or injury to persons.
- To reduce risk of damage to electric plug and cord, pull by plug rather than cord when disconnecting charger.
- An extension cord should not be used unless absolutely necessary. Use of an improper extension cord could result in a risk of fire and electric shock.
- Do not operate charger with a damaged cord or plug.
- Do not operate charger if it has received a sharp blow, been dropped, or otherwise damaged.
- Do not disassemble charger; take it to a qualified service person when service or repair is required.
- To reduce risk of electric shock, unplug charger from outlet before attempting any maintenance or cleaning.
- This charger is not intended for use by children or persons with reduced physical, sensory or mental capabilities, or lack of experience and knowledge, unless they have been given supervision or instruction concerning use of the appliance by a person responsible for their safety.
- Children should be supervised to ensure that they do not play with the appliance.
Product Overview and Components

Figure 1: Front view of the STANLEY BC40BS Battery Charger, showing the LCD screen and control panel.

Figure 2: Diagram highlighting key features of the BC40BS, including the built-in handle, on-board cord storage, 6-ft power cord, battery clamps, LCD screen, and multi-selection control panel.

Figure 3: Image showing the contents of the BC40BS package, primarily the battery charger unit and its integrated battery clamps.
Key Components:
- LCD Screen: Displays charging status, voltage, and selected modes.
- Control Panel: Buttons for selecting battery type (Lithium/Lead Acid), Engine Start, Voltage/Alternator Check, and Battery Reconditioner.
- Battery Clamps: Red (+) and Black (-) clamps for connecting to battery terminals.
- Power Cord: For connecting the charger to an AC power outlet.
- Built-in Handle: For easy portability.
- On-board Cord Storage: For neat storage of the power cord and battery clamps.
Initial Setup
- Unpack the Charger: Remove the charger and all accessories from the packaging.
- Inspect for Damage: Check the charger, cables, and clamps for any signs of damage. Do not use if damaged.
- Prepare the Battery: Ensure the battery terminals are clean and free of corrosion.
- Ventilation: Ensure the charging area is well-ventilated.
- Connect Battery Clamps:
- Connect the RED positive (+) clamp to the positive (+) battery terminal.
- Connect the BLACK negative (-) clamp to the negative (-) battery terminal.
- Ensure connections are secure.
- Connect to Power: Plug the charger's AC power cord into a standard 120V AC wall outlet.
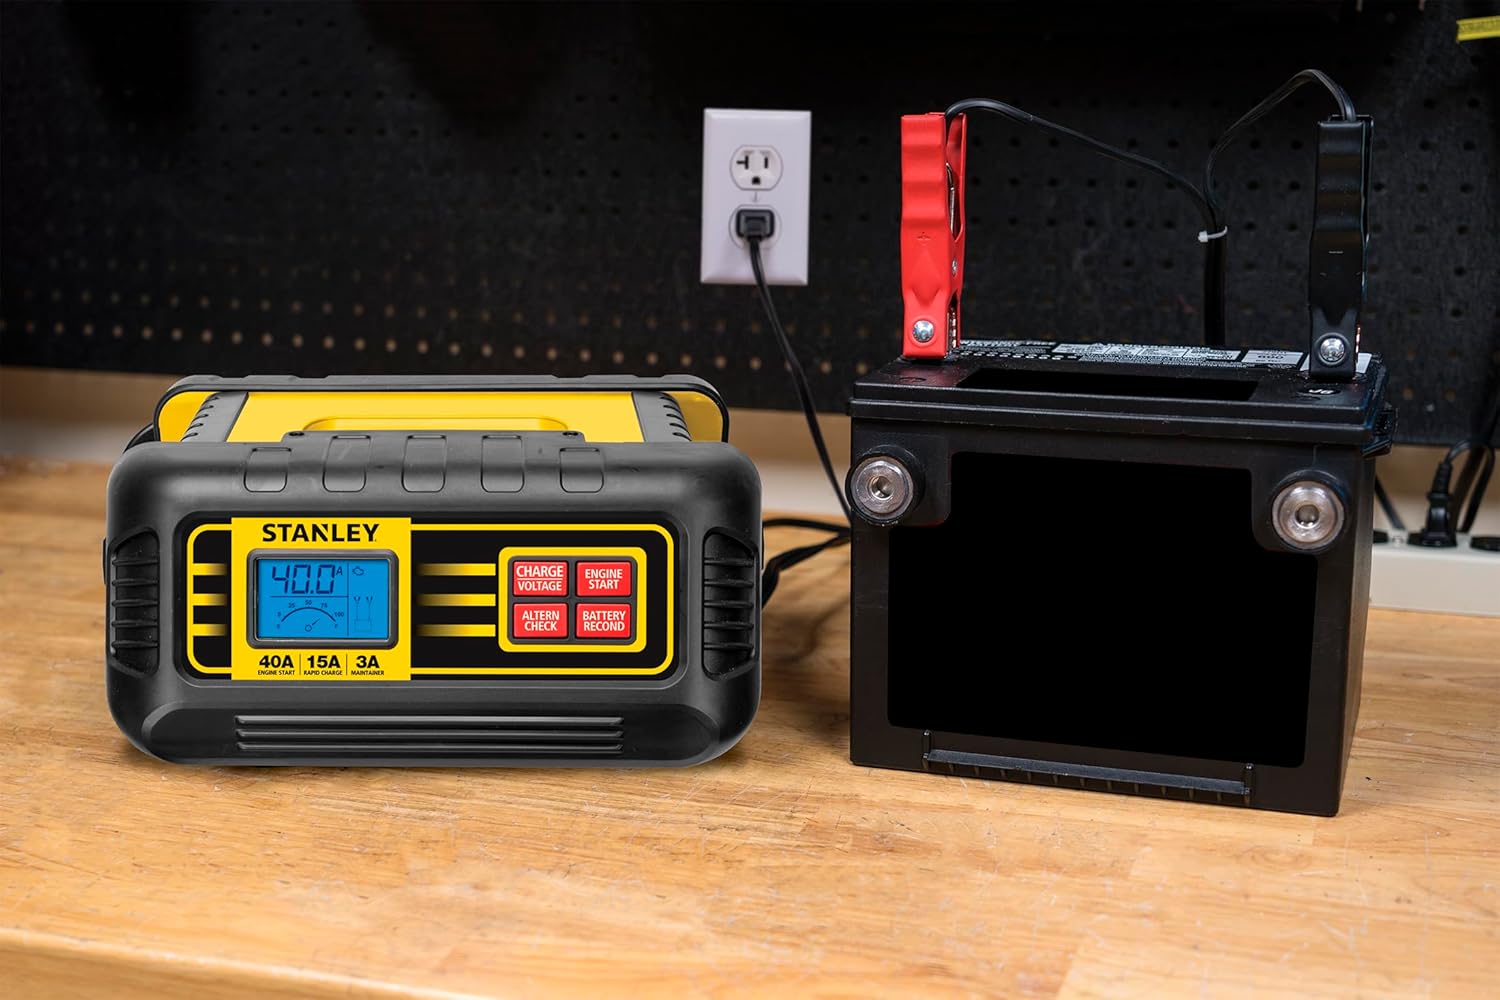
Figure 4: The STANLEY BC40BS Battery Charger connected to a vehicle battery and plugged into a wall outlet, ready for operation.
Operating Instructions
1. Charging a Battery (15 Amp Rapid Charge / 3 Amp Maintainer)
- Ensure the charger is properly connected to the battery and power outlet as described in "Initial Setup".
- The charger will automatically detect the battery voltage.
- Use the "Lithium / Lead Acid" button to select the correct battery type for your battery.
- The charger will automatically select the appropriate charge rate (15 Amp Rapid Charge or 3 Amp Maintainer) to maximize battery life and charge speed.
- Monitor the LCD screen for charging progress. The charger will indicate when charging is complete.


Icons representing the 15 Amp Rapid Charge, 3 Amp Maintainer, and Lithium/Lead Acid battery selection features.
2. Engine Start (40 Amp)
The 40 Amp Engine Start function provides a quick boost to help start most vehicles with a discharged battery.
- Connect the charger to the vehicle battery and power outlet.
- Press the "Engine Start" button on the control panel.
- Attempt to start the vehicle. If the vehicle does not start, wait a few minutes and try again.
- Once the vehicle starts, disconnect the charger from the AC outlet first, then disconnect the battery clamps.

Icon representing the 40 Amp Engine Start feature.
3. Alternator Check
This function helps to indicate potential issues with your vehicle's alternator.
- Ensure the charger is connected to the vehicle battery. The vehicle engine should be running.
- Press the "Voltage / Alt Check" button.
- The LCD screen will display the alternator's output voltage. Refer to your vehicle's service manual for acceptable voltage ranges.

Icon representing the Alternator Check feature.
4. Battery Reconditioner
The battery reconditioner function helps to reverse sulfate build-up on battery plates, improving charging capability and extending battery life, especially for batteries that are not in optimal condition.
- Connect the charger to the battery.
- Press the "Battery Recond" button.
- The charger will automatically assess the battery's viability and initiate the reconditioning process if needed.
- This process can take several hours. Monitor the LCD screen for status.

Icon representing the Battery Reconditioner feature.

Figure 5: The STANLEY BC40BS Battery Charger being used in a workshop environment, demonstrating its practical application.
Care and Maintenance
- Cleaning: Disconnect the charger from power before cleaning. Use a soft, dry cloth to wipe the casing. Do not use abrasive cleaners or solvents.
- Storage: Store the charger in a cool, dry place when not in use. Utilize the on-board cord storage to keep cables neat and prevent damage.
- Cable Care: Regularly inspect the power cord and battery cables for cuts, fraying, or damage. Replace if necessary.
- Terminal Care: Keep battery clamps clean and free of corrosion.

Figure 6: Rear view of the STANLEY BC40BS, illustrating the integrated cord storage feature for convenient and tidy organization of the power cable.
Troubleshooting
| Problem | Possible Cause | Solution |
|---|---|---|
| Charger does not turn on. | No AC power; loose connection; damaged cord/plug. | Check AC outlet; ensure plug is fully inserted; inspect cord/plug for damage. |
| Charger not charging battery. | Incorrect battery type selected; poor clamp connection; battery too deeply discharged (below 2V). | Verify battery type selection; ensure clamps are securely connected to clean terminals; for batteries under 2V, a "dumb" charger may be needed to bring voltage above 2V before using this unit. |
| Engine Start function not working. | Battery too low; insufficient connection. | Ensure battery is connected properly; allow charger to provide a boost for a few minutes before attempting to start. |
| LCD screen displays error code. | Internal fault; battery issue. | Refer to the specific error code in the full manual (if available) or contact customer support. |
Technical Specifications
- Model: BC40BS
- Input: 120V AC
- Output Voltage: 12 Volts (DC)
- Engine Start Current: 40 Amps
- Rapid Charge Current: 15 Amps
- Maintainer Current: 3 Amps
- Battery Types: 12V Lithium, 12V Lead Acid
- Dimensions: Approximately 10 x 4.5 x 9 inches
- Weight: Approximately 4.22 pounds
- Certifications: UL Listed
- Country of Origin: Vietnam
Warranty and Support
For warranty information, technical support, or service inquiries, please refer to the warranty card included with your product or visit the official STANLEY website. Keep your purchase receipt as proof of purchase.
Online Resources: For additional support and frequently asked questions, please visit the STANLEY Store on Amazon.
Related documentsBC40BS


Ask a question about this manual
Ask about setup, troubleshooting, compatibility, parts, safety, or missing instructions. Manuals+ will review the question and use this page’s manual context to help answer it.