1. Introduction
This manual provides instructions for the proper use and maintenance of your Vieta Pro VM-MF040BK Wireless ENC Lavalier Microphones. Please read this manual thoroughly before using the product to ensure optimal performance and longevity.
The Vieta Pro VM-MF040BK system includes two wireless lavalier microphones and a charging case, designed for high-quality audio recording with environmental noise cancellation (ENC). It offers broad compatibility with USB-C and Lightning devices.

Image 1.1: The Vieta Pro VM-MF040BK wireless microphone system, including two microphones and their charging case.
2. Package Contents
Verify that all items are present in the package:
- 2 x Vieta Pro Wireless Lavalier Microphones
- 1 x Charging Case
- 1 x USB-C Receiver
- 1 x Lightning Receiver
- 1 x USB Charging Cable
- User Manual (this document)
3. Product Overview
3.1 Microphone Features
- Power Button: Press and hold to power on/off.
- Status Indicator Light: Indicates power, pairing, and charging status.
- Clip: For attaching the microphone to clothing.
- Microphone Input: Captures audio.
- USB-C Charging Port: For individual microphone charging (if not using case).
3.2 Receiver Features
- USB-C Connector: For Android, Mac, and Windows devices.
- Lightning Connector: For iOS devices.
- Status Indicator Light: Indicates connection status.
- Pass-through Charging Port: Allows charging of the connected device while the receiver is in use.
3.3 Charging Case Features
- Charging Slots: For storing and charging the microphones.
- USB-C Charging Port: For charging the case itself.
- Battery Indicator: Shows the charging case's battery level.
4. Setup and Connection
4.1 Initial Charging
Before first use, fully charge the microphones and the charging case.
- Place both microphones into the charging slots within the charging case.
- Connect the charging case to a power source using the provided USB charging cable. The battery indicator on the case will show charging progress.
- The microphone indicator lights will illuminate during charging and turn off when fully charged.
A full charge provides up to 10 hours of continuous use for each microphone.
4.2 Connecting to Your Device
- Power On Microphones: Take the microphones out of the charging case. They will automatically power on and enter pairing mode. The indicator light will flash.
- Connect Receiver: Identify the correct receiver for your device (USB-C for Android/Mac/Windows, Lightning for iOS). Plug the receiver directly into your device's charging/data port.
- Automatic Pairing: The microphones will automatically pair with the receiver. Once paired, the indicator lights on both the microphones and the receiver will turn solid blue.
- Verify Connection: Open your recording application (e.g., camera app, voice recorder, podcast app) and ensure the audio input is recognized as the external microphone.
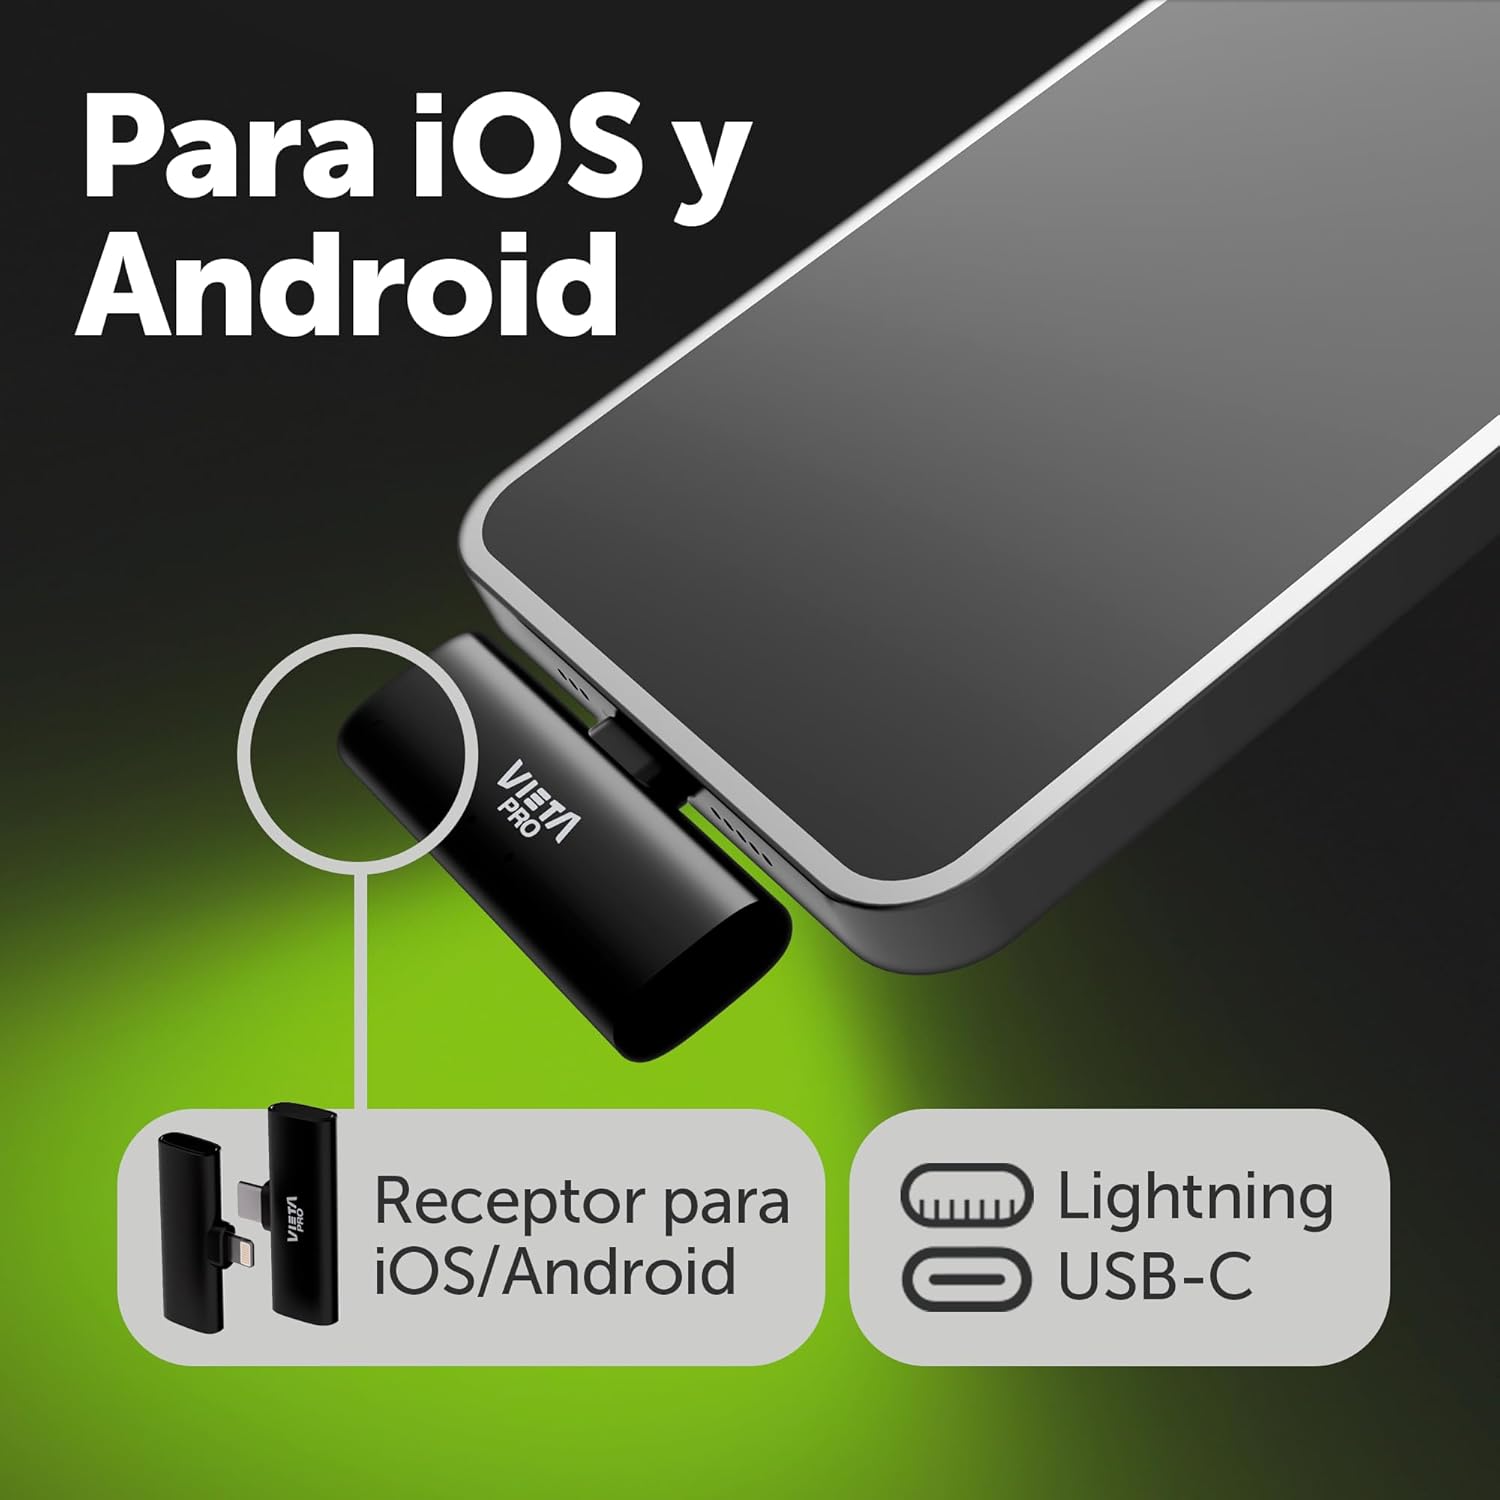
Image 4.2.1: The USB-C and Lightning receivers for broad device compatibility.

Image 4.2.2: Example of the Lightning receiver connected to an iOS device.
5. Operating Instructions
5.1 Wearing the Microphone
Attach the microphone to your clothing using the integrated clip. For optimal sound quality, position the microphone approximately 6-8 inches (15-20 cm) from your mouth, ideally on your lapel or collar.

Image 5.1.1: Proper placement of the lavalier microphone on clothing.
5.2 Environmental Noise Cancellation (ENC)
The microphones feature built-in ENC technology to reduce ambient background noise. This function is active by default to ensure clear voice capture in various environments.
5.3 Gain Level Adjustment
The microphones offer 3 levels of gain adjustment. Refer to your device's recording software or the microphone's physical controls (if available, not explicitly detailed in product info) to adjust the input sensitivity. Start with a medium gain level and adjust as needed to prevent audio clipping or low volume.
5.4 Monitoring Audio
Some devices and applications allow real-time audio monitoring through headphones connected to the device while the microphone is in use. This feature helps ensure optimal sound quality during recording.
5.5 Pass-Through Charging
The receiver includes a pass-through charging port. This allows you to charge your connected mobile device (phone, tablet) simultaneously while using the microphone system, ensuring uninterrupted recording sessions.
6. Maintenance and Care
- Cleaning: Use a soft, dry cloth to clean the microphones and charging case. Do not use liquid cleaners or solvents.
- Storage: Store the microphones in their charging case when not in use to protect them and keep them charged. Store in a cool, dry place.
- Battery Care: To prolong battery life, avoid fully discharging the batteries frequently. Charge regularly, even if not in constant use.
- Avoid Extreme Conditions: Do not expose the product to extreme temperatures, humidity, or direct sunlight.
7. Troubleshooting
| Problem | Possible Cause | Solution |
|---|---|---|
| Microphones not powering on | Low battery | Place microphones in the charging case and charge fully. |
| No sound recording |
|
|
| Poor audio quality / excessive background noise |
|
|
| Limited transmission range | Obstructions or interference | Ensure a clear line of sight between the microphone and receiver. Avoid strong electromagnetic interference sources. The maximum range is 20 meters (65 feet). |
8. Specifications
| Feature | Detail |
|---|---|
| Model Number | VM-MF040BK |
| Microphone Form Factor | Lavalier (Clip-on) |
| Connectivity Technology | Wireless |
| Connector Type | USB-C, Lightning |
| Polar Pattern | Unidirectional |
| Frequency Response | 48 KHz (16-bit) |
| Special Features | Environmental Noise Cancellation (ENC), 3 Gain Levels, Pass-through Charging |
| Battery Life (Microphone) | Up to 10 hours per microphone |
| Transmission Range | Up to 20 meters (65 feet) |
| Compatible Devices | Android Mobile, iOS Mobile, Mac, Windows |
| Power Source | Battery Powered (3 Lithium-ion batteries included) |
| Material | Resin |
| Color | Black |
9. Warranty and Support
For warranty information and customer support, please refer to the documentation included with your purchase or visit the official Vieta Pro website. Keep your proof of purchase for warranty claims.
For technical assistance or further inquiries, please contact Vieta Pro customer service.


