1. Introduction
Thank you for choosing the Aigostar 2500W 13-Element Oil Radiator. This manual provides essential information for the safe and efficient operation, maintenance, and troubleshooting of your new appliance. Please read it thoroughly before use and retain it for future reference.

Image 1.1: Aigostar 2500W 13-Element Oil Radiator with remote control.
2. Safety Instructions
To prevent injury or damage, always observe basic safety precautions when using electrical appliances. This radiator is designed for indoor use only.
- Electrical Safety: Ensure the voltage specified on the rating label matches your mains voltage. Do not operate with a damaged cord or plug.
- Overheating Protection: The radiator is equipped with an automatic shut-off feature if it overheats. Do not cover the radiator, as this can cause overheating.
- Tip-Over Protection: The unit will automatically turn off if it tilts beyond 50 degrees. Ensure it is placed on a stable, flat surface.
- Anti-Freeze Function: This feature maintains a minimum temperature of 5°C to prevent water pipes from freezing in cold environments.
- Placement: Keep the radiator away from flammable materials, curtains, and furniture. Do not use in bathrooms or laundry areas where it may come into contact with water.
- Children and Pets: Supervise children and pets around the operating radiator. The surface can become hot.

Image 2.1: Safety features including overheating, anti-freeze, and tip-over protection.
3. Product Components
Familiarize yourself with the main parts of your Aigostar oil radiator:
- Radiator Body: The main heating unit with 13 oil-filled elements.
- LED Control Panel: Touch-sensitive display for operating the radiator.
- Remote Control: For convenient operation from a distance.
- Carry Handle: Integrated for easy portability.
- Caster Wheels: Four smooth-rolling wheels for mobility.
- Power Cable and Storage: Integrated storage for the power cord when not in use.
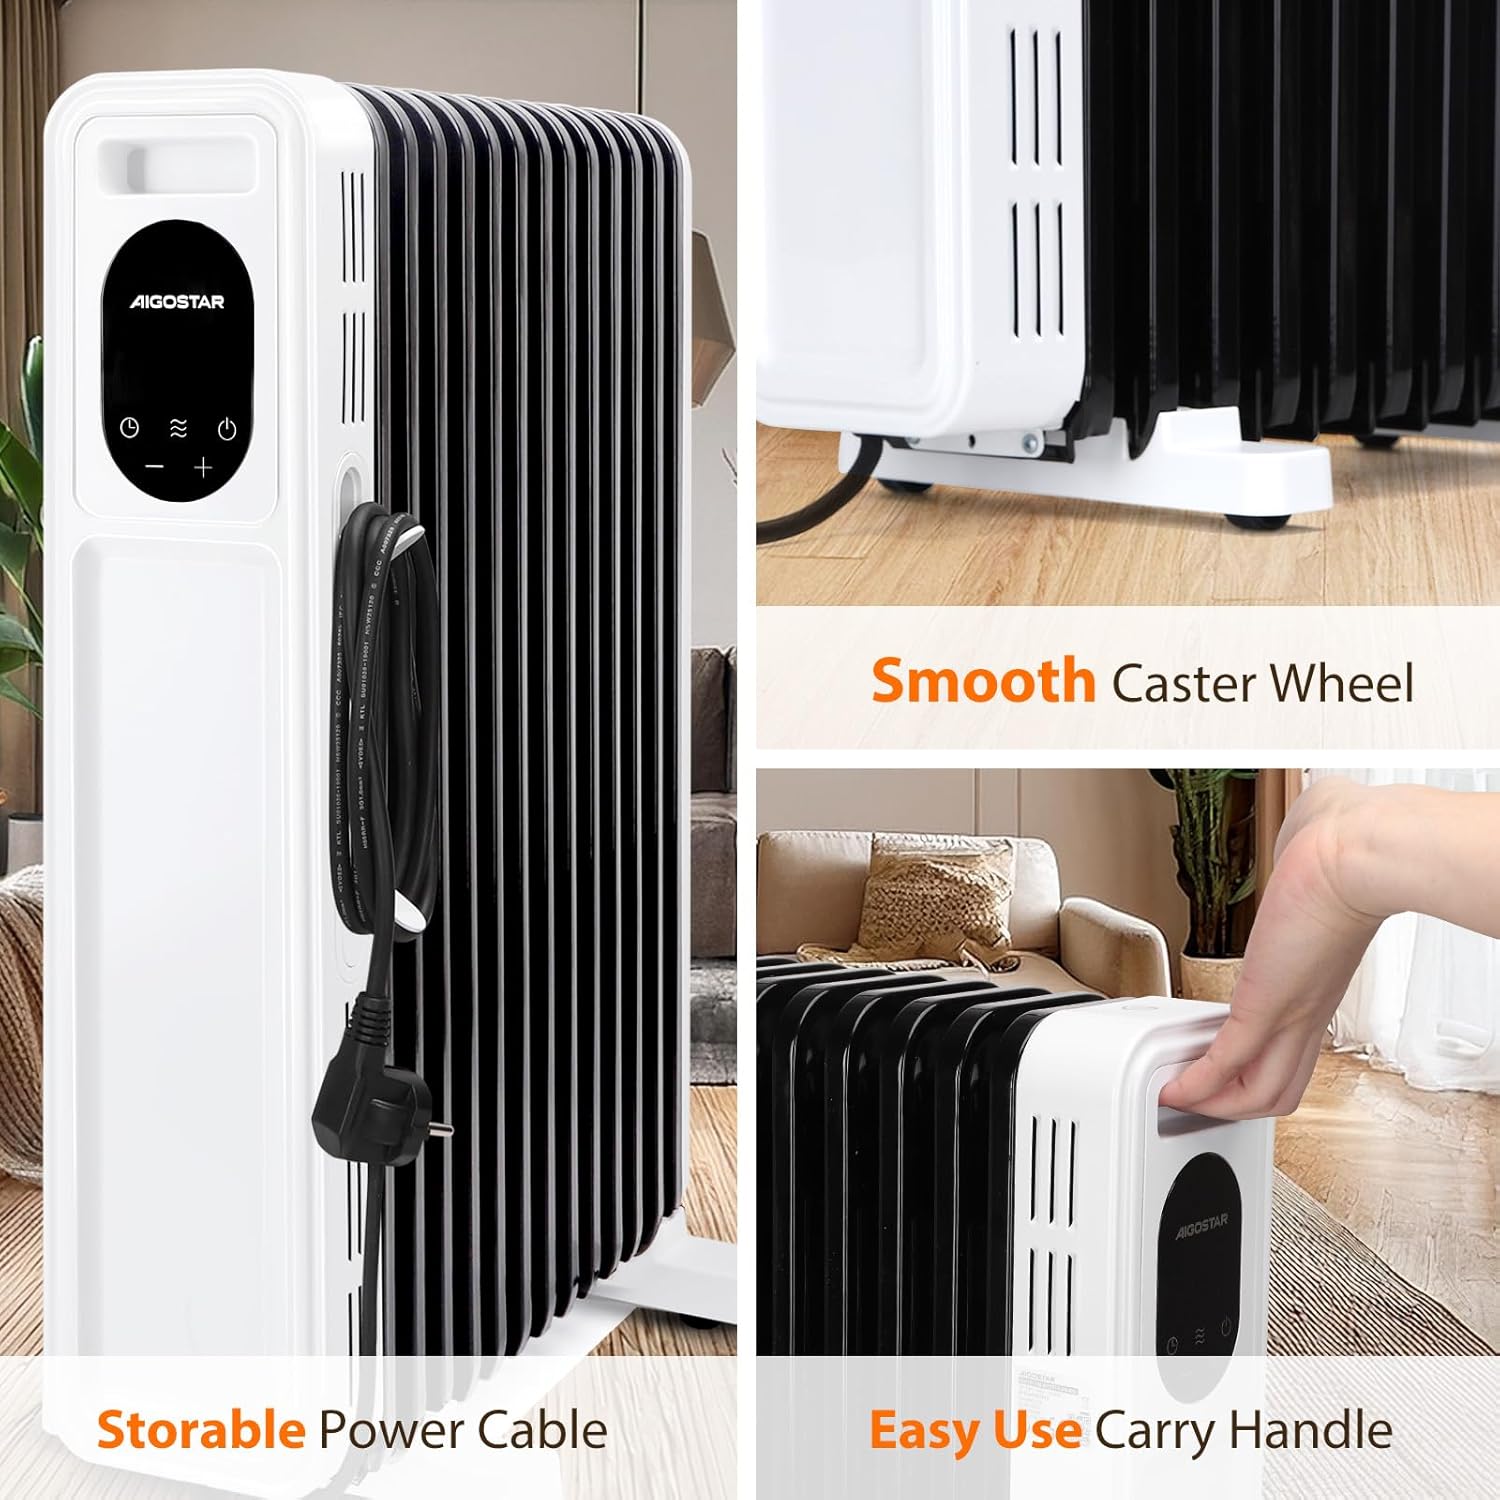
Image 3.1: Details of the storable power cable, carry handle, and caster wheels.
4. Setup and Assembly
Your Aigostar oil radiator is designed for easy setup. Follow these steps:
- Unpacking: Carefully remove the radiator from its packaging. Retain packaging for storage or return if necessary.
- Attaching the Base/Wheels: The radiator comes with pre-installed wheels or a simple clip-on base. Ensure the base is securely attached to provide stability.
- Placement: Position the radiator on a firm, level surface, ensuring adequate clearance from walls, furniture, and flammable materials (at least 1 meter).
- Power Connection: Unwind the power cable from its storage. Plug the radiator into a suitable 220V electrical outlet.
Video 4.1: Demonstration of radiator setup, including attaching the base and initial operation.
5. Operating Instructions
The radiator can be operated using the LED touch control panel or the remote control.
5.1. LED Control Panel

Image 5.1: Detailed view of the LED touch control panel.
- Power ON/OFF: Press the power button (U) to turn the radiator on or off.
- Mode Selection: Press the mode button (~) to cycle through the three heating modes: Low (1000W), High (2500W), and ECO (2500W with optimized energy consumption).
- Temperature Adjustment: Use the '+' and '-' buttons to set your desired temperature between 5°C and 35°C.
- Timer Function: Press the timer button (L) to activate the 24-hour timer. Use '+' and '-' to set the desired operating duration or delay start time.
5.2. Remote Control
The remote control allows you to operate all functions of the radiator from a distance of up to 5 meters.

Image 5.2: Using the remote control for the Aigostar oil radiator.
- The remote control mirrors the functions of the LED control panel.
- Ensure the remote has working batteries (2x AAA, not included).
- Point the remote directly at the radiator's control panel for optimal response.
5.3. Operating Modes

Image 5.3: Explanation of Low, High, and ECO heating modes.
- Low Mode (1000W): Provides gentle heat for smaller areas or maintaining warmth.
- High Mode (2500W): Delivers maximum heat output for rapid warming of larger rooms.
- ECO Mode (2500W): Optimizes energy consumption by automatically adjusting power levels to maintain the set temperature, saving electricity.
5.4. Timer Function
The 24-hour timer allows you to program the radiator to turn on or off at a specific time.

Image 5.4: The 24-hour timer function for pre-heating rooms.
- Press the timer button and use '+' or '-' to set the desired number of hours for the radiator to operate before automatically turning off, or to set a delay for it to turn on.
- The timer can be set for up to 24 hours.
6. Maintenance
Regular maintenance ensures optimal performance and longevity of your radiator.
- Cleaning: Always unplug the radiator and allow it to cool completely before cleaning. Wipe the exterior with a soft, damp cloth. Do not use abrasive cleaners or solvents.
- Storage: When not in use, especially during off-season, store the radiator in a cool, dry place. Utilize the integrated cable storage to keep the power cord tidy.
- No Internal Maintenance: The oil in the radiator is permanently sealed and never needs refilling. Do not attempt to open the unit for internal maintenance.
7. Troubleshooting
If you encounter issues with your radiator, refer to the following common problems and solutions:
| Problem | Possible Cause | Solution |
|---|---|---|
| Radiator does not turn on. | No power, power button not pressed, safety feature activated. | Check power outlet and plug. Press power button. If unit was tipped or overheated, allow it to cool and reset. |
| Radiator is on but not heating. | Temperature setting too low, mode not selected, timer active. | Increase desired temperature. Select a heating mode (Low, High, or ECO). Check if the timer is set to turn off. |
| Unusual odor during first use. | Residual manufacturing oils/dust burning off. | This is normal for initial use. Ensure good ventilation. The odor should dissipate after a few hours of operation. |
| Remote control not working. | Dead batteries, obstruction, out of range. | Replace batteries. Ensure no obstructions between remote and radiator. Move closer to the radiator. |
If the problem persists after trying these solutions, please contact Aigostar customer support.
8. Specifications
| Brand | Aigostar |
| Model Number | 8433325385514 |
| Power | 2500 W |
| Voltage | 220 Volts |
| Number of Heating Elements | 13 |
| Temperature Range | 5-35°C |
| Recommended Coverage Area | Up to 25 m² |
| Dimensions (L x W x H) | 45 x 22.6 x 57 cm |
| Product Weight | 10.7 kg |
| Special Features | Rapid heating, Remote control, Low consumption (ECO mode), Digital display, Silent operation, Automatic shut-off |
9. Warranty and Support
Aigostar products are manufactured to high-quality standards. For warranty information, technical support, or any questions regarding your product, please refer to the warranty card included with your purchase or contact Aigostar customer service directly through their official website or the retailer where the product was purchased.


