
PICO Neo 3 Pro (A7H10)
PICO Neo 3 Pro (VR) Headset User Manual
Model: Neo 3 Pro (A7H10)
Introduction
The PICO Neo 3 Pro is an advanced virtual reality headset designed for business development, training, enterprise solutions, and collaboration. It features a new generation of self-developed 6DoF optical precision positioning technology, offering millimeter-level accuracy and ultra-low tracking lag for an immersive experience. This manual provides essential information for setting up, operating, maintaining, and troubleshooting your Neo 3 Pro headset.
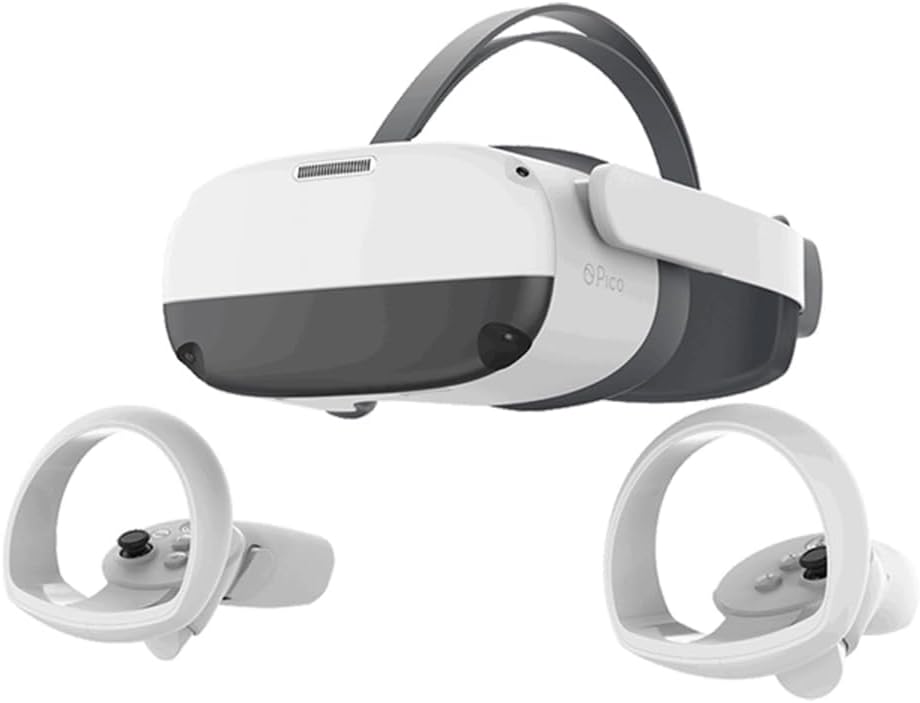
Image: The PICO Neo 3 Pro VR Headset, white and dark grey, with two white motion controllers positioned below it. The headset features a front-facing camera array and an adjustable head strap.
Package Contents
Ensure all items are present in the package:
- PICO Neo 3 Pro Headset
- 2x 6DoF Controllers (Right and Left hand)
- AC Adapter
- USB Type-C Cable
- Head Strap (Elite straps)
Setup
Initial Setup and Power On
- Charge the Headset: Connect the AC adapter to the USB Type-C port on the headset and plug it into a power outlet. The LED indicator will show charging status.
- Adjust the Headset: Place the headset on your head. Use the knob on the back of the Elite Straps to adjust for a secure and comfortable fit. The side-straps can be rotated upwards for quick wear.
- Adjust IPD: The PICO Neo 3 Pro features physical IPD adjustment (58/63.5/69mm). Adjust the lenses until the image appears clear and comfortable.
- Power On: Press and hold the Power button on the headset until the LED indicator lights up.
- Controller Pairing: The 6DoF controllers should automatically pair with the headset upon first use. If not, follow the on-screen instructions or refer to the troubleshooting section.
Setting Up Your Play Space
The 6DoF optical precision positioning technology requires a clear play space. Ensure you have sufficient room to move safely without obstructions.
- Clear the area of any furniture, obstacles, or tripping hazards.
- Ensure adequate lighting for optimal tracking performance.
- Follow the on-screen prompts within the headset to define your play boundary.
Operating Instructions
Basic Navigation
- Controllers: Use the 6DoF controllers for interaction within the VR environment. They feature buttons for Power, App (Back), Trigger, Home, Volume Up, and Volume Down.
- Home Button: Press the Home button on either controller to return to the main menu or dashboard.
- Trigger Button: Used for selection and interaction with virtual objects.
- Volume Buttons: Adjust the audio output from the built-in dual stereo speakers.
PC VR Mode
The PICO Neo 3 Pro can be used as an all-in-one VR headset or connected to a PC for a more powerful experience.
- To switch to PC VR mode, connect the headset to your PC using a 5m PICO DP cable (purchased separately).
- This connection allows for lossless 4K visual experience with zero lagging, enabling access to platforms like SteamVR in original quality.
Business Applications
The Neo 3 Pro is optimized for business development, training, and enterprise collaboration. PICO offers one-stop VR solutions and app development for businesses.
- Utilize the precise 6DoF tracking for accurate spatial positioning in training simulations.
- Engage in immersive collaboration sessions with reduced motion sickness.
- Leverage the Android 10 operating system for custom application deployment.
Maintenance
Cleaning the Headset
- Lenses: Use a dry microfiber cloth specifically designed for optical lenses. Wipe gently from the center outwards in a circular motion. Do not use liquid cleaners or abrasive materials.
- Exterior: Wipe the exterior surfaces of the headset and controllers with a soft, damp cloth. Avoid getting moisture into ports or openings.
- PU Foam: The PU foam interface is durable and easy to clean. Wipe with a damp cloth and mild soap if necessary, then dry thoroughly.
Storage
Store the headset in a cool, dry place away from direct sunlight. Protect the lenses from scratches and dust by using a lens cover or storing it in its original packaging.
Troubleshooting
Common Issues and Solutions
- Headset not powering on:
- Ensure the headset is fully charged. Connect the AC adapter and check the LED indicator.
- Press and hold the Power button for at least 3 seconds.
- Controllers not tracking or pairing:
- Ensure the controllers have sufficient battery.
- Restart the headset.
- If issues persist, refer to the headset's system settings for controller pairing options.
- Blurry image or eye strain:
- Adjust the IPD (Inter-Pupillary Distance) using the physical adjustment mechanism (58/63.5/69mm).
- Ensure the headset is positioned correctly on your head and the straps are snug.
- Clean the lenses carefully with a microfiber cloth.
- PC VR mode not connecting:
- Ensure you are using a compatible 5m PICO DP cable (purchased separately).
- Verify that your PC meets the minimum system requirements for PC VR.
- Check for updated drivers for your graphics card and the PICO software.
Specifications
| Feature | Detail |
|---|---|
| CPU | Qualcomm XR2, Kryo 585, 8 core, 64 bit, up to 2.84GHz max frequency, 7nm process |
| GPU | Adreno 650, 587MHz clock speed |
| RAM | 6GB LPDDR4X (PICO Neo3 Pro) |
| Storage | UFS3.0, 256GB |
| Operating System | Android 10 |
| Display Screen | 5.5 inch x 1 SFR TFT |
| Resolution | 3664 x 1920, PPI: 773 |
| Refresh Rate | 72/90Hz |
| FOV (Field of View) | 98 degrees |
| Lenses | Fresnel |
| IPD Adjustment | Physical adjustment: 58/63.5/69mm |
| Eye Protection | Certified by TÜV Rheinland for low blue light (can be enabled in system settings) |
| Sensors | 9-axis sensor (1KHz sampling frequency), P-sensor (Face proximity sensing) |
| Controllers | 2x 6DoF controllers with optical positioning and linear resonant actuators |
| Audio | Built-in dual stereo speakers, Omnidirectional dual mic with noise canceling |
| Battery | 5300mAh, QC3.0 supported charging |
| Connectivity | WiFi6 (802.11 b/g/n/ac/ax), BT5.1, USB Type-C 3.0 (data, power, OTG, DP video out), DP port, 3.5mm audio jack |
| Dimensions | 7.48"D x 5.3"W x 4.4"H |
| Weight | 8 pounds |
Warranty and Support
For information regarding product warranty, please refer to the warranty card included with your purchase or visit the official PICO website. For technical support, troubleshooting assistance beyond this manual, or service inquiries, please contact PICO customer support directly.
PICO also provides one-stop VR solutions for enterprises, including app development and technical support for business endeavors.
Related documentsNeo 3 Pro (A7H10)


Ask a question about this manual
Ask about setup, troubleshooting, compatibility, parts, safety, or missing instructions. Manuals+ will review the question and use this page’s manual context to help answer it.