
1. Introduction
Thank you for choosing the TREO NANOHD4 Mini Amplifier. This compact, high-performance Class D amplifier is designed to deliver clear and powerful audio for your vehicle's sound system. This manual provides essential information for proper installation, operation, and maintenance to ensure optimal performance and longevity of your amplifier.
2. Safety Information
- Professional Installation Recommended: Due to the complexity of car audio systems, professional installation is highly recommended.
- Power Disconnection: Always disconnect the vehicle's negative battery terminal before starting any installation.
- Wiring: Ensure all wiring is correctly routed and secured to prevent damage, short circuits, or interference. Use appropriate gauge wires for power and speaker connections.
- Ventilation: Install the amplifier in a location that allows for adequate ventilation to prevent overheating. Avoid enclosed spaces.
- Moisture: Keep the amplifier away from moisture and direct water exposure.
- Voltage: This amplifier operates on a 12V DC automotive electrical system. Do not attempt to use it with other voltage sources.
- Fuse Protection: The amplifier is equipped with internal fuses. Do not bypass or replace them with fuses of different ratings.
3. Package Contents
Please check the package for the following items:
- TREO NANOHD4 Mini Amplifier
- Quick Start Guide
If any items are missing or damaged, please contact your retailer.
4. Product Overview
The TREO NANOHD4 is a compact 4-channel amplifier designed for versatile audio system configurations. Below are images illustrating the amplifier and its key connection points and controls.

Figure 4.1: Top view of the TREO NANOHD4 Mini Amplifier, showcasing its compact design.
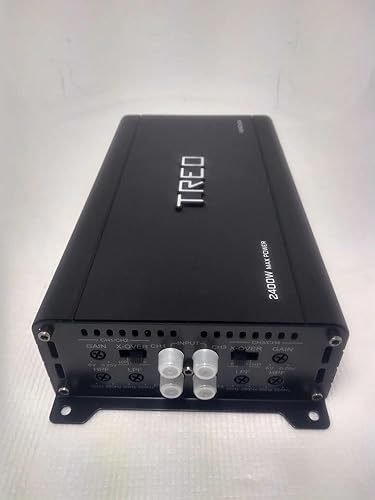
Figure 4.2: Side view of the amplifier, highlighting the input and crossover controls for channels 1/2 and 3/4.
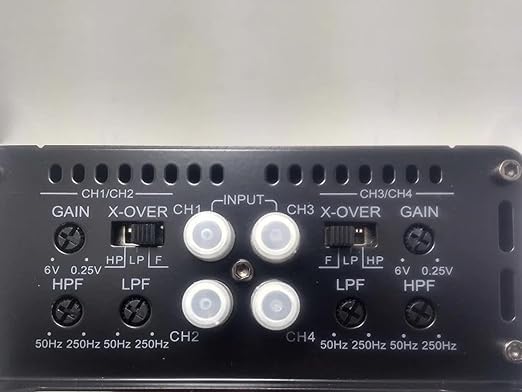
Figure 4.3: Close-up of the input section, showing GAIN controls, X-OVER switches (HP/LP/F), and RCA input jacks for channels 1/2 and 3/4.
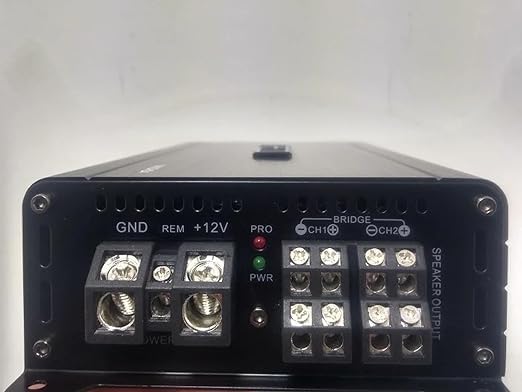
Figure 4.4: Close-up of the power and speaker output terminals. This view shows the GND (Ground), REM (Remote), +12V (Power) connections, and the speaker output terminals with bridging options. Status indicator lights (PRO, PWR) are also visible.
5. Setup and Installation
Proper installation is crucial for the performance and safety of your amplifier. Follow these steps carefully.
5.1 Wiring Connections
- Power (BATT +12V): Connect a fused power cable directly from the positive terminal of your vehicle's battery to the +12V terminal on the amplifier. Ensure the fuse is located within 18 inches of the battery.
- Ground (GND): Connect a ground cable of the same gauge as the power cable from the GND terminal on the amplifier to a clean, unpainted metal surface on the vehicle's chassis. Ensure a solid electrical connection.
- Remote (REM): Connect a remote turn-on wire from your head unit's remote output to the REM terminal on the amplifier. This wire turns the amplifier on and off with your head unit.
- RCA Input: Connect RCA cables from your head unit's pre-amp outputs to the CH1/CH2 and CH3/CH4 INPUTs on the amplifier.
- Speaker Output: Connect your speakers to the SPEAKER OUTPUT terminals. Pay close attention to polarity (+ and -). For bridged operation (2-channel mode), refer to the markings on the amplifier for correct connections.
5.2 Mounting
- Choose a mounting location that is dry, well-ventilated, and away from direct sunlight or heat sources.
- Ensure the mounting surface is sturdy enough to support the amplifier's weight.
- Use appropriate screws to secure the amplifier firmly.
6. Operating Instructions
Once installed, adjust the amplifier settings for optimal sound quality.
6.1 Gain Adjustment
- The GAIN control matches the amplifier's input sensitivity to the output level of your head unit.
- Start with the GAIN set to minimum (0.25V).
- Turn your head unit volume to about 75% of its maximum.
- Slowly increase the GAIN control on the amplifier until you hear distortion, then back it off slightly.
6.2 Crossover Settings (X-OVER)
The NANOHD4 features selectable crossover filters for each channel pair (CH1/CH2 and CH3/CH4).
- HPF (High Pass Filter): Allows frequencies above the set point to pass through. Useful for full-range speakers to prevent low-frequency distortion.
- LPF (Low Pass Filter): Allows frequencies below the set point to pass through. Useful for subwoofers.
- F (Full Range): Disables the crossover, allowing all frequencies to pass through.
Adjust the crossover frequency (50Hz - 250Hz) according to your speaker type and desired sound. For full-range speakers, typically use HPF. For subwoofers, use LPF.
7. Maintenance
Regular maintenance ensures the longevity and optimal performance of your amplifier.
- Cleaning: Use a soft, dry cloth to clean the amplifier''s exterior. Do not use harsh chemicals or abrasive cleaners.
- Ventilation: Periodically check that the amplifier's cooling fins are free from dust and debris to ensure proper heat dissipation.
- Connections: Occasionally inspect all wiring connections to ensure they are secure and free from corrosion.
8. Troubleshooting
If you experience issues with your amplifier, refer to the following common problems and solutions.
| Problem | Possible Cause | Solution |
|---|---|---|
| No Power (PWR LED off) | Blown fuse, poor power/ground connection, no remote signal. | Check inline fuse, verify +12V and GND connections, ensure remote wire is connected and receiving 12V. |
| Amplifier goes into Protect Mode (PRO LED on) | Overheating, speaker short circuit, impedance too low. | Allow amplifier to cool, check speaker wiring for shorts, ensure speaker impedance matches amplifier's rating. |
| No Sound | No input signal, incorrect gain setting, speaker wires disconnected. | Check RCA connections, adjust gain, verify speaker connections and polarity. |
| Distorted Sound | Gain set too high, poor ground connection, damaged speakers. | Reduce gain, check ground connection, inspect speakers for damage. |
9. Specifications
The following table details the technical specifications of the TREO NANOHD4 Mini Amplifier.
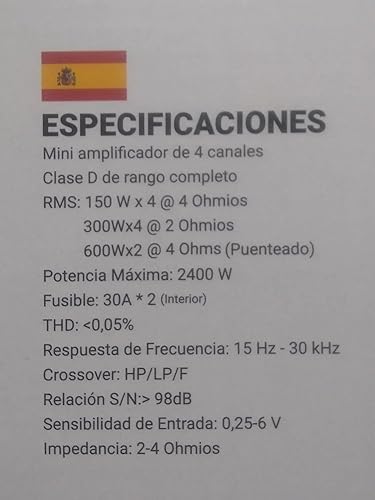
Figure 9.1: Original specifications sheet for the TREO NANOHD4 Mini Amplifier.
| Feature | Specification |
|---|---|
| RMS Power (4 Ohms) | 150 Watts x 4 Channels |
| RMS Power (2 Ohms) | 300 Watts x 4 Channels |
| RMS Power (4 Ohms Bridged) | 600 Watts x 2 Channels |
| Maximum Power | 2400 Watts |
| Fuse Rating | 30 Amps x 2 |
| Total Harmonic Distortion (T.H.D.) | <0.05% |
| Frequency Response | 15 Hz - 30 kHz |
| Signal-to-Noise Ratio (S/N Ratio) | >98 dB |
| Crossover | HP/LP/F (High Pass / Low Pass / Full Range) |
| Input Sensitivity | 0.25 - 6 Volts |
| Impedance | 2-4 Ohms |
| Product Dimensions (L x W x H) | 3.94 x 3.94 x 3.94 inches |
| Item Model Number | NANOHD4 |
| Manufacturer | PROTECH |
10. Warranty and Support
For warranty information and technical support, please refer to the documentation provided with your purchase or contact your authorized retailer. Keep your proof of purchase for warranty claims.