1. Safety Information
Please read all instructions carefully before installation and use. Retain this manual for future reference.
- Power Off: Always cut off the power supply at the circuit breaker before installing, cleaning, or performing any maintenance on the fan light.
- Proper Installation: Ensure the fan light is securely screwed into a standard E26 socket. Do not overtighten.
- Blade Assembly: Insert fan blades firmly until a clicking sound is heard, indicating they are locked into place. Improper installation may cause blades to fall during operation.
- Accidental Touch Protection: The fan is designed with accidental touch protection. If an object obstructs the blades, the fan will stop to prevent injury.
- Indoor Use Only: This product is designed for indoor use in dry locations. Do not expose to water or high humidity.
- Voltage: Ensure your power supply is 110 Volts.
2. Package Contents
Verify that all components are present before beginning installation:
- Socket Fan Light Unit (20.5 inches)
- Remote Control (batteries not included)
- 3.81-inch Socket Extender

Image: The SMART EGG Socket Fan Light, remote control, and socket extender are shown. The fan light features a central LED light and six black blades. The remote has buttons for power, light, fan, color temperature, dimming, fan speed, and timer. The extender is a white E26 base adapter.
3. Setup and Installation
Follow these steps for easy installation without complex wiring or tools:
- Cut Off Power: Before starting, ensure the power to the light socket is turned off at the wall switch and the circuit breaker.
- Assemble Fan Blades: Insert each fan blade into its designated slot on the fan light unit. Push firmly until you hear a distinct clicking sound, confirming the blade is securely locked.
- Screw into Socket: Screw the assembled fan light unit directly into a standard E26 light socket. If installing in a recessed fixture, use the included 3.81-inch socket extender first, then screw the fan light into the extender.
- Restore Power: Once securely installed, turn the power back on at the wall switch and circuit breaker.

Image: A close-up showing the fan blade slot with a green checkmark indicating correct insertion (a click sound) and a red cross indicating incorrect insertion (space in the slot, blade may fall).

Image: A hand screwing the fan light into a ceiling socket. Icons indicate "No wiring required," "No tools needed," and "E26 Standard Base."

Image: A four-panel graphic illustrating the installation process: 1. Cut off the power (switch off). 2. Assemble the fan blades. 3. Install the fan light (screw into socket, with extender shown). 4. Turn on the power (switch on).
Installation Video Guide
Video: This video demonstrates the assembly of the fan blades, installation of the fan light into a socket, and basic operation using the remote control, including light and fan speed adjustments. It also shows the accidental touch protection feature.
4. Operating Instructions
The fan light is controlled by the included remote control. Ensure batteries are installed in the remote.
Remote Control Functions

Image: A detailed diagram of the remote control, labeling each button's function, including Power ON/OFF, Light ON/OFF, Fan ON/OFF, CCT- (Color Light, Long Press), Dimming+, Night Light, Soft Wind, Medium Wind, Timing (1h, 2h, 4h), CCT+ (Color Light, Long Press), Dimming-, and Strong Wind. Note: Batteries are not included.
- Power ON/OFF: Turns the entire unit (light and fan) on or off.
- Light ON/OFF: Controls the light independently.
- Fan ON/OFF: Controls the fan independently.
- Color Temperature (CCT- / CCT+): Long press to adjust the light color temperature between 2700K (warm light) and 6500K (white light).
- Dimming (+ / -): Adjusts the brightness of the light.
- Fan Speed: Select from low, medium, or high wind speeds.
- Timer: Set the fan light to turn off automatically after 1, 2, or 4 hours.

Image: Icons representing three fan speed levels: Level 1-2 (Low Comfortable wind), Level 3-4 (Medium Natural wind), and Level 5-6 (High Cooling wind).

Image: A child sleeping peacefully with the fan light operating above, illustrating the timer function with 1h, 2h, and 4h options.
Memory Function
The fan light features a memory function. It will retain the last used light color and brightness settings when turned on again, eliminating the need to reset preferences frequently.
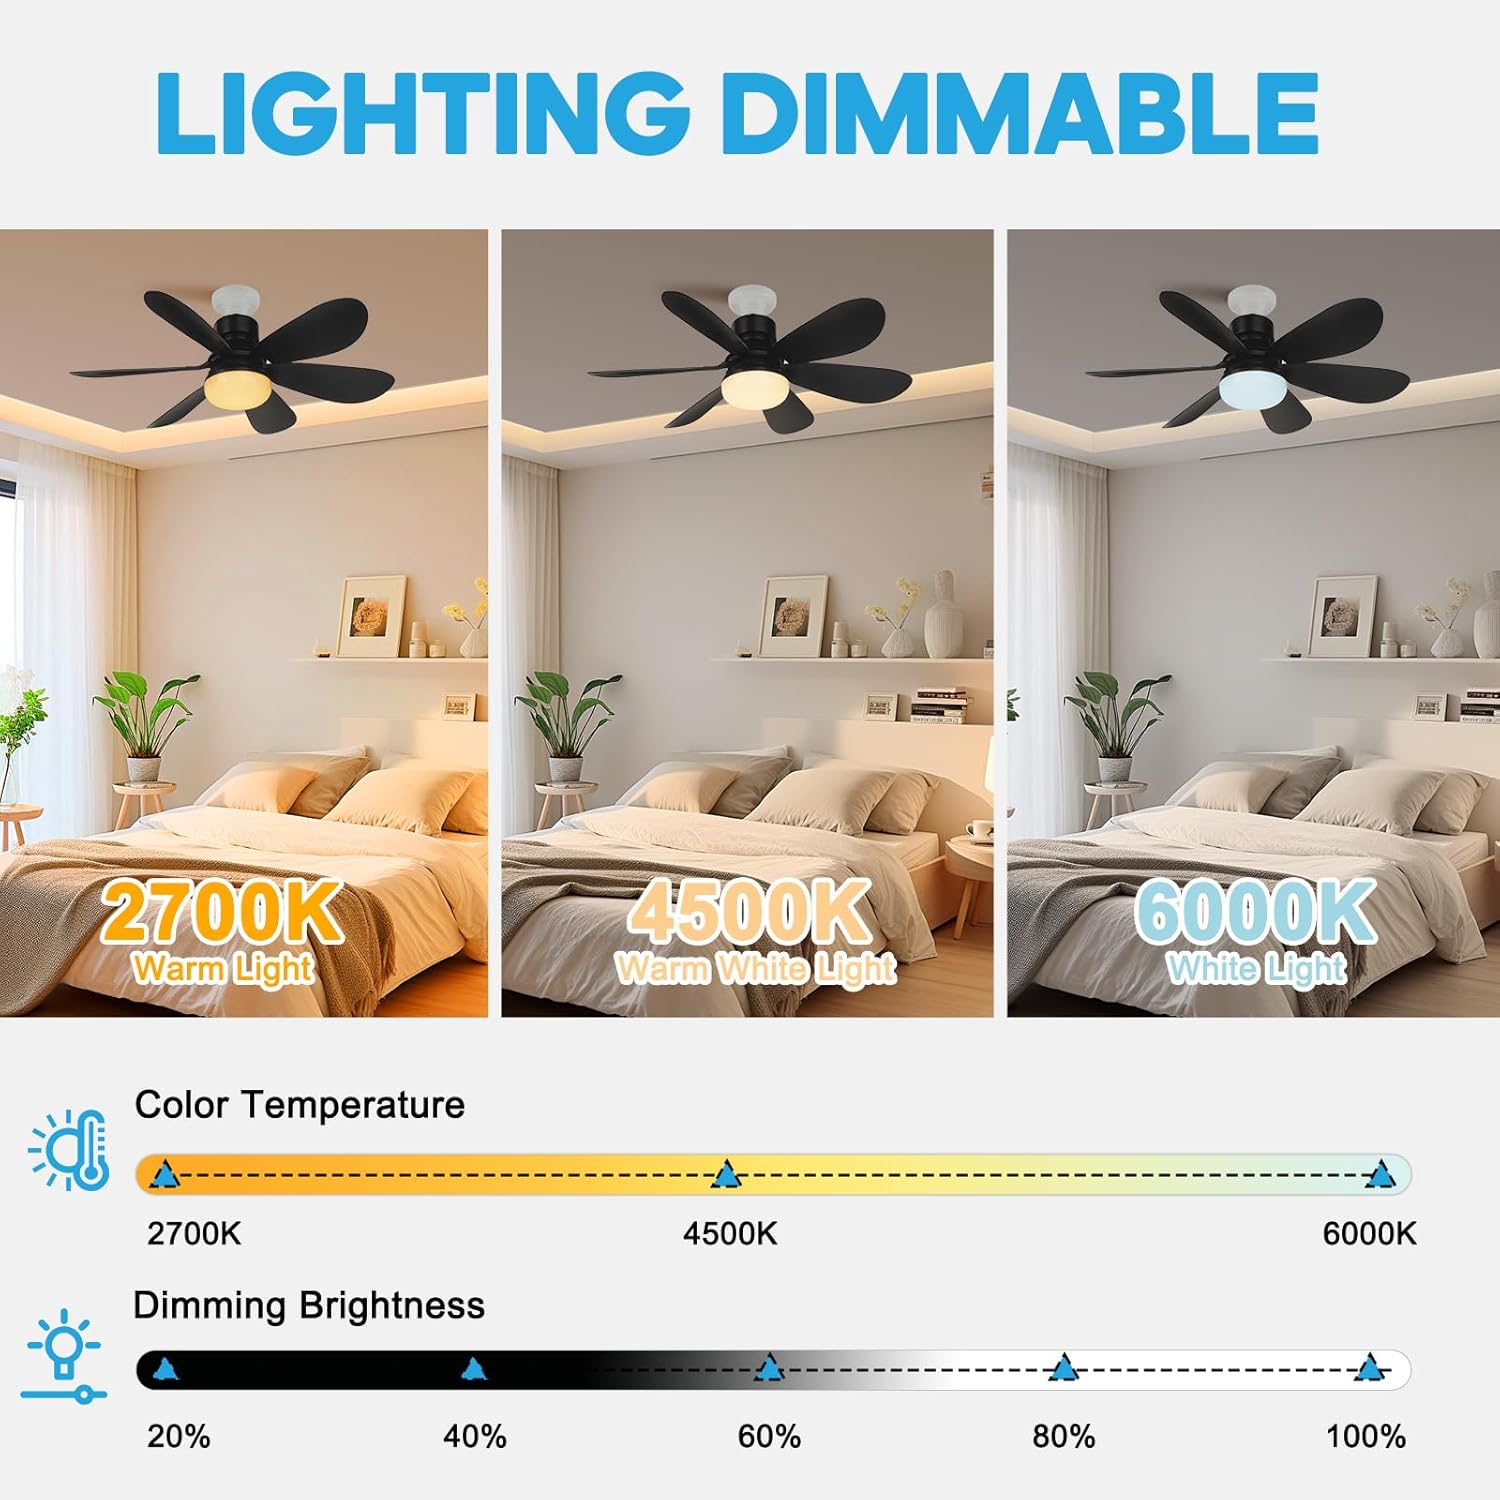
Image: Three bedroom scenes demonstrating different light color temperatures: 2700K Warm Light, 4500K Warm White Light, and 6000K White Light. A slider shows the range of color temperatures and dimming brightness from 20% to 100%.
5. Maintenance
To ensure optimal performance and longevity of your SMART EGG Socket Fan Light, follow these simple maintenance guidelines:
- Cleaning: Before cleaning, always turn off the power to the fan light. Use a soft, dry cloth to wipe down the fan blades and light cover. Do not use abrasive cleaners or solvents, as they may damage the finish.
- Blade Inspection: Periodically check that the fan blades are securely attached and free from any damage.
- Socket Connection: Ensure the fan light remains securely screwed into the E26 socket. If any wobbling occurs, turn off power and re-tighten.
6. Troubleshooting
If you encounter any issues with your fan light, refer to the following common problems and solutions:
- Fan or Light Not Turning On:
- Ensure the power supply to the socket is active.
- Check if the fan light is securely screwed into the E26 socket.
- Verify that the remote control batteries are correctly installed and have sufficient charge.
- Remote Control Not Responding:
- Ensure there are no obstructions between the remote and the fan light.
- Replace the remote control batteries if they are low or depleted.
- Point the remote directly at the fan light unit from a close distance.
- Fan Blades Not Spinning or Making Noise:
- Check that all fan blades are correctly and firmly inserted until they click into place.
- If the fan light is wobbling, turn off power and re-tighten it in the socket.
- The fan has accidental touch protection; ensure no objects are obstructing the blades.
- Light Brightness or Color Temperature Not Changing:
- Ensure you are using the correct buttons on the remote (Dimming +/- for brightness, CCT +/- for color temperature).
- Long press the CCT buttons to adjust color temperature.
7. Specifications
| Feature | Specification |
|---|---|
| Brand | SMART EGG |
| Model Name | Celling Fan |
| Color | Black |
| Material | Plastic |
| Product Dimensions | 6"L x 6"W x 8"H (Fan unit: 20.5 inches diameter) |
| Item Weight | 1.5 Pounds |
| Installation Type | Screw-in (E26 Base) |
| Power Source | AC |
| Voltage | 110 Volts |
| Wattage | 40 watts |
| Light Source Type | LED |
| Brightness | 800 lumen (Max 800 Lumens) |
| Light Color | Adjustable White (2700K-6500K) |
| Control Method | Remote Control |
| Special Feature | Timer, Dimmable, Memory Function |
| Indoor/Outdoor Usage | Indoor |
| Assembly Required | Yes |
| UPC | 755824748323 |
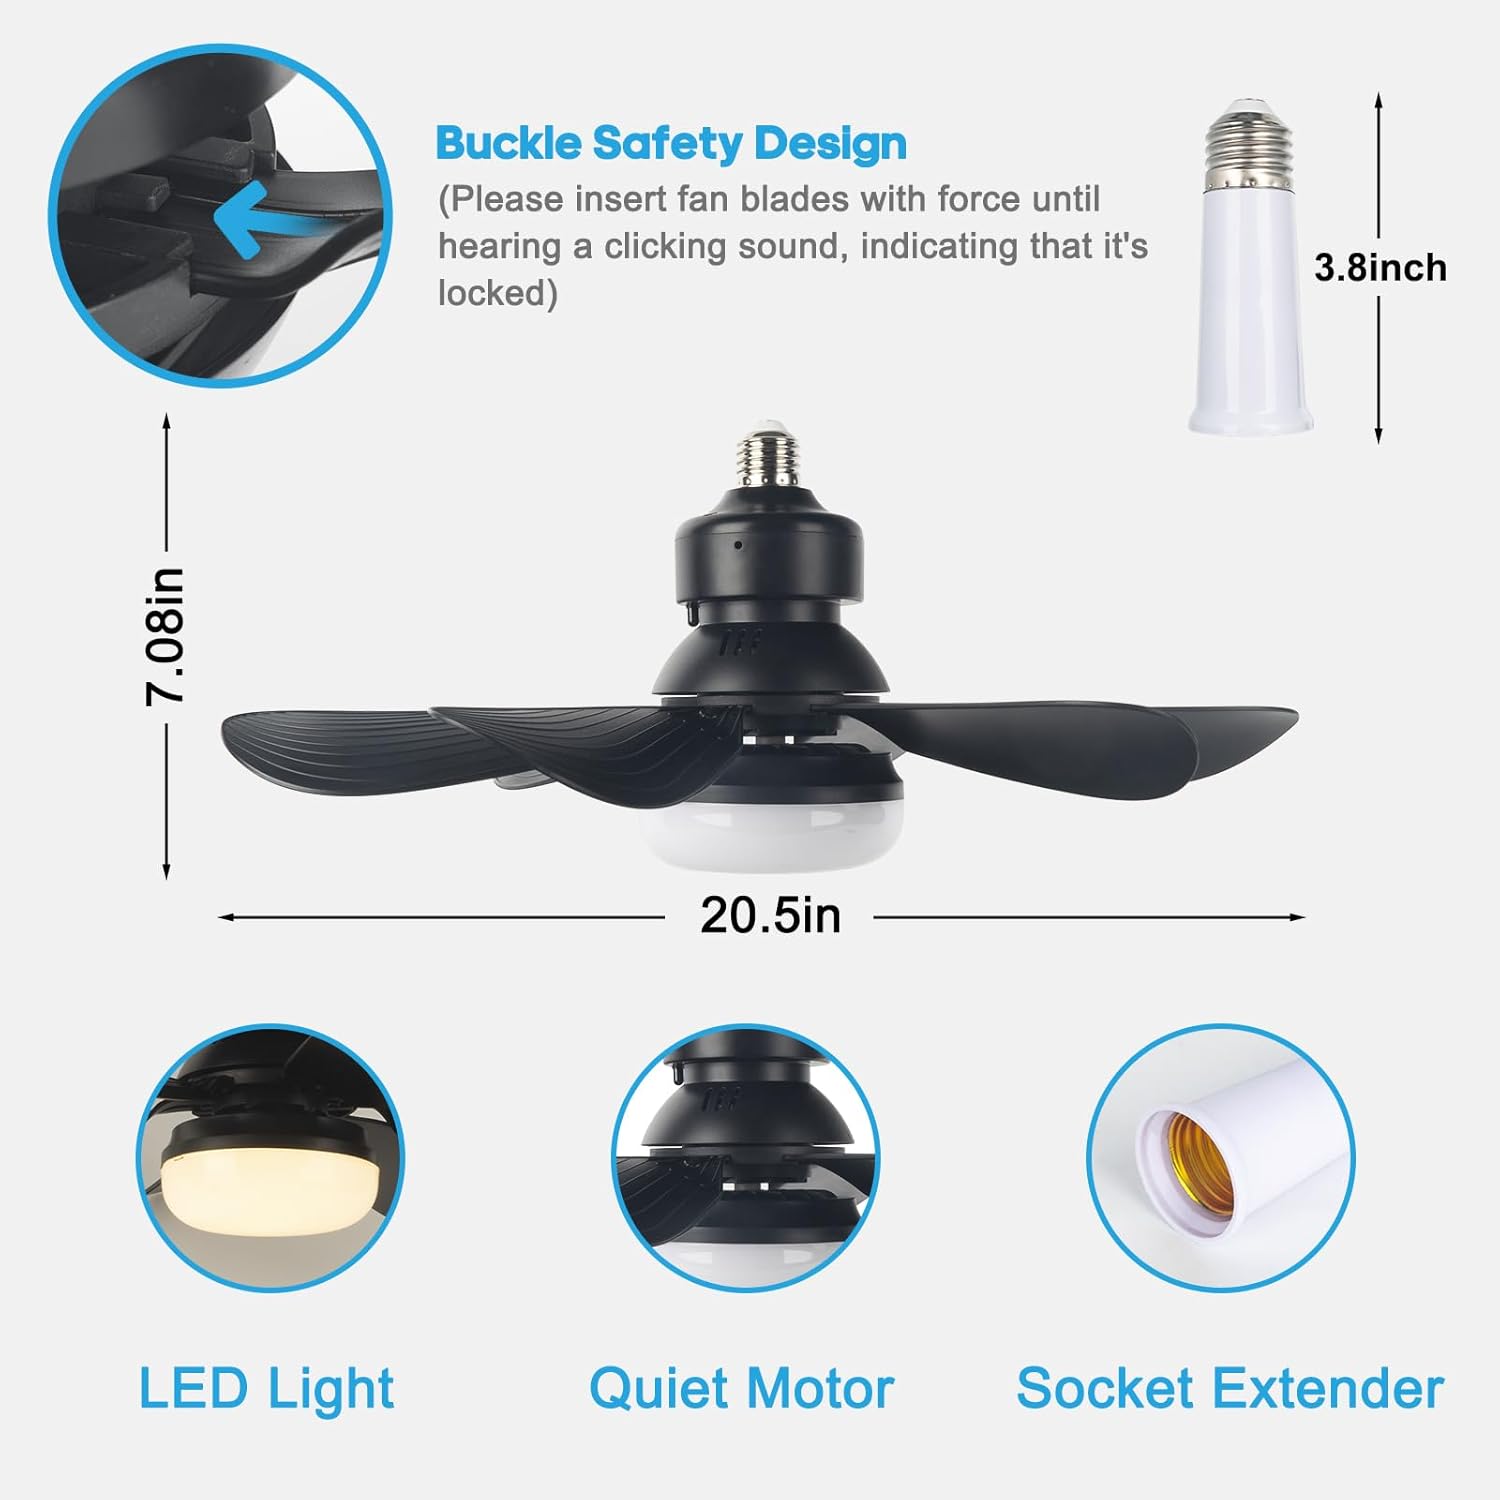
Image: A diagram showing the dimensions of the fan light (7.08 inches height, 20.5 inches width) and the 3.8-inch socket extender. Key features highlighted are LED Light, Quiet Motor, and Socket Extender.
8. Warranty and Support
SMART EGG is committed to customer satisfaction. If you encounter any quality problems with your light socket fan, please contact us directly. We are dedicated to resolving any issues within 24 hours.
For support, please refer to the 'Seller Contact' option on the product's purchase platform.


