
Introduction
Thank you for choosing the FORGING MOUNT Triple Monitor Arm. This manual provides detailed instructions for the safe and efficient installation, operation, and maintenance of your monitor arm. Please read this manual thoroughly before installation and keep it for future reference.
This monitor arm is designed to support three monitors simultaneously, ranging from 13 to 27 inches in size, with a maximum load capacity of 8kg per arm. It features a gas spring system for smooth adjustments and supports VESA mounting patterns of 75x75mm and 100x100mm.
Safety Information
- Ensure all components are present and undamaged before installation. Do not use if any parts are missing or defective.
- This product is intended for indoor use only.
- Do not exceed the maximum load capacity of 8kg per arm. Overloading can cause property damage or personal injury.
- Ensure the mounting surface (desk) is strong enough to support the combined weight of the monitor arm and all attached monitors.
- During gas spring adjustment, ensure no body parts (especially the face) are in the path of the arm's movement to prevent injury.
- Keep children away from the product during installation and adjustment.
Package Contents
Verify that all parts listed below are included in your package:
- Monitor Arm Assembly (Main Pole, Arms)
- C-Clamp Mounting Hardware
- Grommet Mounting Hardware
- VESA Plate Screws (M4, M5, M6)
- Hex Keys for Adjustment
- Cable Management Clips
- User Manual
Specifications
| Feature | Specification |
|---|---|
| Model Number | FM4533 |
| Monitor Size Compatibility | 13 - 27 inches |
| Number of Monitors | 3 |
| Load Capacity (per arm) | 1 - 8 kg (2.2 - 17.6 lbs) |
| VESA Compatibility | 75x75mm, 100x100mm |
| Mounting Type | C-Clamp or Grommet |
| Desk Thickness (C-Clamp) | 10 - 80 mm (0.4 - 3.1 inches) |
| Desk Thickness (Grommet) | 10 - 75 mm (0.4 - 2.9 inches) |
| Tilt Range | -45° to +90° |
| Swivel Range | +90° to -90° |
| Screen Rotation | +180° to -180° (Portrait/Landscape) |
| Material | Aluminum |
| Color | Black |
Setup and Installation
The FORGING MOUNT Triple Monitor Arm offers two installation methods: C-Clamp and Grommet Mount. Choose the method suitable for your desk.
1. Choose Mounting Method
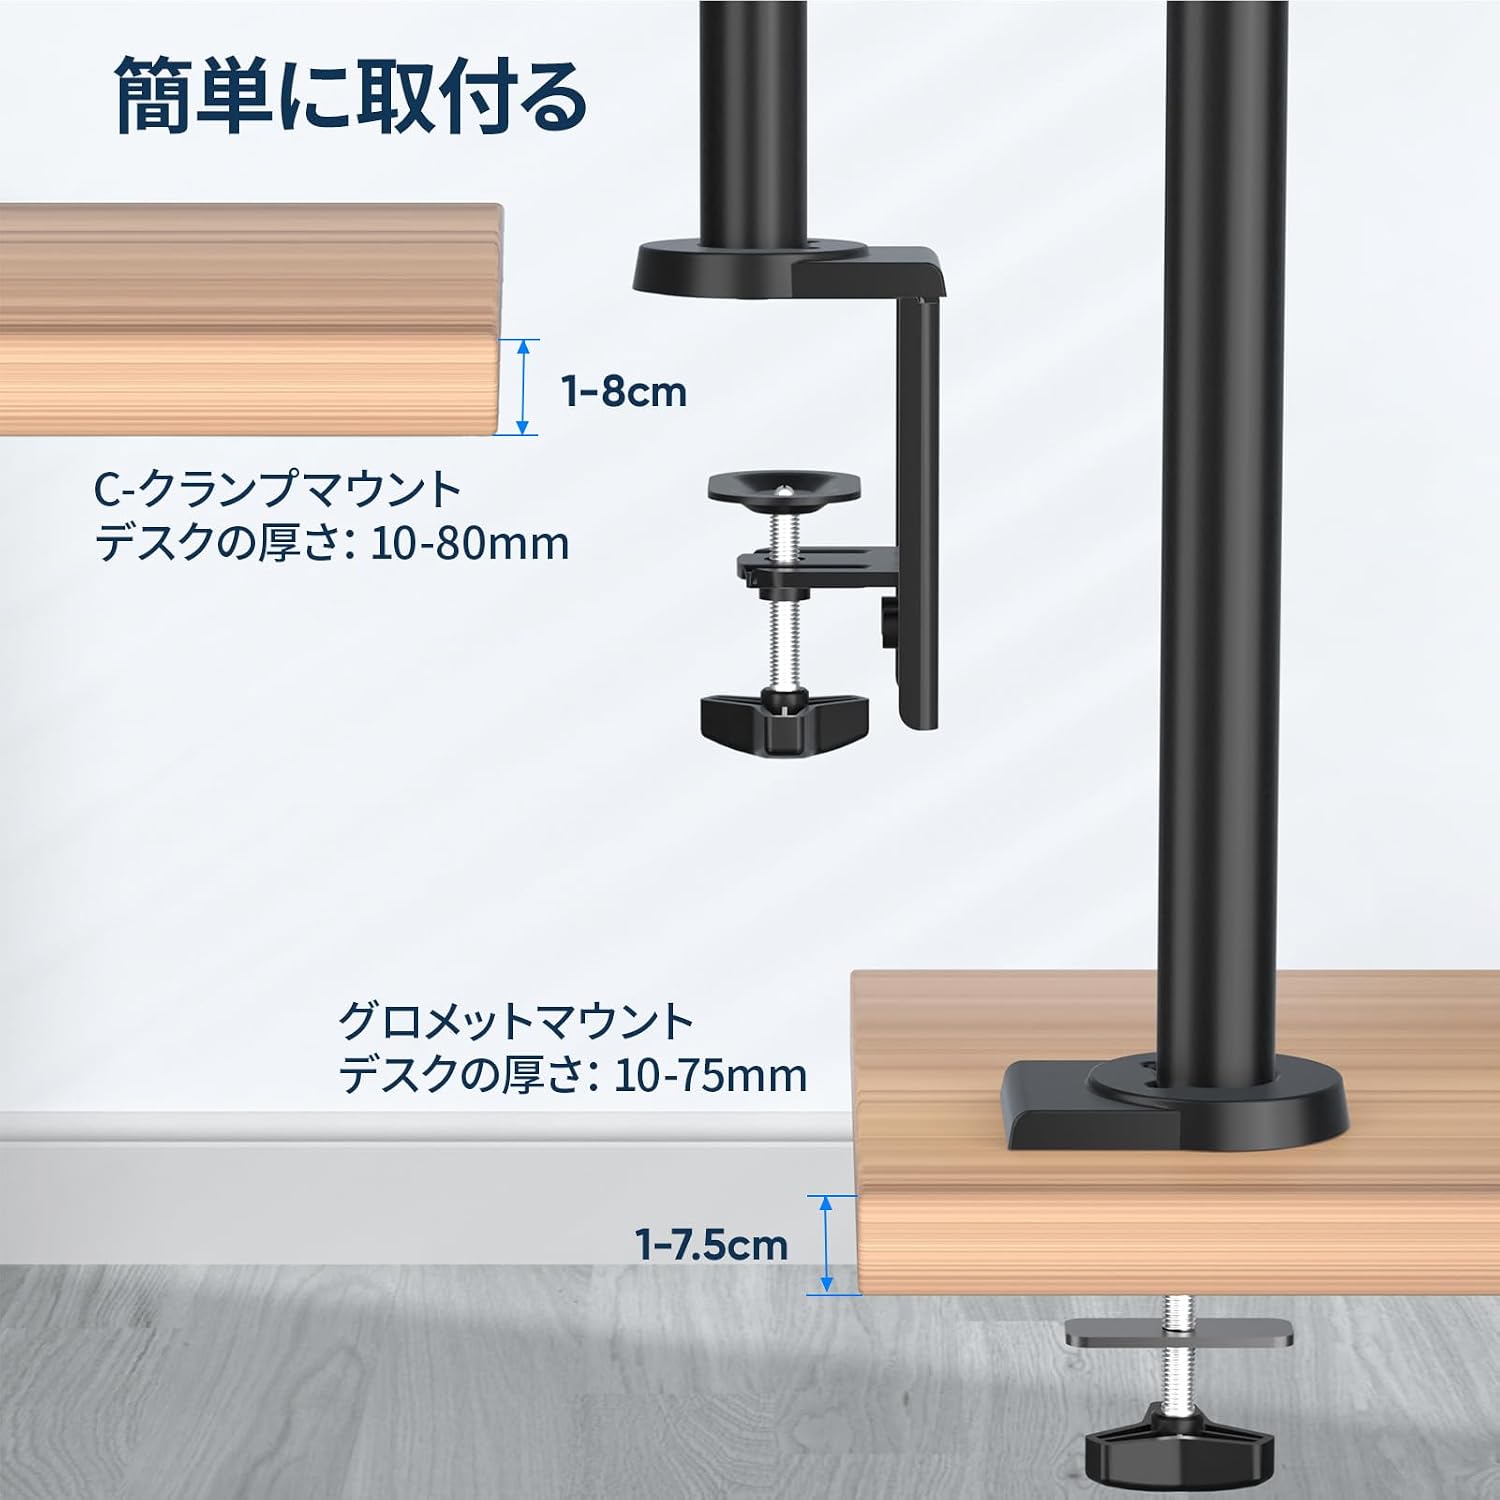
This image illustrates the two available mounting options: C-clamp and grommet. The C-clamp secures the arm to the edge of the desk, while the grommet mount uses an existing hole in the desk.

This image demonstrates the quick and easy installation process, highlighting the modular design that simplifies attaching the VESA plate to the monitor and then to the arm.
C-Clamp Installation:
- Attach the C-clamp base to the main pole.
- Secure the C-clamp to the edge of your desk. Ensure the desk thickness is between 10-80mm. Tighten firmly.
Grommet Mount Installation:
- If your desk has a grommet hole, insert the grommet base through the hole.
- Secure the grommet base from underneath the desk. Ensure the desk thickness is between 10-75mm. Tighten firmly.
2. Attach Monitor Arms:
Slide the monitor arms onto the main pole and secure them at your desired height. The arms are designed for durability and flexibility.

This image highlights the robust and flexible construction of the monitor arm, designed for long-lasting performance and ease of movement.
3. Attach Monitors:
- Attach the VESA plates to the back of your monitors using the appropriate screws (M4, M5, or M6).
- Slide the monitors (with VESA plates attached) onto the arms.
- Secure the monitors to the arms using the provided locking mechanism.
Operating Instructions
The FORGING MOUNT Triple Monitor Arm offers full motion capabilities for optimal viewing comfort and productivity.

This image demonstrates the full motion capabilities of the monitor arm, including 180° swivel, +90°/-85° tilt, and 360° rotation for flexible screen positioning.
Gas Spring Tension Adjustment:
The gas spring system allows for smooth and effortless height adjustment. It is crucial to adjust the tension to match the weight of your monitors. For proper function, each arm requires a minimum monitor weight of 1kg.

This image illustrates how to adjust the gas spring tension. Use the provided hex key to turn the adjustment screw. Turn clockwise to increase tension for heavier monitors (if the arm sags) and counter-clockwise to decrease tension for lighter monitors (if the arm rises too easily).
- After mounting your monitor, if the arm sags, turn the adjustment screw clockwise (towards '+') to increase tension.
- If the arm rises too easily, turn the adjustment screw counter-clockwise (towards '-') to decrease tension.
- Adjust until the arm stays horizontal at any position when moved.
Angle Adjustment:
- Tilt: Adjust the monitor vertically from -45° to +90°. Loosen the tilt screw, set the desired angle, and re-tighten.
- Swivel: Pivot the monitor horizontally from +90° to -90°.
- Rotation: Rotate the screen 360° (+180° to -180°) to switch between landscape and portrait orientations.
Note: The actual range of motion may vary depending on the size of your monitors.
Cable Management
The monitor arm includes integrated cable management features to keep your workspace tidy and organized.
- Route your monitor cables through the cable clips or channels located along the arms and main pole.
- This helps to reduce clutter and maintain a clean aesthetic on your desk.

This image contrasts a clean, organized desk utilizing the monitor arm's cable management with a cluttered desk, demonstrating the space-saving benefits.
Maintenance
- Regularly check all screws and connections to ensure they are tight and secure.
- Clean the monitor arm with a soft, damp cloth. Avoid abrasive cleaners or solvents.
- Do not lubricate the gas spring mechanism.
Troubleshooting
Monitor Arm Sags or Rises Unexpectedly:
- Solution: Adjust the gas spring tension as described in the 'Operating Instructions' section. Ensure the monitor weight is within the 1-8kg range per arm.
Monitors are Not Level:
- Solution: Check the VESA plate attachment to the monitor and the arm. Ensure all screws are tightened evenly. Minor adjustments can be made using the tilt and swivel functions.
Difficulty Moving Arms:
- Solution: Ensure the gas spring tension is correctly set for your monitor's weight. If the arms are too stiff, slightly loosen the pivot point screws (do not over-loosen).
Warranty and Support
This FORGING MOUNT product is covered by a 1-year manufacturer's warranty from the date of purchase.
The warranty covers defects in materials and workmanship under normal use. It does not cover damage caused by improper installation, misuse, accidents, or unauthorized modifications.
For warranty claims, technical support, or any questions regarding your product, please contact FORGING MOUNT customer service through your purchase platform. Please have your order number and product model (FM4533) ready when contacting support.

