1. Introduction
The Mastech MS2203 is a professional 3-Phase Digital Power Clamp Meter designed for accurate measurement of electrical parameters in three-phase systems. This instrument features high sensitivity, True-RMS measurement, power factor correction, and a USB interface for data logging. This manual provides essential information for the safe and effective operation, maintenance, and troubleshooting of your MS2203 meter.
2. Safety Information
To ensure safe operation and service of the meter, follow these safety precautions:
- Always adhere to local and national safety codes.
- Do not use the meter if it appears damaged or if the insulation on the test leads is compromised.
- Ensure the rotary switch is in the correct position for the desired measurement before connecting to the circuit.
- Do not exceed the maximum input ratings for any function.
- Exercise extreme caution when working with live circuits.
- Keep fingers behind the finger guards on the test leads during measurements.
- Replace batteries when the low battery indicator appears to ensure accurate readings.
3. Product Overview
The Mastech MS2203 is a versatile clamp meter capable of measuring AC voltage, AC current, frequency, active power, apparent power, reactive power, and power factor. It features a large LCD display with backlight, data hold, MAX/MIN recording, and a bar graph for quick visual indication.

Image 3.1: The Mastech MS2203 3-Phase Digital Power Clamp Meter and its accessories, neatly organized within its protective carrying case. The kit includes the clamp meter, test leads, USB cable, and user manual.
Key Features:
- Display: 9999 counts
- Jaw Opening: Φ50mm/2.0"
- Auto & Manual Ranging
- Data Logging: 28 groups
- True Root Mean Square (True-RMS) measurement
- Bar Graph display
- MAX/MIN Measurement function
- Data Hold function
- Display Backlight for low-light conditions
- Low Battery Display indicator
- RS232 Interface for Windows OS connectivity
4. Unpacking and Contents
Carefully unpack the meter and check for any damage. Verify that all items listed below are present. If any item is missing or damaged, contact your dealer immediately.

Image 4.1: An illustrative diagram detailing the contents included with the Mastech MS2203, such as the main unit, test leads, alligator clips, RS232 cable, software, carrying case, and batteries.
Package Contents:
- Mastech MS2203 3-Phase Digital Power Clamp Meter
- Test Leads (Red, Yellow, Green, Black)
- Alligator Clips
- RS232 Interface Cable
- PC data record graph software (CD-ROM)
- Carrying Case
- Batteries (2 x LR44, included)
- Quick Start Guide
- Calibration Certificate
5. Setup
5.1 Battery Installation
- Locate the battery compartment cover on the back of the meter.
- Use a screwdriver to loosen the screw(s) and remove the cover.
- Insert the two LR44 batteries, observing the correct polarity (+/-) as indicated inside the compartment.
- Replace the battery cover and secure it with the screw(s).
5.2 Connecting Test Leads
Insert the banana plugs of the test leads into the appropriate input jacks on the meter. For most measurements, the common (COM) jack will be used with the black lead, and the V1, V2, V3, or A jacks will be used with the colored leads (red, yellow, green) depending on the measurement type and phase configuration.
5.3 USB/RS232 Interface Setup
To connect the meter to a computer for data logging and analysis:
- Install the provided PC data record graph software from the CD-ROM onto your Windows OS computer.
- Connect one end of the RS232 interface cable to the meter's RS232 port.
- Connect the other end of the cable to an available USB port on your computer (an RS232-to-USB adapter may be required if your computer lacks an RS232 port).
- Follow the software instructions to establish communication with the meter.
6. Operating Instructions
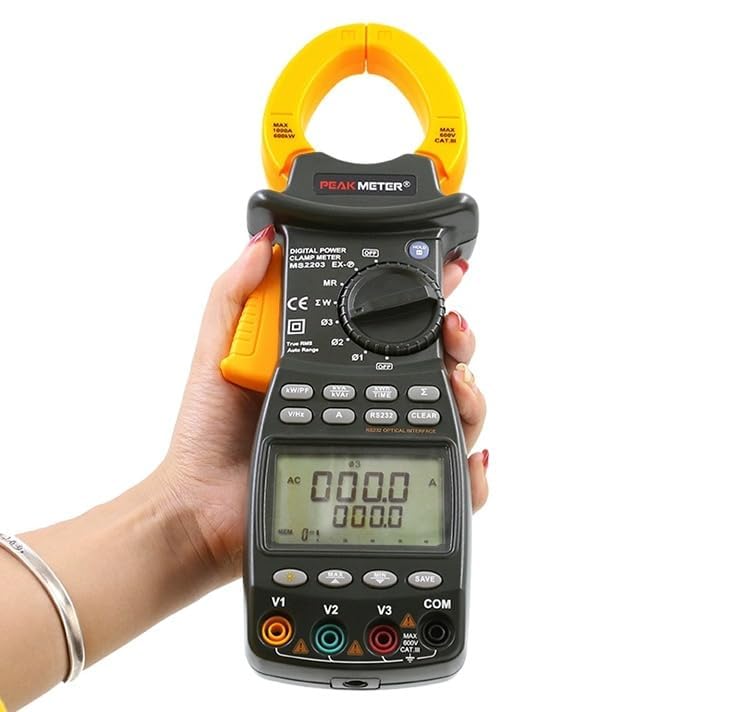
Image 6.1: The Mastech MS2203 in use, highlighting the digital display and the rotary selector for various measurement functions.
6.1 Power On/Off
To power on the meter, rotate the function switch from the 'OFF' position to any desired measurement function. To power off, rotate the switch back to 'OFF'.
6.2 Function Selection
The rotary switch allows selection of different measurement modes. Ensure the switch is set to the appropriate function before taking a measurement.
6.3 Measurement Procedures
AC Current Measurement:
- Rotate the function switch to the 'A' (AC Current) position.
- Open the clamp jaws by pressing the trigger.
- Enclose only one conductor of the circuit within the jaws. Ensure the jaws are fully closed.
- Read the current value on the display.
AC Voltage Measurement (3-Phase):
- Rotate the function switch to the 'V' (AC Voltage) position.
- Connect the test leads to the V1, V2, V3, and COM input jacks.
- Connect the test leads to the respective phase conductors and neutral/ground of the 3-phase system.
- The meter will display the voltage readings for each phase.
Power Measurement (Active, Apparent, Reactive, Power Factor):
- Rotate the function switch to the 'W/PF' (Power/Power Factor) position.
- Connect the test leads and clamp the current jaws as required for 3-phase power measurement.
- The meter will display active power (W), apparent power (VA), reactive power (VAR), and power factor (PF).
6.4 Special Functions
- Data Hold: Press the 'HOLD' button to freeze the current reading on the display. Press again to release.
- MAX/MIN Measurement: Press the 'MAX/MIN' button to record the maximum and minimum values during a measurement session. Press again to cycle through MAX, MIN, and current readings.
- Data Logging: The meter can store up to 28 groups of data. Refer to the detailed software manual for instructions on logging and retrieving data via the RS232 interface.
- Backlight: Press the backlight button to illuminate the display for use in dimly lit environments.
- True-RMS: The MS2203 provides True-RMS measurements for accurate readings on non-sinusoidal waveforms.
7. Maintenance
7.1 Cleaning
Wipe the meter with a damp cloth and mild detergent. Do not use abrasives or solvents. Ensure the meter is completely dry before use.
7.2 Battery Replacement
When the low battery indicator appears on the display, replace the batteries as described in Section 5.1. Remove batteries if the meter is not to be used for an extended period.
7.3 Storage
Store the meter in its carrying case in a cool, dry environment, away from direct sunlight and extreme temperatures.
8. Troubleshooting
- No Display: Check battery installation and charge. Ensure the rotary switch is not in the 'OFF' position.
- Inaccurate Readings: Verify correct function selection and proper test lead connection. Ensure the clamp jaws are fully closed around a single conductor for current measurements. Check for low battery.
- No PC Communication: Ensure the RS232 cable is correctly connected and the software drivers are installed. Check COM port settings in the software.
9. Specifications
Image 9.1: A detailed overview of the Mastech MS2203's technical specifications, including measurement ranges and display capabilities.
| Parameter | Value |
|---|---|
| Display | 9999 counts |
| Jaw Opening | 50mm / 2.0" |
| AC Voltage | 600V |
| AC Current | 1000A |
| Frequency | 1000Hz |
| Active Power | 600kW |
| Apparent Power | 600kVA |
| Reactive Power | 600kVAR |
| Item Model Number | YQ-MS2203 |
| Product Dimensions | 7.87 x 5.91 x 9.84 inches |
| Item Weight | 1 Kilogram (2.2 Pounds) |
| Batteries | 2 LR44 batteries (included) |
10. Warranty and Support
Mastech products are designed for reliability and performance. For warranty information, technical support, or service inquiries, please refer to the warranty card included with your product or visit the official Mastech website. Do not attempt to repair the meter yourself, as this may void the warranty and pose a safety risk.


