
1. Introduction
This manual provides essential information for the safe and effective use of your YARD FORCE 12V Cordless 2-WAY Hedge Trimmer III (Model: Y3LH-C30-P000A). Please read these instructions thoroughly before operation and retain them for future reference.
The YARD FORCE 12V Cordless 2-WAY Hedge Trimmer III is a versatile tool designed for maintaining hedges, plants, grass, and lawns. Its lightweight design, extendable pole, and adjustable head make it suitable for various trimming tasks, including high branches up to 3 meters.
2. Safety Instructions
Always prioritize safety when operating power tools. Failure to follow these instructions may result in serious injury or property damage.
- Read the Manual: Understand all instructions and warnings before use.
- Wear Protective Gear: Always wear safety glasses, gloves, and appropriate clothing. The product includes UV99% cut protective glasses and work gloves.
- Battery Compatibility: WARNING: The dedicated battery (AL-C15D1) included with the old model "YARDFORCE 12V Cordless 2WAY Hedge Trimmer II (Model: Y3LH-C30-P000)" is NOT compatible with this product, "YARDFORCE 12V Cordless 2WAY Hedge Trimmer III (Model: Y3LH-C30-P000A)". Ensure you use the correct battery for this model.
- Secure Grip: Use the safety switch (lock-off button) with your thumb while firmly gripping the operating switch. The power automatically cuts off when you release the operating switch.
- Clear Work Area: Ensure the work area is clear of bystanders, children, and pets.
- Inspect Before Use: Check the blades and tool for any damage or loose parts before each operation.
- Avoid Overreaching: Maintain proper footing and balance. Do not overreach.
- Proper Charging: Use only the specified charger for the 12V lithium-ion battery.
3. Components and Package Contents
Your YARD FORCE 12V Cordless 2-WAY Hedge Trimmer III package includes the following items:
- Main Unit (Hedge Trimmer Head)
- Extension Pole
- 12V Lithium-ion Battery
- Charger
- Shoulder Strap
- Blade Cover
- UV99% Cut Protective Glasses (Clear, with side/top/bottom guards, impact-resistant polycarbonate)
- Work Gloves
- PROSTAR Cleaning Brush (color and shape may vary)

Figure 3.1: Package Contents of YARD FORCE 12V Cordless 2-WAY Hedge Trimmer III.
4. Setup and Assembly
4.1 Attaching the Extension Pole
For extended reach, attach the extension pole to the main unit.
- Align the connection point of the main unit with the extension pole.
- Push the pole firmly into the main unit until it clicks into place.
- Secure the connection using the locking mechanism on the pole.

Figure 4.1: Attaching the extension pole.
4.2 Battery Installation
Insert the 12V lithium-ion battery into the designated slot at the base of the handle until it locks securely.
4.3 Shoulder Strap Attachment
Attach the shoulder strap to the designated attachment points on the extension pole for comfortable and balanced operation, especially during extended use or when trimming high branches.
5. Operating Instructions
5.1 Powering On/Off
To turn on the trimmer, press the lock-off button with your thumb and then squeeze the operating switch. Release the operating switch to turn off the trimmer.
5.2 Adjusting Head Angle
The trimmer head can be adjusted to 6 different angles to suit various cutting needs, including hard-to-reach areas. Press the angle adjustment button while moving the head to the desired position.
Figure 5.1: Head angle adjustment for versatile trimming.
5.3 Using the Extension Pole
The extension pole allows the trimmer to reach lengths between 178cm and 244cm. Combined with your height, this enables trimming hedges up to approximately 3 meters high. The pole grip is also 3-step adjustable for optimal comfort and control.
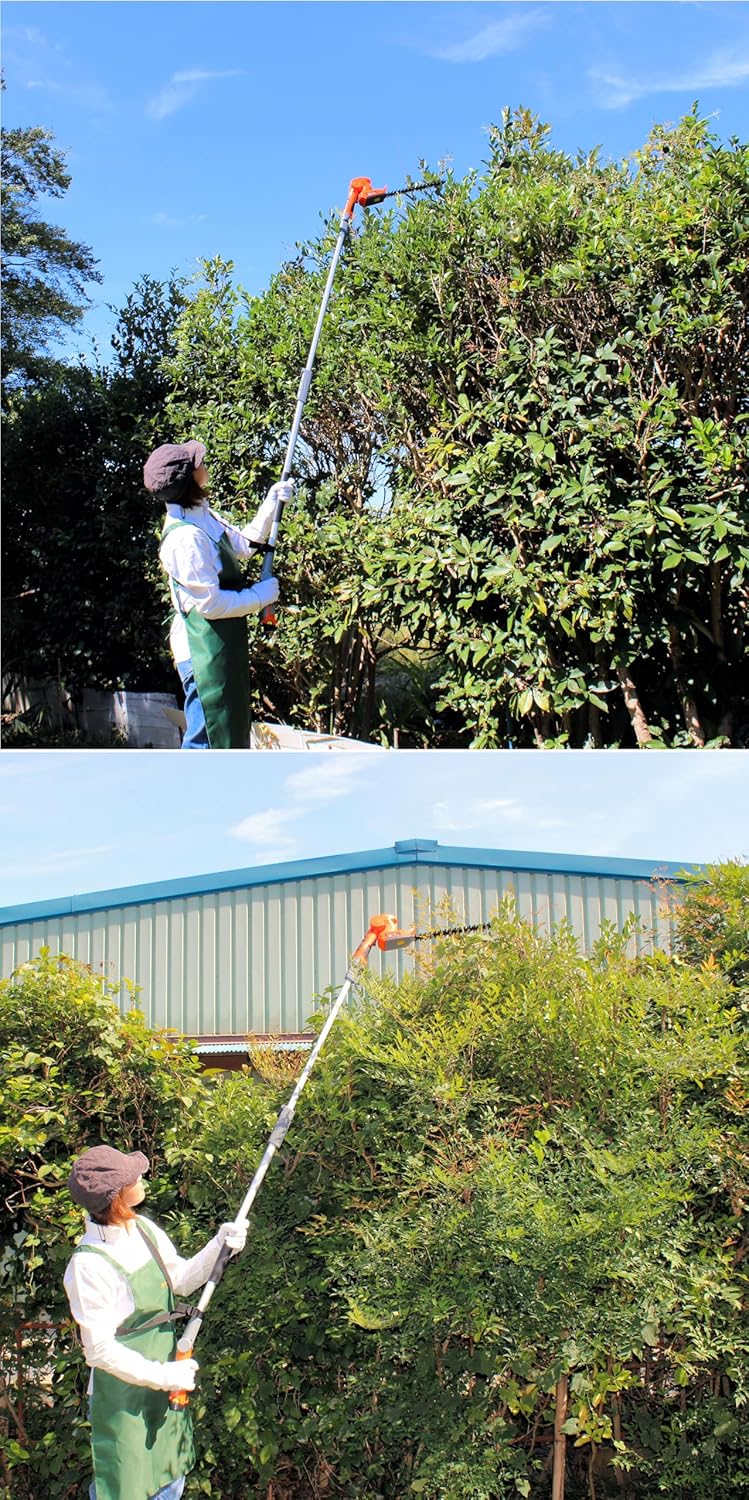
Figure 5.2: Demonstrating the reach of the extension pole for high and low trimming.
5.4 Trimming Techniques
- Hedge Trimming: Use smooth, sweeping motions to achieve an even cut. The 3D blade provides excellent cutting performance.
- Branch Cutting: The trimmer can cut branches up to 10mm in diameter. For thicker branches, use appropriate pruning tools.
- Grass/Lawn Trimming: For lower areas, the handheld mode is ideal. For wider areas, the pole can be used to reduce bending.

Figure 5.3: Handheld hedge trimming.

Figure 5.4: Pole trimming for ground cover.

Figure 5.5: Trimming high branches with the extension pole.

Figure 5.6: Detail of the 3D blade and maximum cutting diameter.
5.5 Product Video Demonstration
Video 5.1: Official demonstration of the YARDFORCE 2WAY Hedge Trimmer III in use, showcasing its features and versatility for various gardening tasks.
6. Maintenance
- Blade Cleaning: After each use, clean the blades with the provided brush to remove sap and debris. Apply a light coat of oil to prevent rust.
- Battery Charging: Charge the battery after each use. A full charge takes approximately 120 minutes.
- Storage: Store the trimmer in a dry, secure place, out of reach of children. Ensure the blade cover is always in place during storage.
7. Troubleshooting
| Problem | Possible Cause | Solution |
|---|---|---|
| Trimmer does not start. | Battery not charged or improperly inserted. Safety switch not engaged. | Ensure battery is fully charged and correctly inserted. Press the lock-off button before squeezing the operating switch. |
| Reduced cutting performance. | Blades are dull or dirty. Cutting branches too thick. | Clean and lubricate blades. Sharpen blades if necessary. Do not attempt to cut branches exceeding 10mm diameter. |
| Tool stops during operation. | Overload protection activated. Battery low. | Release the trigger, remove the tool from the material, and restart. Charge the battery. |
8. Specifications
| Feature | Detail |
|---|---|
| Brand | Yard Force |
| Model Number | Y3LH-C30-P000A |
| Power Source | 12V Lithium-ion Battery (Cordless) |
| Color | Orange/Black |
| Product Dimensions (L x W x H) | 12 x 7 x 244 cm (with pole extended) |
| Main Unit Dimensions (W x H x L) | 7 x 12 x 63 cm |
| Pole Length (Extended) | 178 - 244 cm |
| Product Weight | Main unit: 1 kg, Extension pole: 0.8 kg, Battery: 180 g (Total approx. 1.98 kg) |
| Blade Length | 30 cm |
| Max Cutting Branch Diameter | 10 mm (Note: May vary depending on wood type and hardness) |
| Strokes Per Minute | 1500 rpm |
| Charging Time | Approx. 120 minutes |
| Continuous Operation Time | Approx. 50 minutes (no-load) |
| Materials | Nylon resin, Aluminum, Stainless steel |
| Country of Origin | China (American planned design) |
9. Warranty and Support
The main unit of this product comes with a 1-year warranty from the date of purchase. Please retain your proof of purchase for warranty claims.
For technical support, spare parts, or warranty inquiries, please contact your retailer or the Yard Force customer service department.


