
Parmida LED Technologies PLED-PDN12WMCCT-NL-16P
Parmida 6-Inch 5CCT Ultra-Thin LED Recessed Ceiling Light Instruction Manual
Model: PLED-PDN12WMCCT-NL-16P
Product Overview
The Parmida 6-Inch 5CCT Ultra-Thin LED Recessed Ceiling Light is designed for versatile indoor lighting applications. This canless wafer slim panel downlight features selectable color temperatures and a dedicated night light mode, providing adaptable illumination for various environments. Its low-profile design allows for installation in spaces with limited clearance.
Safety Information
- Always turn off power at the circuit breaker before beginning installation or maintenance.
- Installation should be performed by a qualified electrician or in accordance with local electrical codes.
- Ensure the product's voltage rating matches your electrical supply (108-132 Volts AC).
- Do not modify the fixture or its components.
- This product is rated for direct contact with insulation (IC-Rated) and is airtight.
- Do not install in wet locations. This product is for indoor use only.
Package Contents
Each package of Parmida 6-Inch 5CCT Ultra-Thin LED Recessed Ceiling Lights includes:
- Ultra-Thin LED Recessed Ceiling Light fixture
- Ultra-slim Junction Box with wire nut connectors
- Spring-loaded clips (pre-attached to fixture)
- Cable connecting fixture to junction box
- Cut-out template
Specifications
| Feature | Detail |
|---|---|
| Brand | Parmida LED Technologies |
| Model Number | PLED-PDN12WMCCT-NL-16P |
| Wattage | 15W |
| Brightness | 1200 Lumens |
| Color Temperature (CCT) | 2700K (Warm White), 3000K (Soft White), 3500K (Neutral White), 4000K (Cool White), 5000K (Day Light) |
| Night Light Feature | 3W, 2000K Ambient Backlight |
| Dimmability | 100-5% smooth dimming (compatible with most LED dimmers) |
| Voltage | 108-132 Volts AC |
| Material | Aluminum |
| Product Dimensions | 6.7"L x 6.7"W x 0.9"H |
| Cut-out Hole Required | 6.2 inches |
| Clearance Required | 2 inches (minimum) |
| Certifications | ETL-Listed, IC-Rated Airtight |
| Usage | Indoor use only |
Installation Guide
Follow these steps for proper installation of your Parmida LED Recessed Ceiling Light. Ensure power is OFF at the circuit breaker before starting any electrical work.
Prepare the Ceiling Hole
Use the provided cut-out template to mark the desired location on the ceiling. The template indicates a required hole diameter of 6.2 inches. Carefully cut the hole using an appropriate tool, such as a drywall saw or hole saw.

Image: Marking the ceiling with the provided 6.2-inch cut-out template.
Wire the Junction Box
Fish the electrical wires from the ceiling through the cut-out hole. Open the junction box and remove one of the knockouts on the side plate. Connect the black wire from your electrical supply to the black wire in the junction box (live), the white wire to the white wire (neutral), and the bare copper or green wire to the green wire (ground) using the provided easy connectors. Ensure all connections are secure. Close the junction box cover.

Image: Detailed view of electrical connections within the junction box, showing wire nuts and ground wire.
Insert Junction Box and Connect Fixture
Carefully push the wired junction box through the cut-out hole into the ceiling. Connect the cable from the light fixture to the junction box by tightening the nut connector. Ensure the connection is firm.
Secure the Light Fixture
Pull the spring clips on the light fixture upwards. Insert the fixture into the cut-out hole. The spring clips will automatically snap down and secure the luminaire flush against the ceiling.

Image: Step-by-step visual guide for the installation process, from cutting the hole to securing the light fixture.
Installation Video Guide
For a visual guide on the installation process, please refer to the official "Slim Panel Installation" video below:
Video: Official Parmida Brands "Slim Panel Installation" guide, demonstrating the step-by-step process for installing the recessed light fixture.
Operating Instructions
Color Temperature Selection (5CCT)
The light fixture offers five selectable color temperatures. Before installation, use the CCT toggle switch located on the junction box to choose your desired color temperature:
- 2700K (Warm White)
- 3000K (Soft White)
- 3500K (Neutral White)
- 4000K (Cool White)
- 5000K (Day Light)
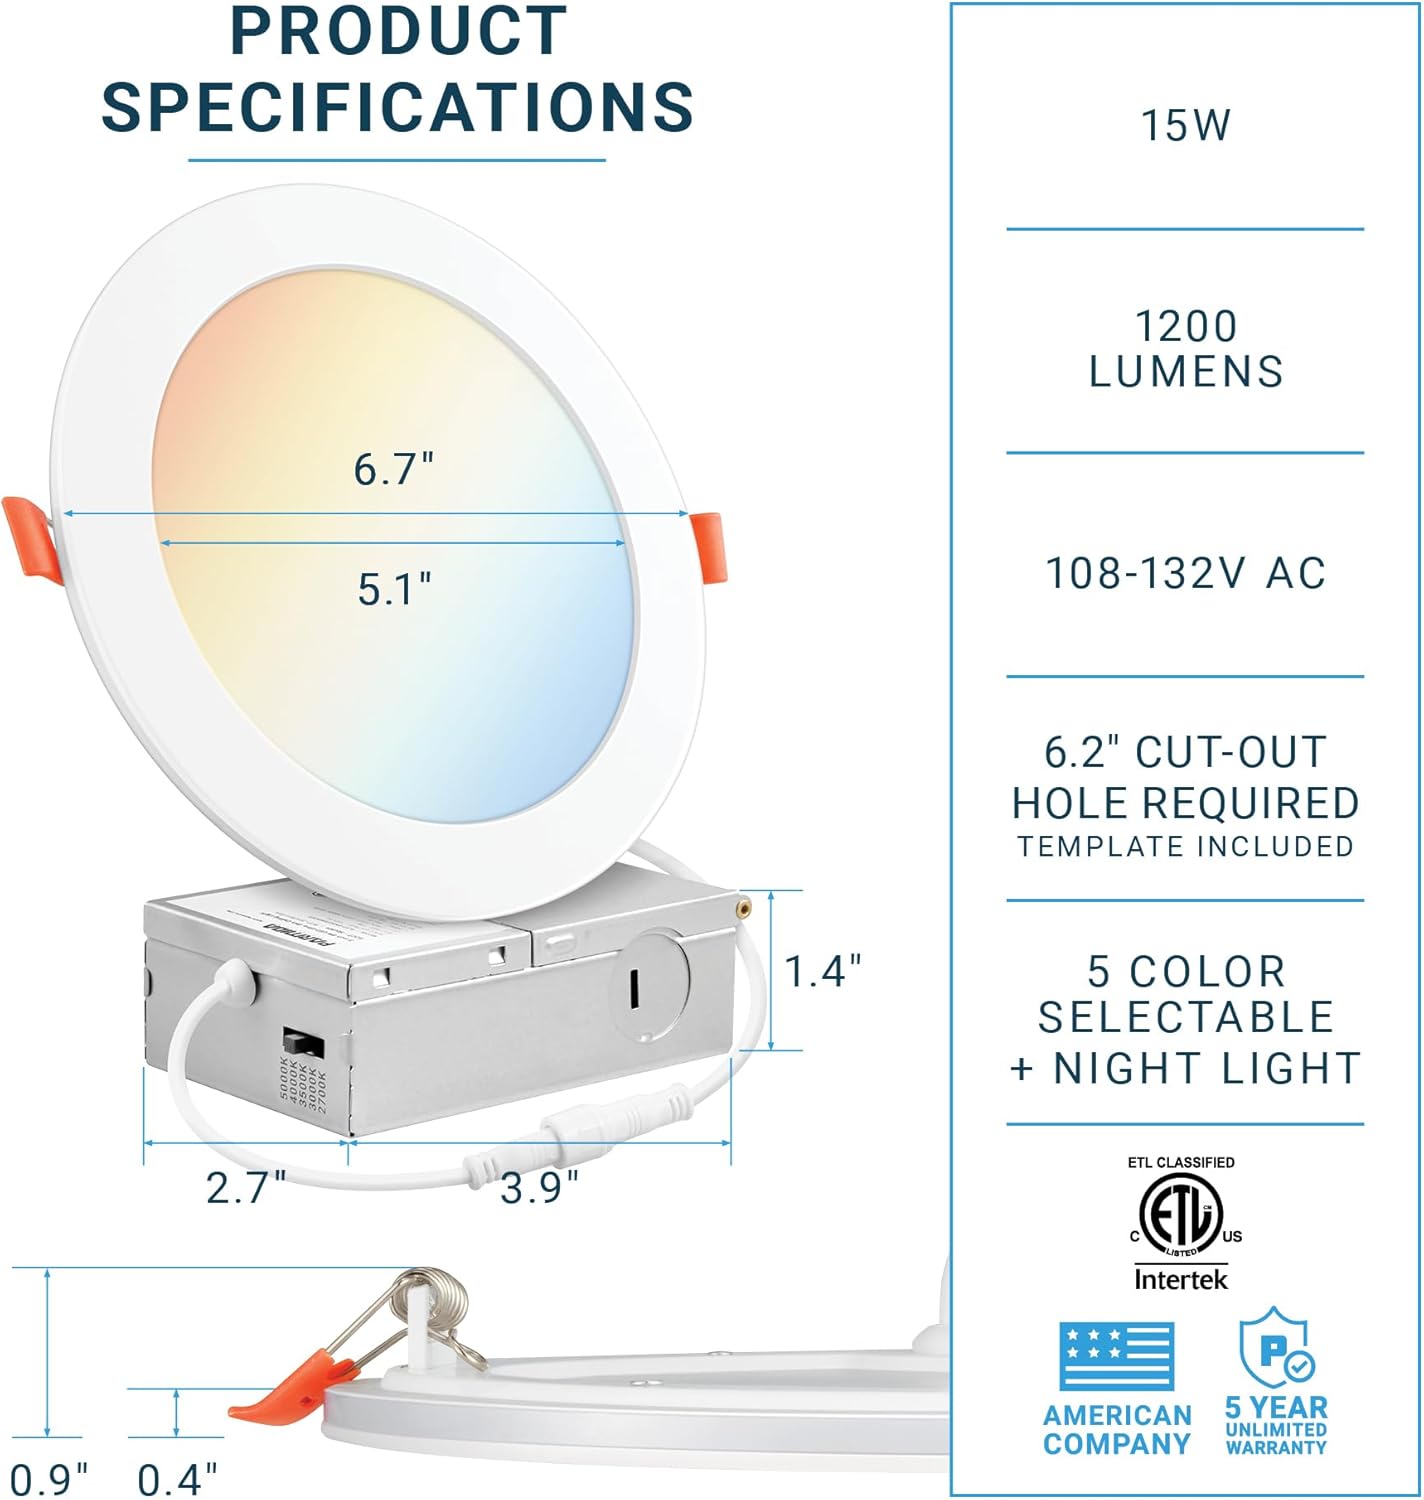
Image: The CCT toggle switch on the junction box, allowing selection of five different color temperatures.
Night Light Feature (2000K)
To activate the 3W 2000K ambient backlight (night light mode):
- Turn the light switch OFF.
- Wait for approximately 3 seconds.
- Turn the light switch ON. The light will illuminate in 2000K night light mode.
To switch back to the main light (selected CCT) from night light mode, or to activate the main light directly:
- Turn the light switch OFF.
- Turn the light switch ON within 1 second. The light will illuminate in the previously selected main CCT mode.

Image: Visual comparison of the room ambiance with the 2000K night light and the main 5CCT light.
Dimming Functionality
This fixture is dimmable from 100% down to 5%. For optimal performance, use with compatible LED dimmers. Refer to the dimmer manufacturer's instructions for specific wiring and operation details.
Maintenance
The Parmida LED Recessed Ceiling Light requires minimal maintenance. To clean the fixture:
- Ensure power is OFF at the circuit breaker before cleaning.
- Use a soft, dry cloth to wipe the surface of the light.
- Do not use abrasive cleaners, solvents, or cleaners containing alcohol, as these may damage the finish or electrical components.
Troubleshooting
| Problem | Possible Cause | Solution |
|---|---|---|
| Light does not turn on. | No power supply; Loose wiring; Faulty switch. | Check circuit breaker. Verify all wire connections are secure. Test the switch. |
| Light flickers or hums. | Incompatible dimmer; Loose wiring. | Ensure dimmer is compatible with LED fixtures. Check wire connections. |
| Night light mode not activating. | Incorrect switch sequence. | Turn switch OFF, wait 3 seconds, then turn ON. |
| Light stuck in night light mode. | Incorrect switch sequence to return to main light. | Turn switch OFF, then turn ON within 1 second. |
Warranty and Support
This Parmida LED Recessed Ceiling Light is protected by a 5-Year Unlimited Warranty. For warranty claims or technical support, please contact Parmida LED Technologies directly. Refer to the official Parmida website or your purchase documentation for contact information.
Additional Resources
For more detailed information, you can download the official PDF documents:
Related documentsPLED-PDN12WMCCT-NL-16P


Ask a question about this manual
Ask about setup, troubleshooting, compatibility, parts, safety, or missing instructions. Manuals+ will review the question and use this page’s manual context to help answer it.