Introduction
Thank you for choosing the RAINPOINT Sprinkler Timer. This programmable water timer is designed to simplify your garden and lawn watering, offering automatic, manual, and rain delay modes. With its easy-to-read LCD screen and intuitive controls, managing your irrigation has never been easier. This manual provides detailed instructions for setting up, operating, and maintaining your new sprinkler timers.

Image: Two RAINPOINT Sprinkler Timers, highlighting their compact design and digital displays.
Safety Information
- Do not immerse the timer in water. It is designed to be water-resistant (IP54), not submersible.
- Use only 2 AAA alkaline batteries (not included). Do not mix old and new batteries or different battery types.
- Ensure all connections are tight to prevent leaks.
- Do not expose the timer to freezing temperatures. Remove from faucet and store indoors during winter.
- Keep out of reach of children.
Package Contents
- RAINPOINT Sprinkler Timer (x2)
- User Manual (x1)
Note: 2 AAA alkaline batteries are required for each timer and are not included in the package.
Setup
1. Battery Installation
- Locate the battery compartment on the back of the timer.
- Slide the battery tray out.
- Insert two new AAA alkaline batteries, ensuring correct polarity (+/-).
- Slide the battery tray back into the compartment until it clicks securely.
2. Attaching the Timer to the Faucet
- Ensure the faucet is clean and free of debris.
- Screw the timer's inlet (top connector) onto your outdoor faucet or hose bib. Hand-tighten only. Do not overtighten.
- The timer features an upgraded anti-leakage design with increased thread engagement for a tighter fit.
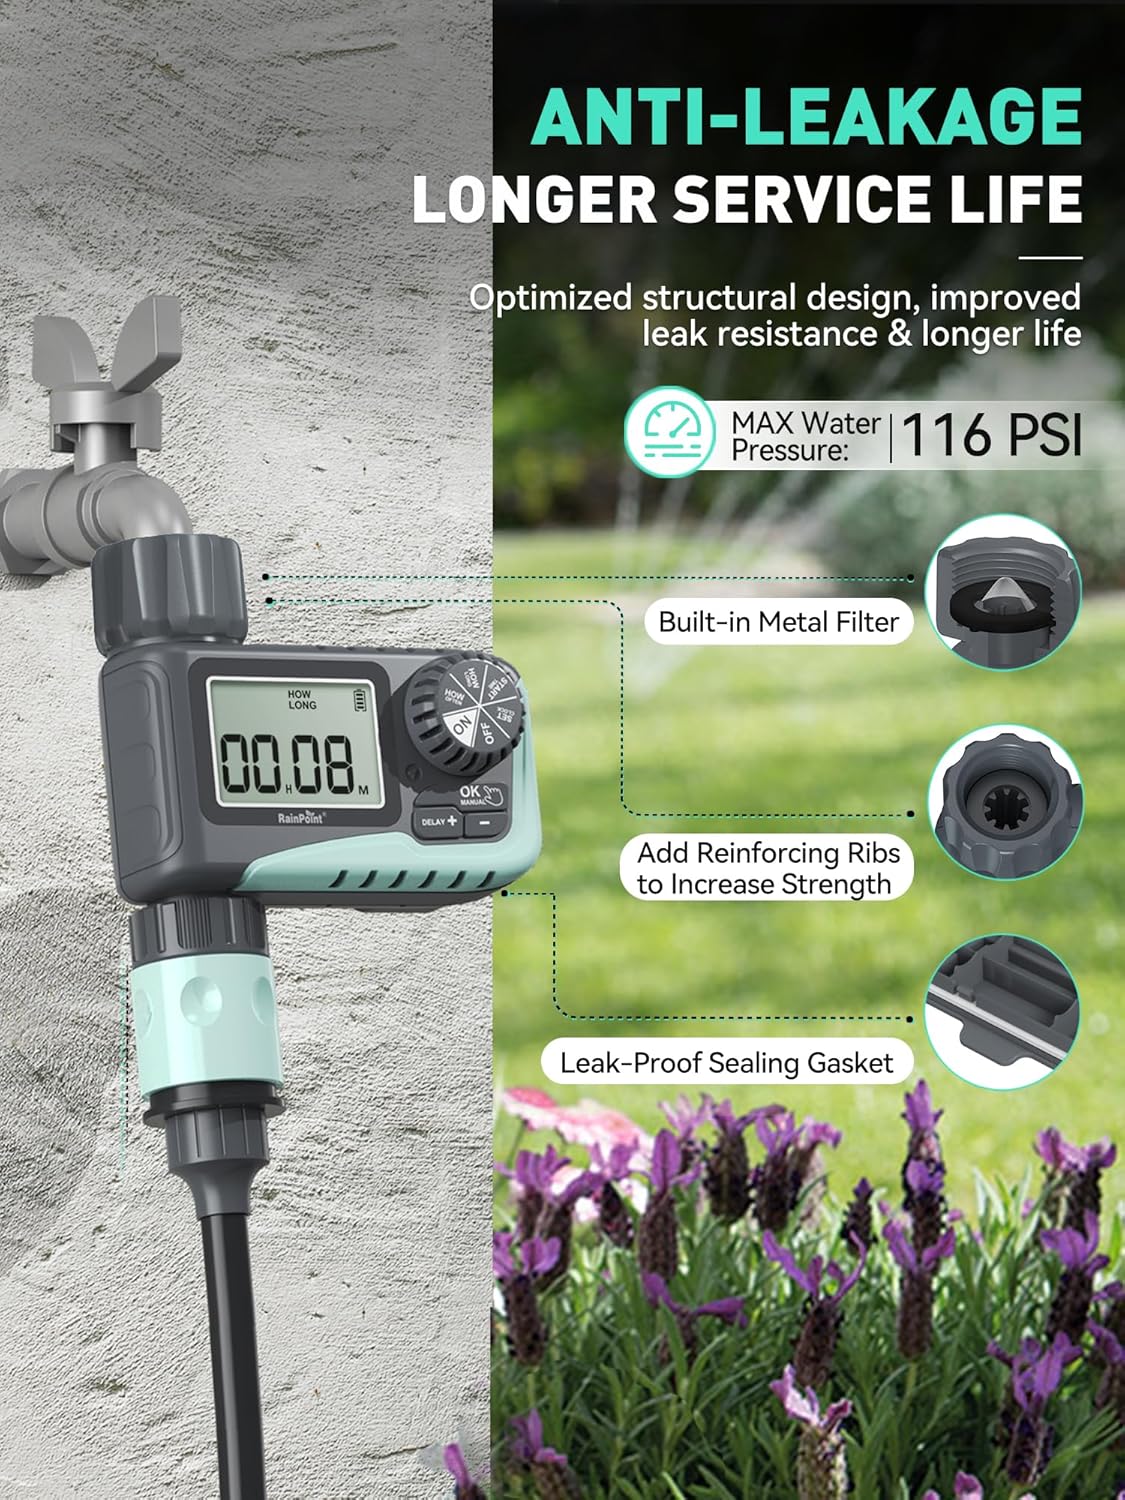
Image: The sprinkler timer connected to a faucet, illustrating its anti-leakage design and built-in metal filter for debris prevention.
3. Connecting the Hose
- Screw your garden hose onto the timer's outlet (bottom connector). Hand-tighten only.
- The timer is designed to withstand up to 116 PSI water pressure.
Operating Instructions
The RAINPOINT Sprinkler Timer features a large LCD screen and a rotary dial for easy programming. The dial allows you to select different modes, and the buttons below the screen are used for adjustments.

Image: A close-up view of the timer's large LCD display and user-friendly rotary dial, emphasizing ease of setup and reading.
1. Setting the Clock
- Turn the dial to "SET CLOCK".
- Use the "+" and "-" buttons to adjust the current time.
- Press "OK" to confirm and move to the next setting.
2. Programming Automatic Watering
This mode allows you to set a customized watering schedule.
- Turn the dial to "START TIME". Use "+" and "-" to set the desired start time for watering. Press "OK".
- Turn the dial to "HOW LONG". Set the watering duration from 1 minute to 3 hours 59 minutes. Press "OK".
- Turn the dial to "HOW OFTEN". Choose the watering frequency:
- Every 1h to 12h (e.g., every 6 hours)
- Every 1 day to 7 days (e.g., every 2 days)
- Turn the dial to "ON" to activate the programmed schedule.

Image: The timer's display showing options for setting watering duration and frequency, including hourly and daily cycles.
3. Manual Watering Mode
Use this mode for immediate, on-demand watering without affecting your programmed schedule.
- Turn the dial to "ON".
- Press the "MANUAL" button.
- Use "+" and "-" to set the desired manual watering duration (1 minute to 8 hours).
- Press "OK" to start manual watering. The timer will automatically return to its programmed schedule after the manual watering is complete.
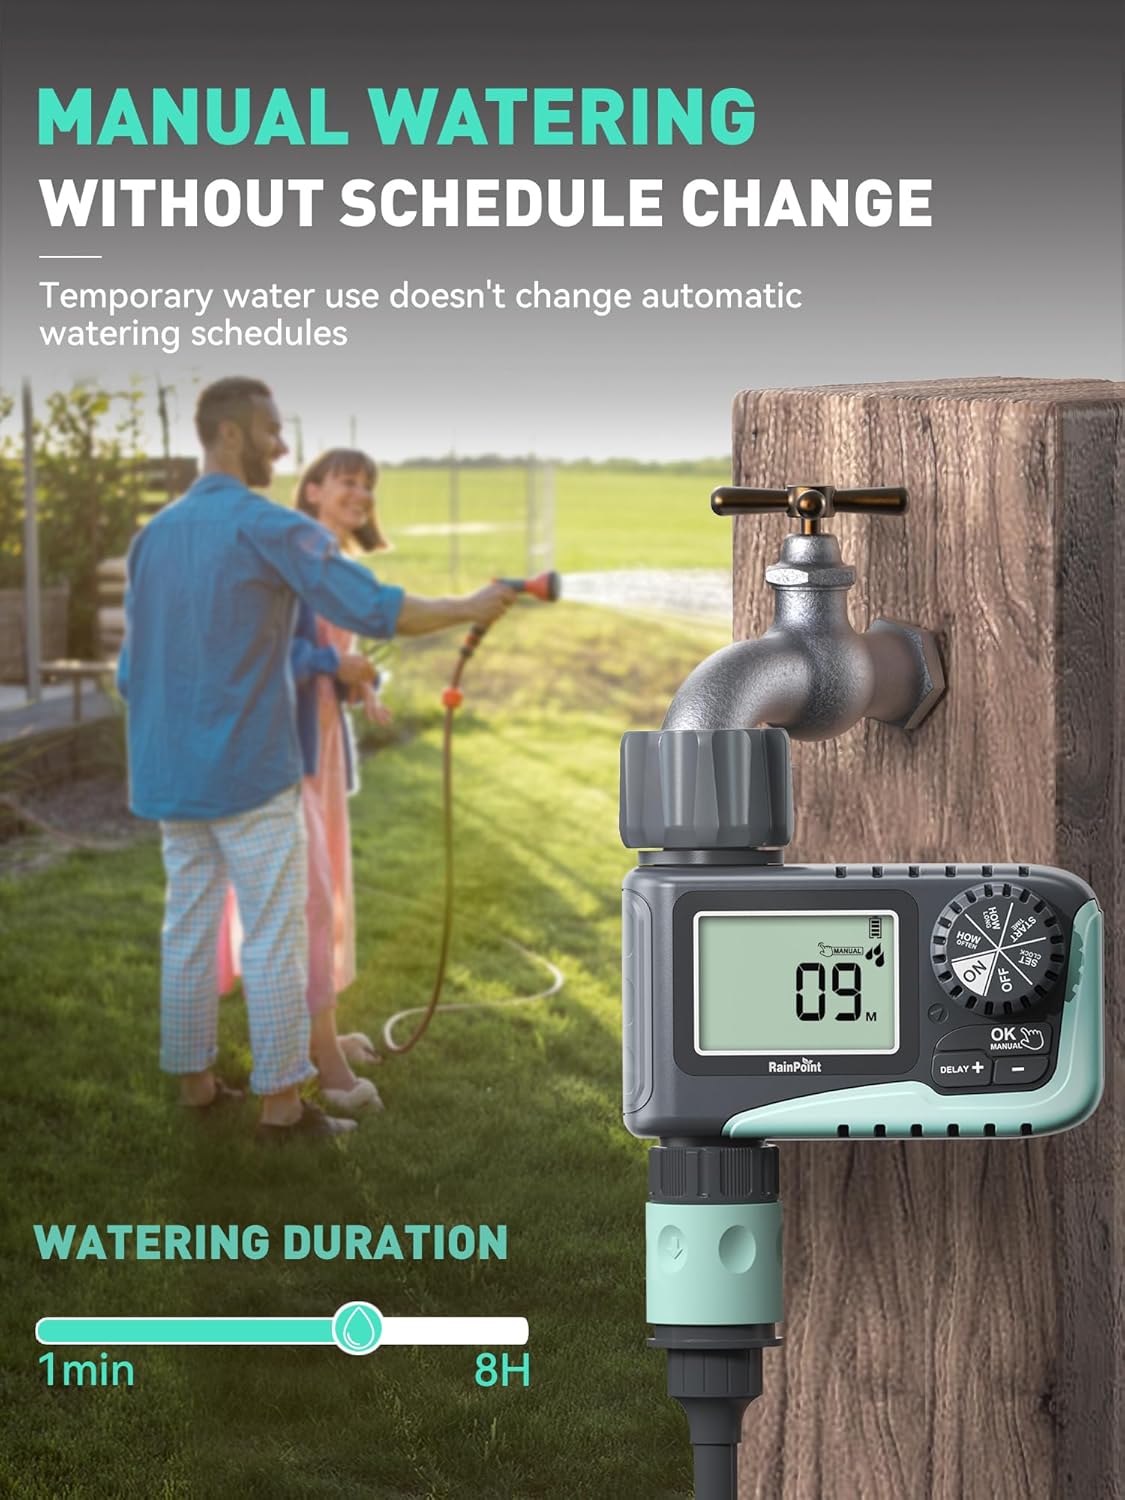
Image: A person manually watering a garden using the RAINPOINT Sprinkler Timer, demonstrating the manual mode functionality.
4. Rain Delay Mode
This feature allows you to pause your watering schedule during rainy periods to conserve water and prevent overwatering.
- Turn the dial to "ON".
- Press the "DELAY +" button.
- Each press will increase the delay by 24 hours (options: 24h, 48h, 72h).
- The timer will automatically resume its programmed schedule after the selected delay period.

Image: The sprinkler timer displaying a rain delay countdown, set against a backdrop of a rainy garden, illustrating its water-saving feature.
5. Turning Off the Timer
- Turn the dial to "OFF". This will stop all watering programs.
Maintenance
Battery Life and Replacement
- The timer is designed for long battery life (up to 365 days).
- The LCD screen will display a low power indicator when batteries need replacement.
- When the battery is low, the valve will automatically close to prevent flooding and water waste.
- Replace batteries promptly when the low power indicator appears. Your programmed settings will be saved during battery replacement.

Image: The timer's display indicating low battery, with an icon showing the valve automatically closing to prevent flooding, emphasizing its low power auto-shutoff feature.
Cleaning the Filter
- The timer has a built-in metal filter at the inlet to prevent debris from entering the irrigation system.
- Periodically check and clean the filter to ensure optimal water flow and prevent blockages.
- Unscrew the timer from the faucet, remove the filter, rinse it under running water, and reinsert.
Winter Storage
- Before the first frost, remove the timer from the faucet.
- Drain any remaining water from the timer.
- Store the timer indoors in a dry, frost-free location.
Troubleshooting
| Problem | Possible Cause | Solution |
|---|---|---|
| Timer not turning on/display blank. | Dead or incorrectly installed batteries. | Replace with new AAA alkaline batteries, ensuring correct polarity. |
| No water flow. | Faucet is off; low water pressure; clogged filter; incorrect programming. | Ensure faucet is fully open. Check water pressure. Clean the inlet filter. Verify programming settings. |
| Timer is leaking. | Loose connection; damaged washer; cracked housing. | Ensure connections are hand-tight. Check rubber washer for damage and replace if necessary. If housing is cracked, contact support. |
| Watering schedule not starting. | Timer is in "OFF" or "MANUAL" mode; incorrect start time/frequency. | Turn the dial to "ON". Recheck and adjust your programmed start time and frequency. |
Specifications
- Brand: RAINPOINT
- Model: ITV 107 (Based on video information)
- Material: Plastic
- Color: Green
- Product Dimensions: 5"D x 4"W x 4.8"H
- Item Weight: 1.3 pounds (for the pack, likely)
- Power Source: 2 x AAA Alkaline Batteries (not included)
- Watering Duration: 1 minute to 3 hours 59 minutes (Automatic), 1 minute to 8 hours (Manual)
- Watering Frequency: Every 1-12 hours or Every 1-7 days
- Rain Delay Options: 24h, 48h, 72h
- Max Water Pressure: 116 PSI
- Water Resistance: IP54
Warranty and Support
RAINPOINT products are designed for quality and reliability. For any questions, technical support, or warranty claims, please contact RAINPOINT customer service. Refer to the contact information provided in your product packaging or visit the official RAINPOINT website for assistance.
You can also visit the RAINPOINT Store on Amazon for more information and support resources.


