
1. Introduction
This manual provides essential information for the safe and effective operation, setup, and maintenance of your Reboot RBC6000D PRO 8th Generation Plasma Cutter. Please read this manual thoroughly before using the equipment to ensure proper function and safety.
2. Safety Information
Plasma cutting involves high voltage, high temperatures, and intense light. Failure to follow safety precautions can result in serious injury or death.
- Always wear appropriate personal protective equipment (PPE), including a welding helmet with proper shade, flame-resistant clothing, gloves, and safety shoes.
- Ensure adequate ventilation to remove fumes and gases produced during cutting.
- Never operate the plasma cutter in wet conditions or near flammable materials.
- Ensure the workpiece is properly grounded.
- Do not touch live electrical parts or hot metal.
- Keep children and unauthorized personnel away from the work area.
- Disconnect power before performing any maintenance or changing consumables.
3. Package Contents
Verify that all items are present in the package:
- RBC6000D-PRO Plasma Cutter (120/240V with conversion line)
- Upgrade PT31 Torch
- Earth Ground Clamp
- Air Regulator Set
- Air Hose and Manual
- 14pcs Extra Consumables (tips, electrodes, endcaps)

Image: The Reboot RBC6000D PRO Plasma Cutter shown with all included accessories, such as the plasma torch, ground clamp, air regulator, air hose, and various consumables.
4. Product Overview
The Reboot RBC6000D PRO is an 8th Generation plasma cutter featuring IGBT inverter technology, dual voltage capability (120V/240V), and a high-frequency touch arc starting mode. It is designed for efficient metal cutting with a maximum clean cut of 3/5 inch and severance cut of 4/5 inch.
Key Features:
- Touch Arc Start: High-frequency starting mode where the torch head touches the metal plate.
- Large Digital Screen: Displays real-time parameters including air pressure, post air settings, and current.
- Air Pressure Sensor: Integrated sensor indicates appropriate air pressure with a green light, or red for too high/low pressure.
- Dual Voltage: Operates on 120V (15-35A) or 240V (15-60A).
- Post Air Function: Adjustable cooling time (3-15 seconds, recommended 4-8 seconds) for torch consumables.
- 2T/4T Function: 2T for semi-automatic cutting, 4T for automatic cutting.
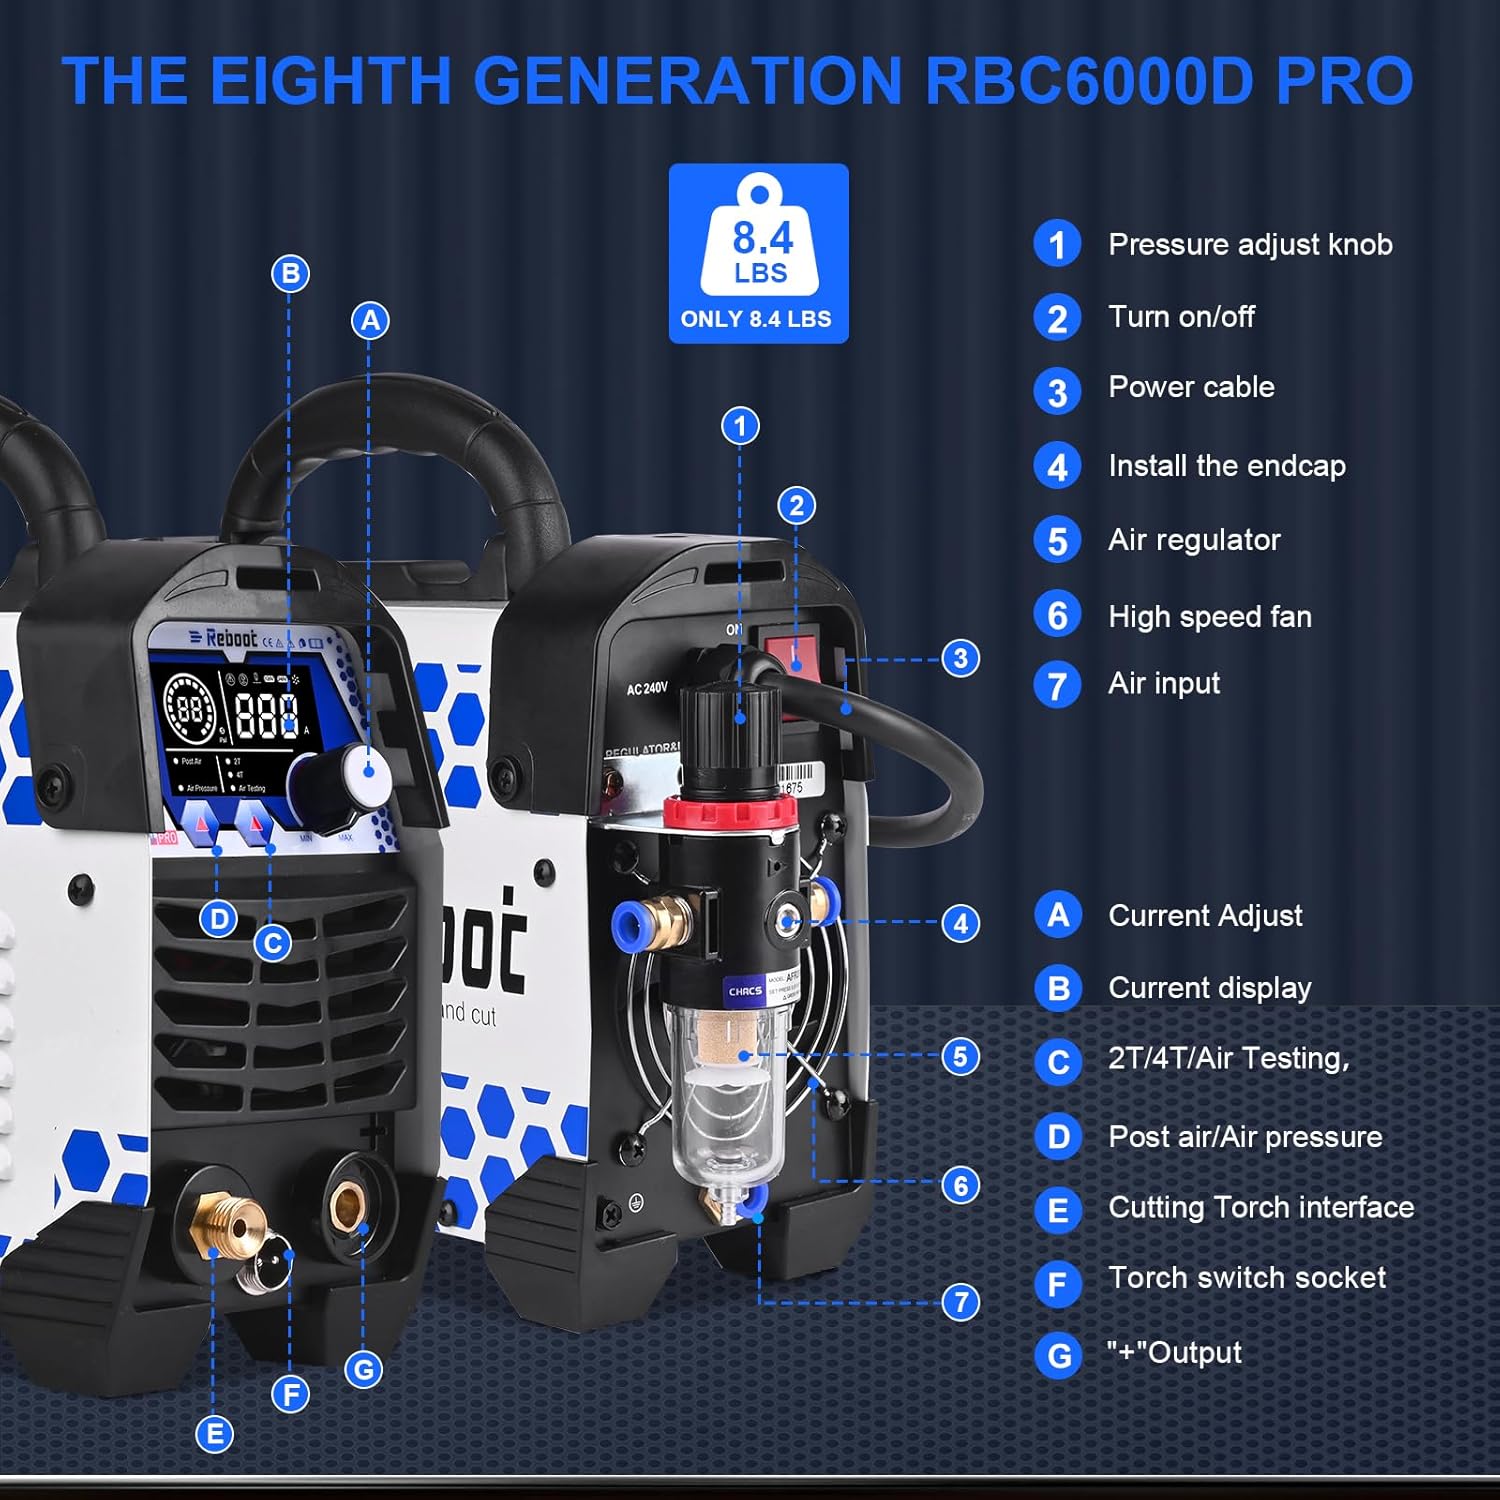
Image: Labeled diagram of the plasma cutter showing the pressure adjust knob, on/off switch, power cable, air regulator, high speed fan, air input, current adjust, current display, 2T/4T/Air Testing button, post air/air pressure display, cutting torch interface, and torch switch socket.

Image: Close-up of the intelligent digital screen display, showing air pressure (PSI), current (Amps), and indicators for Post Air, 2T, 4T, and Air Testing functions.
5. Setup
Follow these steps to set up your plasma cutter:
- Unpacking: Carefully remove the plasma cutter and all accessories from the packaging.
- Power Connection: Connect the power cable to an appropriate 120V or 240V power source. Use the provided conversion line if switching between voltages.
- Air Compressor Connection: An air compressor (minimum 90 PSI, 60 L/min) is required. Connect the air hose from your compressor to the air filter regulator, then connect the regulator to the plasma cutter's air input.

Image: Illustration showing the quick connector for the air hose, simplifying the connection between the air compressor, air filter regulator, and the plasma cutter.
- Torch and Ground Clamp Connection: Connect the plasma torch to the cutting torch interface and the ground clamp to the designated ground terminal.
- Air Regulator Installation: The plasma cutter has a built-in air pressure sensor. The included air regulator does not require an additional gauge.

Image: The air filter regulator, indicating that it does not require an additional pressure gauge as the machine has a built-in sensor and displays air pressure on its LED panel.
6. Operating Instructions
6.1 Power On/Off
- Turn the main power switch to the 'ON' position. The digital screen will light up after approximately four seconds.
- To power off, turn the main switch to 'OFF'. The screen will go off after about six seconds.
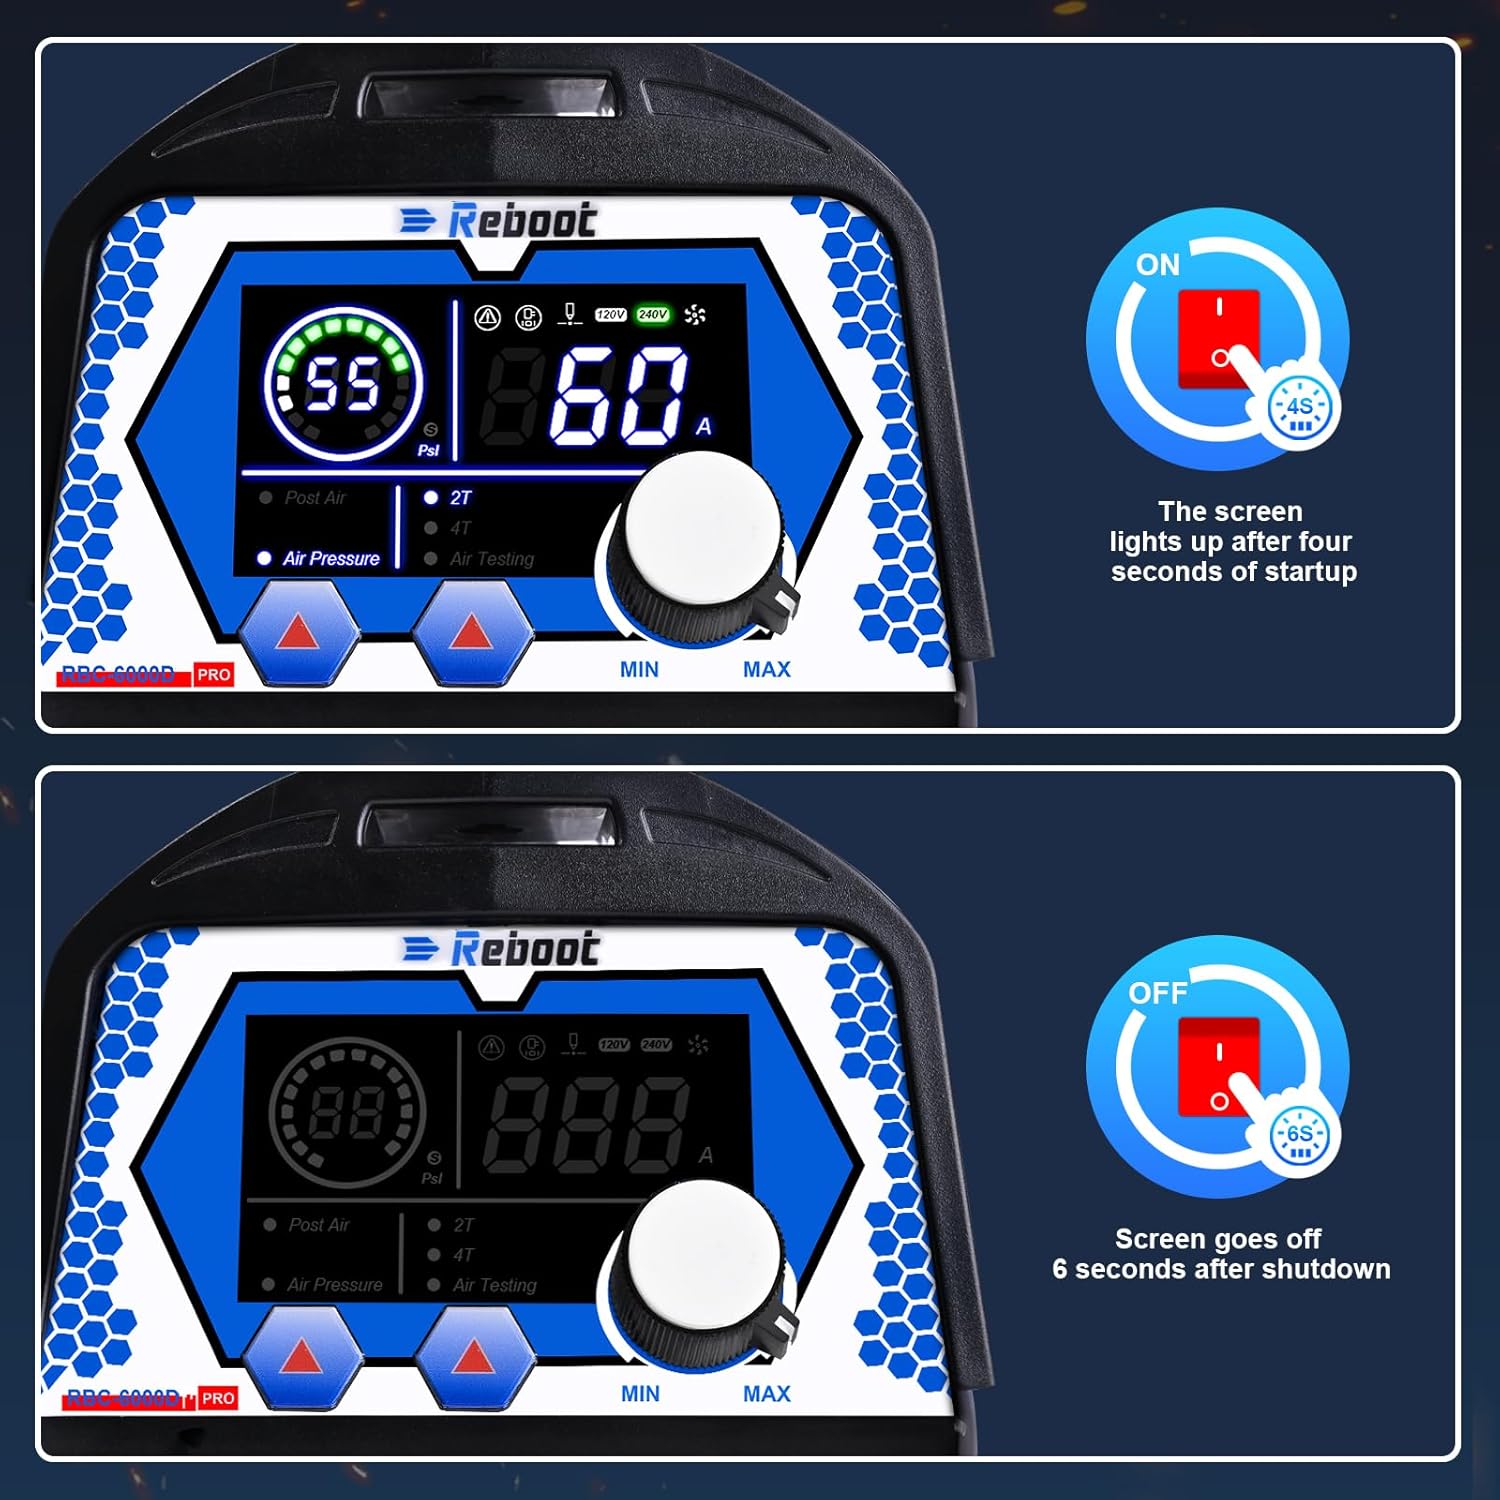
Image: Two panels illustrating the digital screen's behavior during startup (lights up after 4 seconds) and shutdown (goes off after 6 seconds).
6.2 Adjusting Air Pressure
- The digital screen displays the current air pressure.
- Adjust the air pressure using the regulator until the green light on the screen indicates the pressure is within the normal operating range.
- A red light indicates air pressure is too high or too low.

Image: Four panels showing the digital screen indicating appropriate air pressure (green light), no air connected (E06 error code), air pressure too low, and air pressure too high.
6.3 Adjusting Cutting Current
- Use the current adjust knob to set the desired amperage for your cutting task.
- Current range at 120V is 15-35A.
- Current range at 240V is 15-60A.
6.4 2T/4T Function
- 2T (Two-Touch): For semi-automatic cutting. Press and hold the torch trigger to start cutting, release to stop.
- 4T (Four-Touch): For automatic cutting. Press the trigger once to start, release, and press again to stop. This function is useful for longer cuts as it frees your finger from holding the trigger.

Image: An illustration explaining the 2T and 4T functions, showing how they control the cutting process for semi-automatic and automatic operation, respectively.
6.5 Post Air Function
- Post air adjusts the cooling time for the torch head after cutting stops, extending consumable lifespan.
- Adjustable range: 3-15 seconds.
- Recommended range: 4-8 seconds.
6.6 Cutting Guidelines
- Maximum cutting thickness: 14mm (approx. 3/5 inch) at 35A (120V, 50 PSI).
- Maximum cutting thickness: 20mm (approx. 4/5 inch) at 60A (240V, 60 PSI).

Image: The Reboot RBC6000D PRO Plasma Cutter in use, demonstrating its cutting capabilities on metal, with text indicating maximum cutting thicknesses at different voltages and amperages.
7. Maintenance
Regular maintenance ensures optimal performance and extends the life of your plasma cutter.
- Consumables: Regularly inspect the torch consumables (tips, electrodes, shield cups) for wear and replace them as needed. Worn consumables can affect cut quality and efficiency.
- Air Filter Regulator: Periodically check and drain any accumulated moisture from the air filter regulator. Clean or replace the filter element if it becomes clogged.
- Cleaning: Keep the plasma cutter clean and free from dust and debris. Use compressed air to blow out internal components if necessary, ensuring the unit is unplugged.
- Cables and Connections: Inspect all cables and connections for damage or loose fittings. Repair or replace any damaged parts immediately.
8. Troubleshooting
This section addresses common issues you might encounter.
8.1 Error Codes
- E06: Indicates no air connected or insufficient air pressure. Check air compressor connection, air hose, and regulator settings.
8.2 Common Issues and Solutions
- No Arc:
- Ensure the ground clamp is securely attached to the workpiece.
- Check power supply and connections.
- Verify air pressure is within the recommended range.
- Inspect torch consumables for wear and replace if necessary.
- Poor Cut Quality:
- Adjust cutting current and air pressure according to material thickness.
- Replace worn consumables.
- Ensure proper torch standoff distance from the workpiece.
- Machine Overheating:
- Allow the machine to cool down. The unit has thermal overload protection.
- Ensure adequate ventilation around the machine.
- Check for blocked air vents.
9. Specifications
| Specification | Value |
|---|---|
| Manufacturer | Reboot-US |
| Part Number | RBC6000-PRO |
| Item Model Number | RBC6000D-PRO |
| Item Weight | 14.21 pounds |
| Product Dimensions | 12.4 x 4.53 x 8.66 inches |
| Power Source | AC |
| Voltage | 120/240 Volts |
| Cutting Amperage (120V) | 15-35A |
| Cutting Amperage (240V) | 15-60A |
| Max Clean Cut (120V) | 14mm (approx. 3/5 inch) @ 35A, 50PSI |
| Max Clean Cut (240V) | 20mm (approx. 4/5 inch) @ 60A, 60PSI |
| Post Air Adjustment | 3-15 seconds (recommended 4-8 seconds) |
| Item Package Quantity | 1 |
10. Warranty and Support
Reboot provides a ONE YEAR AFTER-SALES warranty for the RBC6000D PRO Plasma Cutter. For technical support, warranty claims, or service inquiries, please contact Reboot customer service through their official channels or the retailer where the product was purchased.


