1. Introduction
This user manual provides detailed instructions for the installation, operation, and maintenance of your Brilvibera Large Motion Sensor Outdoor Wall Light. Designed for outdoor use, this fixture combines modern aesthetics with advanced motion sensing and dusk-to-dawn capabilities to enhance the safety and ambiance of your home's exterior.

Figure 1.1: Brilvibera Large Motion Sensor Outdoor Wall Light. This image shows the black-finished outdoor wall light with its clear glass panels, revealing two E12 bulb sockets inside. A motion sensor is visible at the top of the fixture.
2. Product Features
- Upgraded Sensor with 4 Lighting Modes: Features High, Low, Dusk to Dawn (DTD), and Manual Override modes for versatile lighting control.
- Large Size & Versatile Application: Measures 18 inches in height, suitable for porches, front doors, garages, entryways, balconies, and gardens.
- Modern Style & E12 Base Socket: Two-light modern design with clear lamp shades, compatible with 40W max E12-based bulbs (bulbs not included).
- Waterproof & Weather Resistance: Constructed from premium aluminum with an IP65 waterproof rating, ensuring durability against rain, snow, and extreme temperatures.
- ETL Certification: Guarantees superior quality and safe operation.
3. Package Contents
Please verify that all components are present before beginning installation:
- Brilvibera Outdoor Wall Light Fixture
- Mounting Hardware (screws, wire nuts, mounting plate)
- Shade (pre-installed)
- User Manual
4. Specifications
| Attribute | Value |
|---|---|
| Brand | Brilvibera |
| Model | Black-Motion Sensor |
| Color | Black |
| Material | Aluminum, Glass, Metal |
| Style | Modern, Classic, Contemporary, Mid-Century Modern |
| Light Fixture Form | Sconce |
| Product Dimensions | 18 inches (Height) |
| Specific Uses | Outdoor use only |
| Power Source | AC/DC |
| Installation Type | Surface Mount |
| Special Features | Energy Efficient, Motion Sensor, Waterproof |
| Control Method | Touch (via sensor settings) |
| Light Source Type | LED (compatible) |
| Finish Type | Matte |
| Shade Material | Glass |
| Number of Light Sources | 2 |
| Voltage | 120 Volts |
| Wattage (Max) | 40 watts per bulb |
| Bulb Base | E12 |
| Water Resistance Level | Waterproof (IP65) |
| Certifications | ETL Listed |
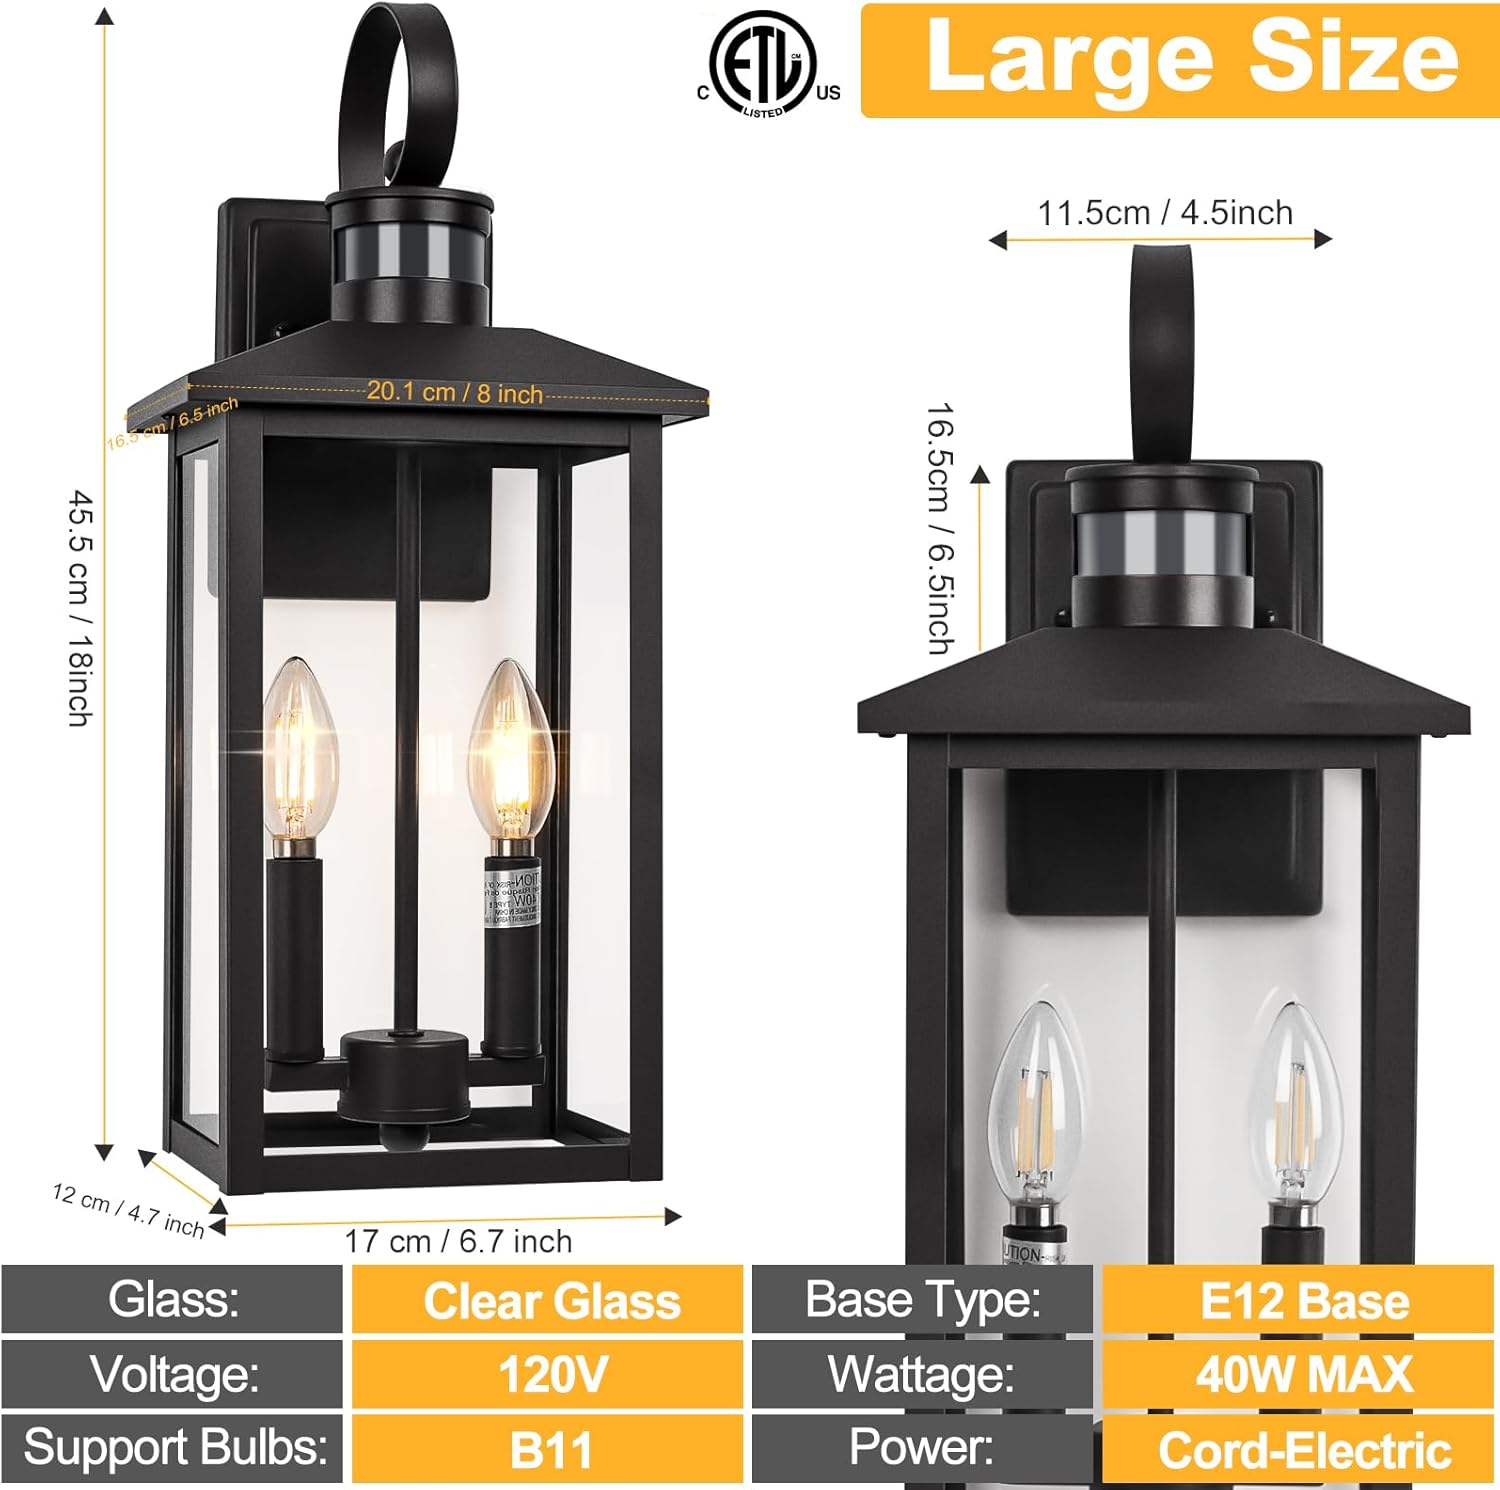
Figure 4.1: Product Dimensions. This image provides detailed measurements of the outdoor wall light, including its 18-inch height and other key dimensions for installation planning.
5. Safety Information
Please read and understand all instructions before installing or operating this fixture. Failure to do so may result in electric shock, fire, or other hazards that could cause injury or property damage.
- Always turn off power at the circuit breaker before installation or servicing.
- Consult a qualified electrician if you are unsure about the installation process.
- Ensure all electrical connections are secure and comply with local codes and ordinances.
- Do not exceed the maximum wattage specified for the bulbs (40W max E12).
- This fixture is designed for outdoor use only.
- Handle glass components with care to prevent breakage.
6. Setup and Installation
Follow these steps for proper installation of your outdoor wall light. It is recommended to have two people for installation for safety and ease.
- Prepare for Installation:
- Turn off the power to the light fixture at the main circuit breaker.
- Ensure the mounting surface is clean, dry, and structurally sound.
- Attach Mounting Plate:
- Secure the mounting plate to the junction box using the provided screws. Ensure the plate is level.
- Wire Connections:
- Connect the fixture's black wire to the house's black (live) wire.
- Connect the fixture's white wire to the house's white (neutral) wire.
- Connect the fixture's ground wire to the house's ground wire (or ground screw on the mounting plate).
- Secure all connections with wire nuts and wrap with electrical tape for added safety.
- Mount the Fixture:
- Carefully align the fixture with the mounting plate and secure it with the provided screws or nuts.
- Install Bulbs:
- Insert E12 base bulbs (not included) into the sockets. Do not exceed 40W per bulb.
- Restore Power:
- Turn the power back on at the circuit breaker.

Figure 6.1: Key Components. This image highlights the main parts of the light fixture, including the top handle, the dusk to dawn sensor, the E12 bulb base, and the durable aluminum construction.
7. Operating Instructions
Your Brilvibera outdoor wall light features an advanced sensor with multiple operating modes. The mode selection switch is located under the sensor cap at the top of the fixture.
7.1 Switching Lighting Modes
To change the lighting mode:
- Carefully unscrew the cap of the sensor located at the top of the light fixture.
- Locate the small switch inside the sensor housing.
- Slide the switch to select your desired mode: LOW, HIGH, or DTD (Dusk to Dawn).
- Screw the sensor cap back on securely.
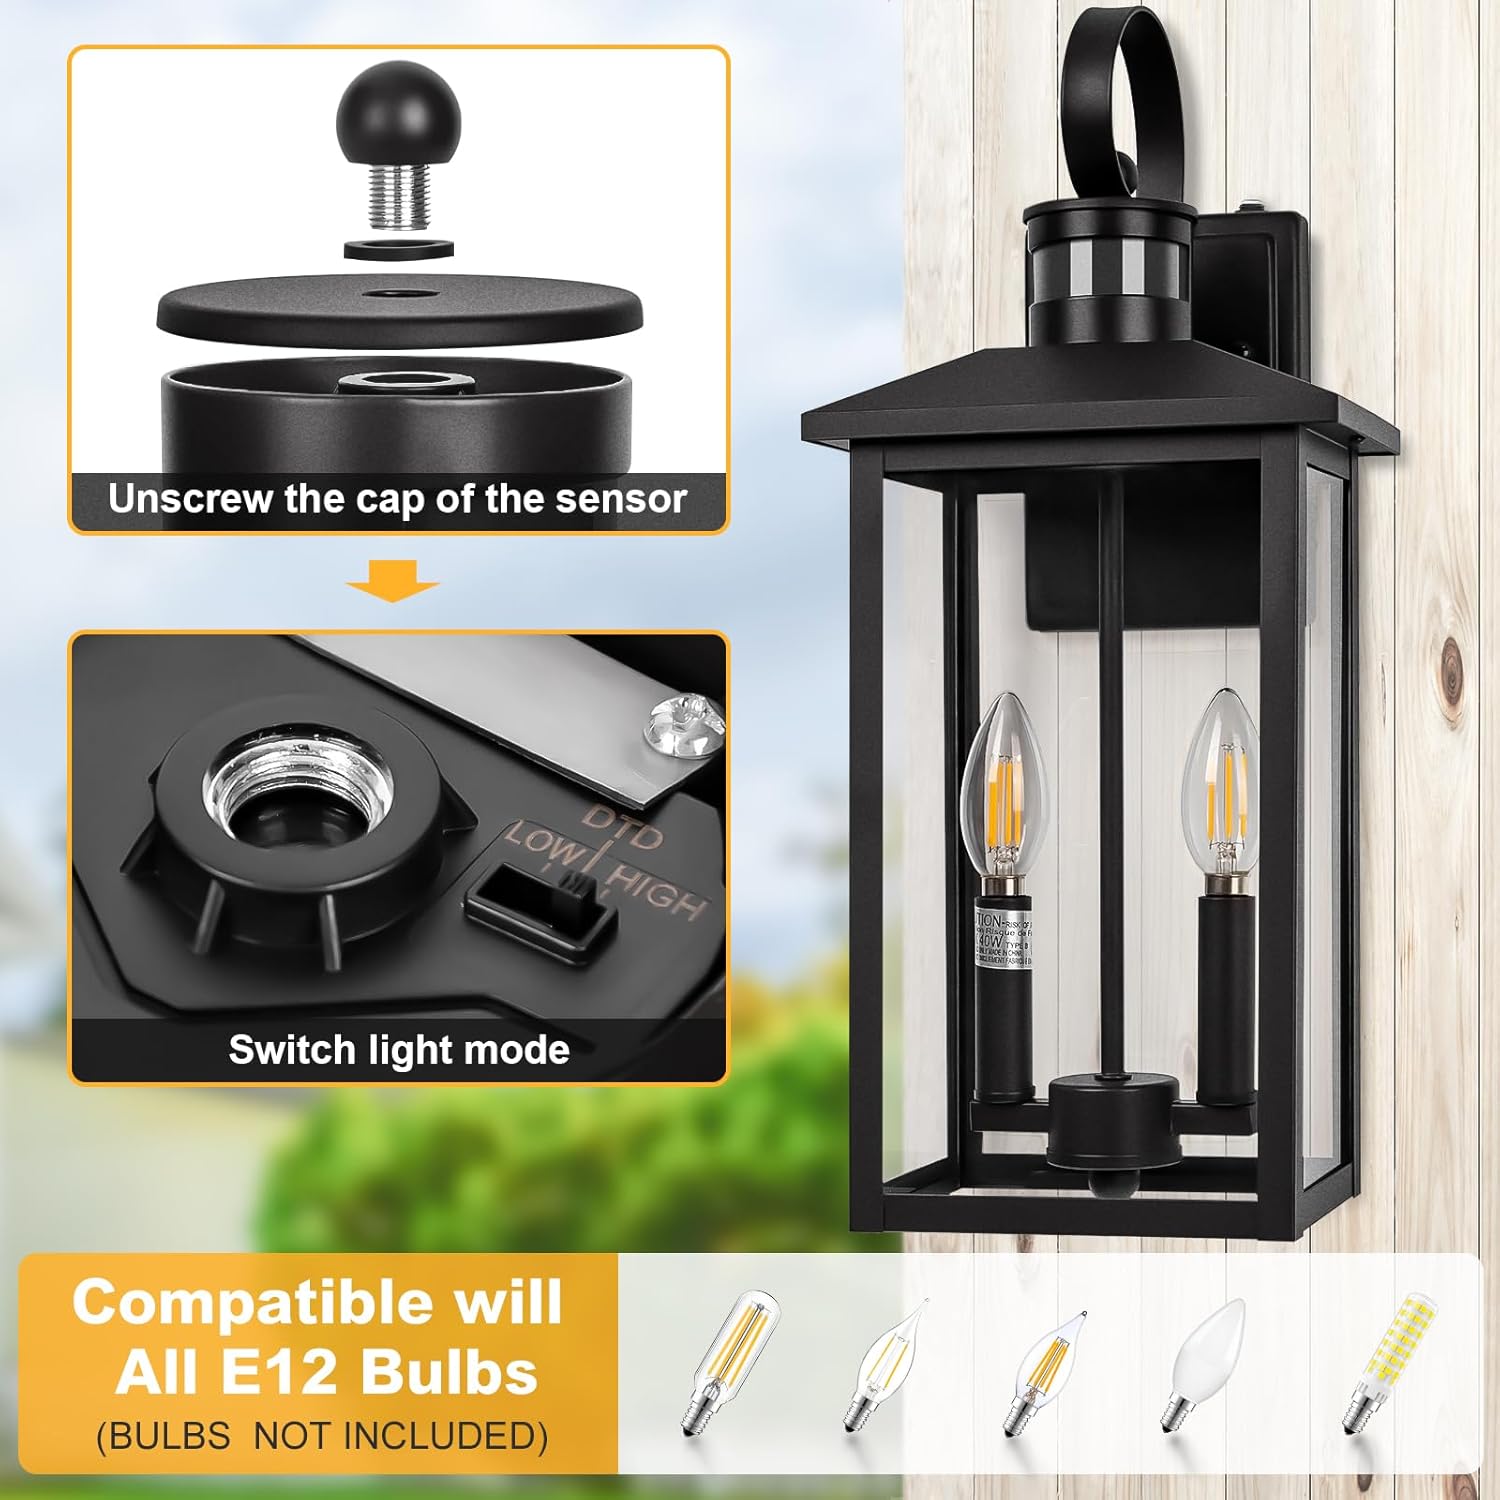
Figure 7.1: Switching Light Modes. This image illustrates the process of accessing the mode selection switch by unscrewing the sensor cap.
7.2 Lighting Modes Explained
- High Mode:
During nighttime, the light stays on at 30% brightness. When motion is detected, it automatically brightens to 100% for 120 seconds, then returns to 30% brightness if no further motion is detected.
- Low Mode:
During nighttime, the light remains off when no motion is detected. When motion is detected, it turns on to 100% brightness for 120 seconds, then turns off if no further motion is detected.
- DTD (Dusk to Dawn) Mode:
The light automatically turns on at night and stays on at 100% brightness until dawn, when it automatically turns off.
- Manual Override Mode:
To activate manual override, quickly turn the wall switch OFF and then ON within 2 seconds. The light will stay on at 100% brightness for 8 hours. It will then turn off at dawn and automatically return to the previously selected Auto mode (High, Low, or DTD).

Figure 7.2: Lighting Mode Behavior. This diagram illustrates how the light behaves in Low, High, and Dusk to Dawn modes based on motion detection and time of day.
7.3 Motion Sensor Functionality
The integrated motion sensor detects movement up to 40 feet away with a 220-degree detection angle. This ensures reliable activation when people, animals, or vehicles approach the fixture.
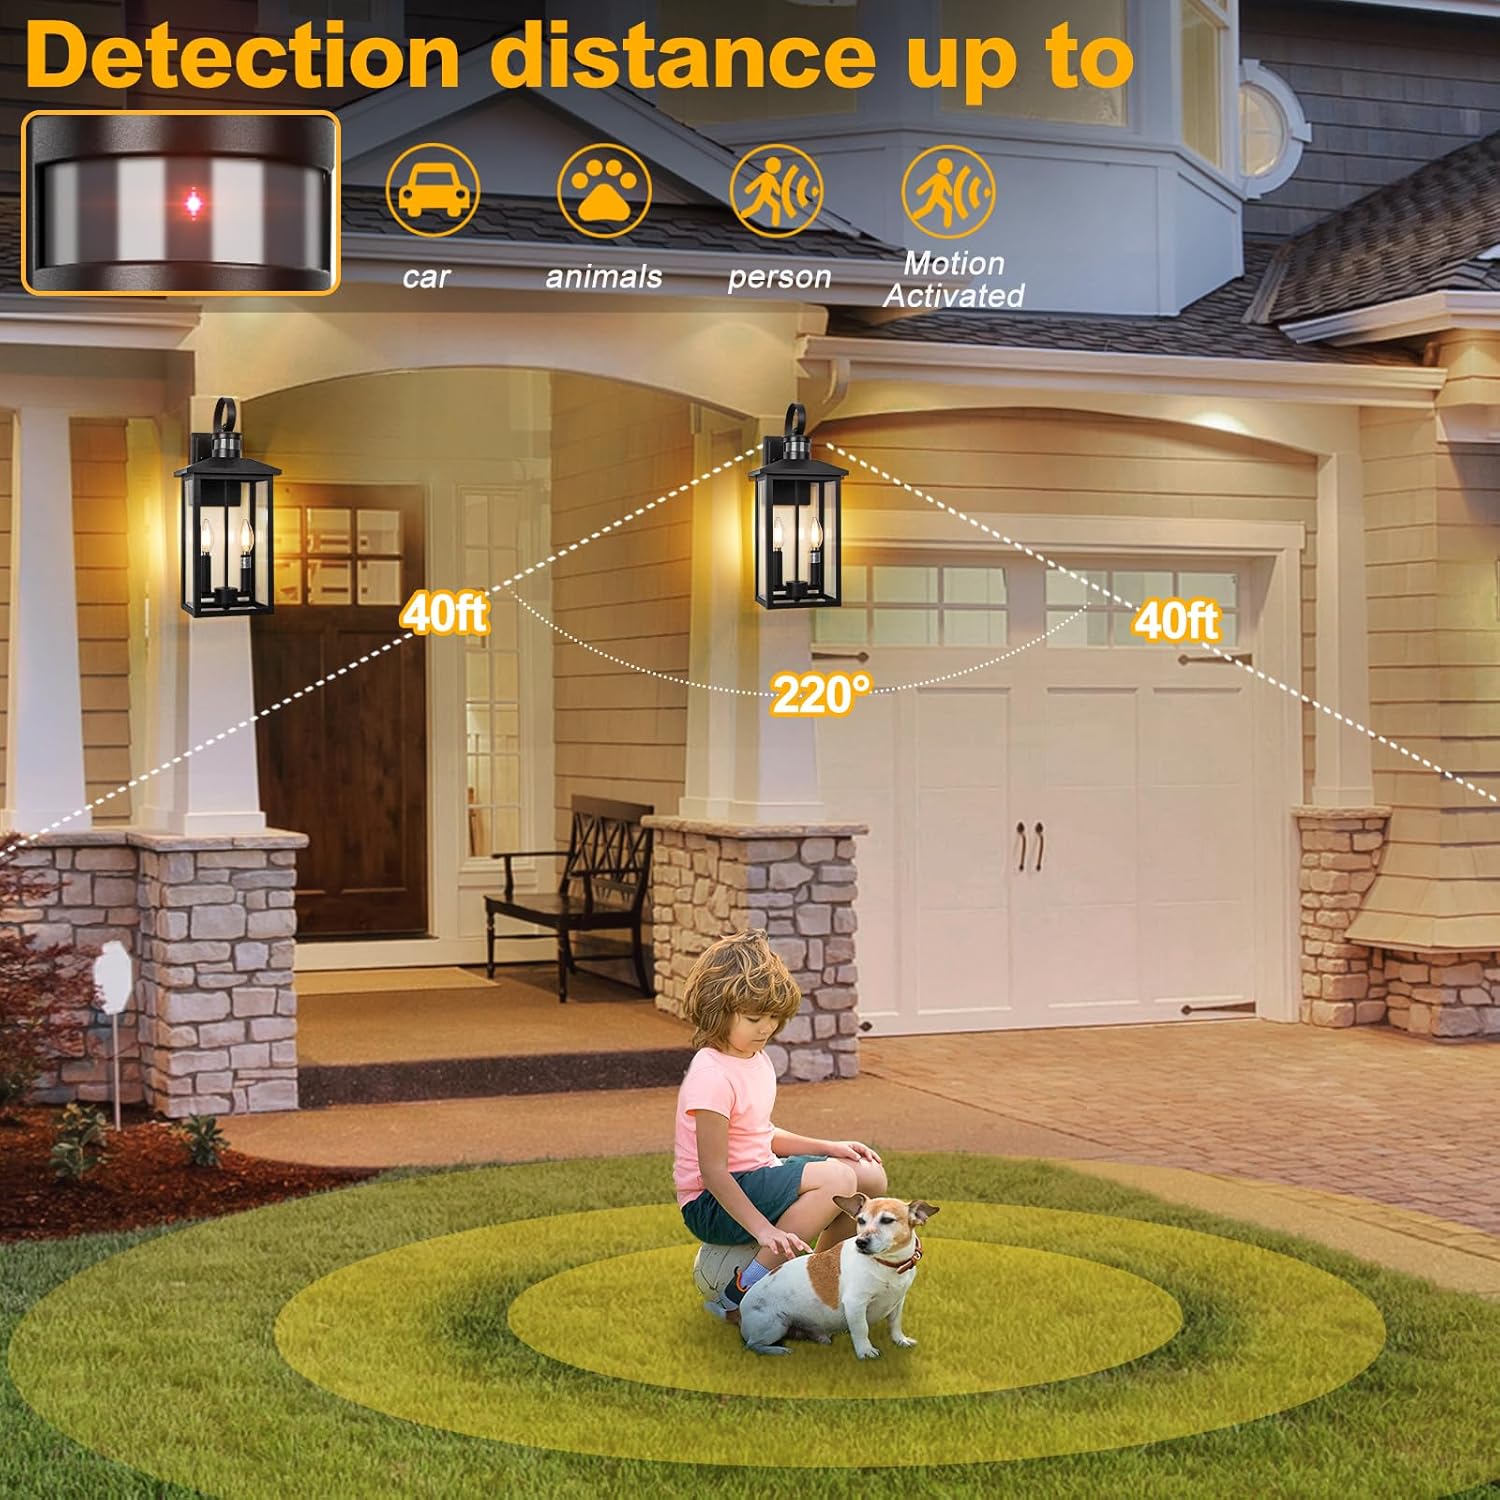
Figure 7.3: Motion Detection Range. This image visually represents the effective detection distance and angle of the motion sensor.
8. Maintenance
Regular maintenance will help prolong the life and appearance of your outdoor wall light.
- Cleaning:
- Ensure power is off before cleaning.
- Wipe the fixture with a soft, damp cloth. Do not use abrasive cleaners or solvents, as they may damage the finish or glass.
- Clean the motion sensor lens periodically to ensure optimal performance.
- Bulb Replacement:
- Turn off power at the circuit breaker.
- Allow bulbs to cool completely before touching.
- Unscrew the old E12 bulb and screw in a new one. Ensure the new bulb does not exceed 40W.
- Weather Resistance:
The fixture is designed to withstand various weather conditions, including rain, snow, sun, and wind, thanks to its IP65 waterproof rating and durable aluminum construction.

Figure 8.1: Weather Resistance. This image visually confirms the fixture's ability to withstand various outdoor elements.
9. Troubleshooting
If you encounter issues with your light fixture, refer to the following common problems and solutions:
| Problem | Possible Cause | Solution |
|---|---|---|
| Light does not turn on. | No power; loose wiring; faulty bulb; sensor obstructed. | Check circuit breaker. Verify all wire connections are secure. Replace bulb. Ensure sensor is not covered or dirty. |
| Light stays on constantly. | Sensor in DTD mode; continuous motion detected; sensor malfunction. | Check sensor mode setting (ensure not DTD). Remove any objects causing constant motion detection. If problem persists, contact support. |
| Light flickers or dims. | Loose bulb; incompatible bulb; unstable power supply. | Tighten bulb. Ensure bulb is compatible (E12, 40W max). Consult an electrician for power supply issues. |
| Motion sensor not detecting. | Sensor obstructed; incorrect mode; sensor sensitivity issue. | Clear any obstructions from sensor. Verify sensor is in High or Low mode. Ensure sensor lens is clean. |
10. Warranty and Support
This Brilvibera product is ETL Listed, ensuring it meets recognized safety standards. For specific warranty details or technical support, please refer to the product packaging or contact Brilvibera customer service directly. Contact information can typically be found on the manufacturer's website or the original purchase receipt.


