1. Introduction
This manual provides comprehensive instructions for the safe and effective operation, setup, and maintenance of your Reboot RBM2500 Multi-Process Welding Machine. The RBM2500 is a versatile 6-in-1 welding system designed for various welding applications, including Gas/Solid Wire MIG (GMAW), Gasless Flux Core MIG (FCAW), Stick/MMA, Spot welding, and Lift TIG. It supports both 120V and 240V power inputs and is capable of welding aluminum.
Please read this manual thoroughly before operating the machine to ensure proper usage and to prevent injury or damage to the equipment.
2. Safety Instructions
Welding can be dangerous. Always follow safety precautions to prevent electric shock, fire, burns, and other serious injuries. This section outlines general safety guidelines. Refer to local regulations and industry standards for complete safety information.
- Electric Shock: Ensure the machine is properly grounded. Do not touch live electrical parts. Wear dry welding gloves and protective clothing. Work in a dry area.
- Fumes and Gases: Weld in a well-ventilated area. Use local exhaust ventilation or a respirator if necessary. Keep your head out of the fumes.
- Arc Rays: Protect your eyes and skin from arc rays. Use a welding helmet with the correct shade filter. Wear protective clothing, including long sleeves and pants.
- Fire and Explosion: Remove all flammable materials from the welding area. Have a fire extinguisher readily available. Do not weld on containers that have held flammable materials.
- Burns: Hot metal and equipment can cause severe burns. Wear protective gloves and clothing. Allow welded materials to cool before handling.
- Cylinders: Secure gas cylinders properly. Use the correct gas for the welding process.
- Maintenance: Disconnect power before performing any maintenance or service.
3. Product Overview
The Reboot RBM2500 is a versatile welding machine capable of performing multiple welding processes. Its intuitive design includes a large LED digital display for easy parameter adjustment and monitoring.
3.1 Key Features
- 6-in-1 Multi-Process: Supports Gas/Solid Wire MIG, Gasless Flux Core MIG, Stick/MMA, Spot welding, and Lift TIG. Spool gun connector is also available (spool gun and TIG gun sold separately).
- Dual Voltage Input: Operates on both 120V and 240V power supplies.
- Synergic & Manual MIG: Digital control for automatic parameter matching based on wire diameter and material, with manual override for fine-tuning.
- Advanced Functions: Includes inductance adjustment, fast/slow wire feed adjustment, and pre-flow/post-flow settings.
- Large LED Display: Provides clear and accurate data display for easy readability, even with a welding helmet.
- Aluminum Welding Capability: Pre-programmed settings for aluminum, with included Teflon liner for the 15AK MIG gun.
3.2 Components and Accessories

Figure 3.2.1: Reboot RBM2500 Multi-Process Welder with included accessories. This image displays the main welding unit, MIG gun, ground clamp, electrode holders, power adapter, and various consumables such as welding tips and gas nozzles.

Figure 3.2.2: Another view of the Reboot RBM2500 welder and its accessories, showing the arrangement of the components including the welding machine, MIG torch, ground clamp, electrode holder, power cord, and various welding consumables.

Figure 3.2.3: Close-up of the large LED digital display on the Reboot RBM2500 welder. This display provides real-time welding parameters such as voltage, amperage, and wire feed speed, making it easy to monitor and adjust settings.

Figure 3.2.4: Illustration of the multi-function capabilities of the welder, highlighting its intelligent cooling fan, safety features, and low noise operation. It also shows examples of suitable welding materials: Carbon Steel, Stainless Steel, Iron, and Alloy.

Figure 3.2.5: The Reboot 300AMP Electrode Holder, a component designed for holding welding electrodes securely during stick welding operations.
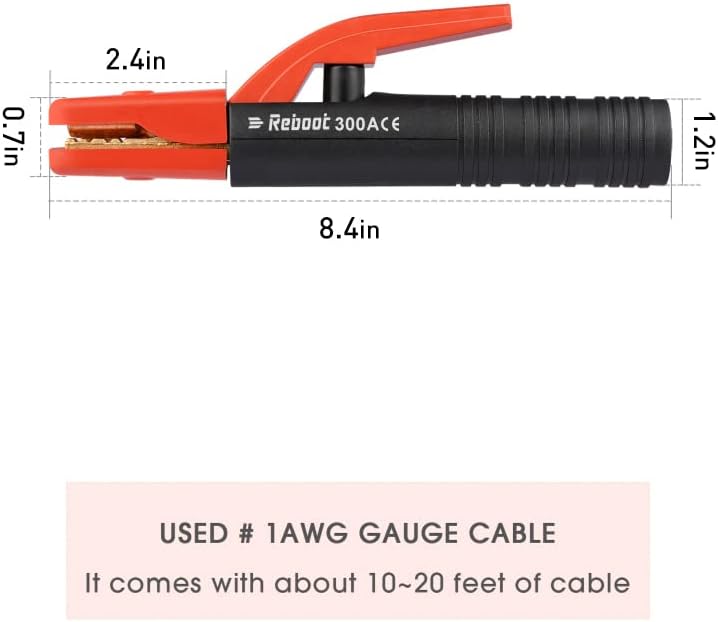
Figure 3.2.6: Dimensions of the Reboot 300AMP Electrode Holder, indicating its length (8.4 inches) and jaw opening measurements (2.4 inches wide, 0.7 inches high, 1.2 inches deep). It is designed for use with #1 AWG gauge cable.

Figure 3.2.7: Close-up view demonstrating the strong bite force of the Reboot 300AMP Electrode Holder's jaws, ensuring a secure grip on the welding electrode.

Figure 3.2.8: The Reboot 500AMP Electrode Holder, a heavy-duty plier-style clamp for holding welding electrodes, designed for higher amperage applications.

Figure 3.2.9: Detail of the Reboot 500AMP Electrode Holder, emphasizing its large 500-AMP capacity and its ability to hold electrodes ranging from 1/4 to 7/8 inches.
4. Setup
Proper setup is crucial for safe and effective welding. Follow these steps to prepare your RBM2500 for operation.
4.1 Power Connection
- Ensure the welding machine is turned off before connecting to power.
- The RBM2500 supports both 120V and 240V power inputs. Select the appropriate power outlet and ensure it meets the machine's power requirements.
- Connect the power cord securely to the machine and then to the power outlet.
4.2 Wire Installation (MIG/Flux Core)
- Open the wire feed compartment.
- Place the wire spool onto the spindle, ensuring it rotates freely.
- Thread the welding wire through the wire feed mechanism, ensuring it passes through the drive rollers and into the MIG gun liner.
- Adjust the tension of the drive rollers to prevent slipping or crushing the wire.
- For aluminum welding, install the included Teflon liner into the 15AK MIG gun. This is essential for smooth feeding of softer aluminum wire.
4.3 Gas Connection (Gas MIG/Lift TIG)
- For Gas MIG (GMAW) or Lift TIG welding, connect the gas hose from your shielding gas cylinder (e.g., Argon, CO2, or Argon/CO2 mix) to the gas inlet on the rear of the welding machine.
- Ensure all connections are tight to prevent gas leaks.
- Set the gas flow rate using a flowmeter attached to your gas cylinder. Recommended flow rates vary by process and material.
4.4 Connecting Welding Accessories
- MIG Gun: Connect the MIG gun cable to the appropriate connector on the front panel.
- Ground Clamp: Connect the ground clamp cable to the designated ground terminal. Attach the ground clamp securely to the workpiece or welding table, ensuring good electrical contact.
- Electrode Holder (Stick/MMA): For Stick welding, connect the electrode holder cable to the positive (+) terminal and the ground clamp to the negative (-) terminal (DCEN) for most electrodes, or vice-versa (DCEP) as required by the electrode type.
- TIG Torch (Lift TIG): For Lift TIG, connect the TIG torch to the appropriate connector. Ensure the ground clamp is connected.
5. Operating Modes
The Reboot RBM2500 offers multiple welding modes, each with specific settings and applications. Use the large LED display and control knobs to select and adjust parameters.
5.1 General Operation and Display
- Turn on the machine using the power switch. The LED display will illuminate.
- Use the mode selection buttons to cycle through MIG (Gas/Gasless), Stick (MMA), and Lift TIG modes.
- The display will show current welding parameters such as voltage, amperage, and wire feed speed (for MIG).
- Adjust parameters using the control knobs. The display will update in real-time.
5.2 MIG Welding (GMAW/FCAW)
The RBM2500 supports both Gas MIG (GMAW) and Gasless Flux Core MIG (FCAW).
- Synergic MIG: Select "SYN MIG" mode. Choose the welding wire diameter (.023”, .030”, .035”) and gas material (Fe+CO2, Fe+MIX, FLUX, AL+Ar). The machine will automatically set recommended current and wire feed speed. You can fine-tune these settings based on your welding habit.
- Manual MIG: Select "MAN MIG" mode for full manual control over voltage and wire feed speed. This mode is recommended when using a spool gun.
- Advanced MIG Functions:
- Inductance Adjustment: Adjusts the arc stiffness and puddle fluidity.
- Fast/Slow Wire Feed Adjustment: Press and hold the "Welding Wire Selection" button for fast wire feed.
- Pre-flow/Post-flow: Controls the shielding gas flow before and after the arc.
- 2T/4T Modes:
- 2T (Two-Touch): Press and hold the trigger to weld, release to stop.
- 4T (Four-Touch): Press and release to start welding, press and release again to stop. Useful for long welds to reduce hand fatigue.
- Aluminum Welding: The machine has pre-programmed selections for aluminum. Ensure the Teflon liner is installed in the 15AK MIG gun for optimal aluminum wire feeding. A spool gun (not included) can also be used for aluminum welding.
5.3 Stick Welding (MMA)
- Select "MMA" mode on the display.
- Connect the electrode holder and ground clamp as described in Section 4.4.
- Adjust the welding current (amperage) based on the electrode type and diameter, and the material thickness.
- Strike the arc by lightly touching the electrode to the workpiece and quickly lifting it slightly to establish the arc.
5.4 Lift TIG Welding
- Select "TIG" mode on the display.
- Connect the TIG torch and ground clamp. Ensure shielding gas is connected and flowing.
- Adjust the welding current (amperage).
- To initiate the arc, gently touch the tungsten electrode to the workpiece and then lift it slightly. The arc will ignite.
5.5 Spot Welding
- Select "SPOT" mode on the display.
- This mode is typically used with the MIG gun.
- Adjust the spot welding time and current as needed for the material thickness.
- Position the MIG gun nozzle firmly against the two overlapping pieces of metal to be joined. Trigger the gun to create a timed spot weld.
6. Maintenance
Regular maintenance ensures the longevity and optimal performance of your welding machine. Always disconnect the power before performing any maintenance.
- Cleaning: Regularly clean the exterior of the machine with a dry cloth. Use compressed air to blow out dust and debris from the cooling vents.
- MIG Gun Maintenance:
- Inspect and clean the contact tip, gas nozzle, and diffuser regularly. Replace worn or spattered parts.
- Check the MIG gun liner for kinks or blockages. Replace if necessary, especially when changing wire types or experiencing feeding issues.
- Ground Clamp and Electrode Holder: Inspect cables and connections for damage. Ensure good contact surfaces on the ground clamp.
- Wire Feed Mechanism: Keep the drive rollers clean and free of debris. Ensure proper tension.
- Power Cord: Inspect the power cord for any cuts, fraying, or damage. Do not use the machine with a damaged power cord.
7. Troubleshooting
This section provides solutions to common issues you might encounter. If the problem persists, contact customer support.
| Problem | Possible Cause | Solution |
|---|---|---|
| No power to machine | Power cord unplugged, circuit breaker tripped, faulty power switch. | Check power cord connection. Reset circuit breaker. Contact support if switch is faulty. |
| No arc/Weak arc | Poor ground connection, incorrect settings, worn consumables, wrong polarity. | Ensure ground clamp is clean and securely attached. Adjust voltage/amperage. Replace contact tip/electrode. Check polarity for Stick welding. |
| Wire feeding issues (MIG) | Incorrect drive roller tension, clogged liner, wrong wire size, spooled wire tangled. | Adjust drive roller tension. Clean or replace liner. Ensure correct wire size for tip/liner. Untangle wire spool. |
| Overheating/Thermal overload | Exceeding duty cycle, poor ventilation, fan malfunction. | Allow machine to cool down. Ensure adequate airflow around the machine. Check if cooling fan is operating. |
| Poor weld quality | Incorrect parameters, improper technique, contaminated material, insufficient gas flow. | Adjust voltage/amperage/wire feed. Practice technique. Clean workpiece. Check gas flow rate and cylinder level. |
8. Specifications
| Feature | Detail |
|---|---|
| Model | RBM2500 |
| Welding Processes | Gas/Solid Wire MIG (GMAW), Gasless Flux Core MIG (FCAW), Stick/MMA, Spot welding, Lift TIG |
| Input Voltage | 120V/240V |
| Amperage Range | Up to 250Amp |
| Wire Diameter Support | .023”/.030”/.035” solid wire, .023”/.030”/.035” flux core wire, .040” aluminum wire |
| Display | Large LED Digital Display |
| ASIN | B0D26G2L41 |
| Date First Available | June 22, 2024 |
9. Warranty and Support
For information regarding warranty coverage, technical support, or replacement parts, please refer to the official Reboot website or contact Reboot customer service directly. Keep your purchase receipt as proof of purchase for warranty claims.
Reboot Customer Support: Please visit the Reboot Store on Amazon or their official website for contact details and further assistance.


