
1. Introduction
This instruction manual provides comprehensive guidance for the DieseRC Smart WiFi Relay Module 1CHx4-TEW. This device allows you to remotely control various electrical appliances and systems via Wi-Fi, Bluetooth, and voice commands. Please read this manual carefully before installation and operation to ensure proper use and safety.
2. Product Overview
The DieseRC Smart WiFi Relay Module is a versatile control unit designed for integration into various smart home and automation projects. It features stable and reliable performance with high reception sensitivity for 2.4 GHz Wi-Fi networks. The module supports multiple control methods, including a dedicated mobile application, voice assistants, and a Bluetooth remote control.
Key Features:
- Wireless Connectivity: Supports 2.4 GHz Wi-Fi for remote control via the eWelink app.
- Voice Control: Compatible with Amazon Alexa and Google Home for hands-free operation.
- Bluetooth Remote: Includes a Bluetooth RM2.4G remote control for local operation.
- Flexible Power Input: Operates on DC 5V or DC 7V-48V.
- Passive Output: Features a 10A relay with normally open (NO), common (COM), and normally closed (NC) pins for dry contact output.
- Compact Design: Small form factor (55x29x17 mm) for easy integration into electrical boxes.
- Multiple Operating Modes: Configurable for Inching (momentary) or Self-Locking (toggle) modes.
- Scheduling and Timer Functions: Available through the eWelink application.

Image 2.1: The DieseRC Smart WiFi Relay Module (four units shown) alongside its Bluetooth remote control. The remote features four numbered buttons, an 'ALL ON' button, and an 'ALL OFF' button.

Image 2.2: This image illustrates the various control methods for the relay module: APP control via eWelink, voice control with Alexa or Google Assistant, and remote control via 2.4GHz Bluetooth. A detailed view of the module's dimensions (52mm x 30mm x 20mm) is also provided.
3. Specifications
| Specification | Value |
|---|---|
| Model Number | EW748 |
| Dimensions (L x W x H) | 55 x 29 x 17 mm (2.2 x 1.1 x 0.7 inches) |
| Input Voltage | DC 5V (via USB) or DC 7V-48V |
| Relay Contact Rating | 10A (AC 250V, DC 30V) |
| Power Consumption | 480 Watts (Max) |
| Wireless Standard | Wi-Fi 2.4 GHz |
| Control Methods | eWelink APP, Bluetooth Remote, Voice Control (Alexa/Google Home) |
| Operating Modes | Inching (Momentary), Self-Locking (Toggle) |
| Material | Plastic |
| Certification | CE |
4. Setup and Installation
4.1 Wiring the Relay Module
The relay module offers flexible power input options and passive output contacts. Ensure all power is disconnected before performing any wiring.
- Power Input: The module can be powered via a Micro USB 5V/0.5A input or directly with DC 7V-48V. Connect the positive (+) and negative (-) terminals accordingly for DC 7V-48V input.
- Relay Output: The module provides dry contact output through three terminals: NO (Normally Open), COM (Common), and NC (Normally Closed). Connect your device's control circuit to these terminals based on your application's requirements.

Image 4.1: This diagram shows the main components and connection points of the relay module. It highlights the Relay Indicator Light, Open Key/Pairing Button, WiFi Network Indicator Light, Input USB 5V/0.5A, and the NO, COM, NC terminals for relay output. Below, an example illustrates connecting the module to a DC 7V-48V power source.

Image 4.2: This image provides wiring examples. The top left shows wiring for a DC device with DC 7V-48V power. The top right shows wiring for a device with 1V-250V AC/DC power. The bottom image illustrates how to make any device an internet device by connecting the module to its control circuit and powering it via USB 5V/0.5A.
4.2 eWelink App Installation
To control the module via Wi-Fi, download and install the eWelink app on your smartphone (Android or iOS).
- Scan the QR code below or visit http://app.coolkit.cc/dl.html to download the eWelink app.
- Register an account and log in.

Image 4.3: QR code for downloading the eWelink application.
4.3 Pairing the Module with eWelink
Follow these steps to connect your relay module to the eWelink app:
- Power on the relay module.
- Open the eWelink app and tap the '+' icon to add a device.
- Select the appropriate pairing mode (e.g., Quick Pairing Mode).
- Press and hold the 'Open the key / Pairing button' on the module until the Wi-Fi network indicator light blinks rapidly.
- Follow the on-screen instructions in the eWelink app to complete the pairing process, including entering your Wi-Fi network credentials.
5. Operating Modes
The DieseRC Smart WiFi Relay Module supports two primary operating modes: Inching (Momentary) and Self-Locking (Toggle). These modes can be configured within the eWelink app.
5.1 Inching Mode (Momentary)
In Inching mode, the relay will activate for a set duration (e.g., 0.5 to 3600 seconds) after being triggered, and then automatically deactivate. This is suitable for applications like garage door openers or pulse-triggered devices.
5.2 Self-Locking Mode (Toggle)
In Self-Locking mode, the relay acts like a standard on/off switch. One trigger activates the relay, and it remains active until another trigger deactivates it. This is suitable for controlling lights or other devices that require a continuous on/off state.

Image 5.1: This image illustrates the two operation modes: Inching mode, represented by a momentary push button, and Self-Locking mode, represented by a toggle switch.
5.3 Bluetooth Remote Control
The included Bluetooth remote control allows for local operation of the relay module. Each button on the remote can be paired to control specific channels or functions (e.g., ALL ON/ALL OFF).
5.4 APP Control (eWelink)
Once paired, you can control the relay module from anywhere using the eWelink app. The app allows you to:
- Turn devices on/off.
- Set schedules and timers.
- Share control with family members.
- Configure operating modes (Inching/Self-Locking).
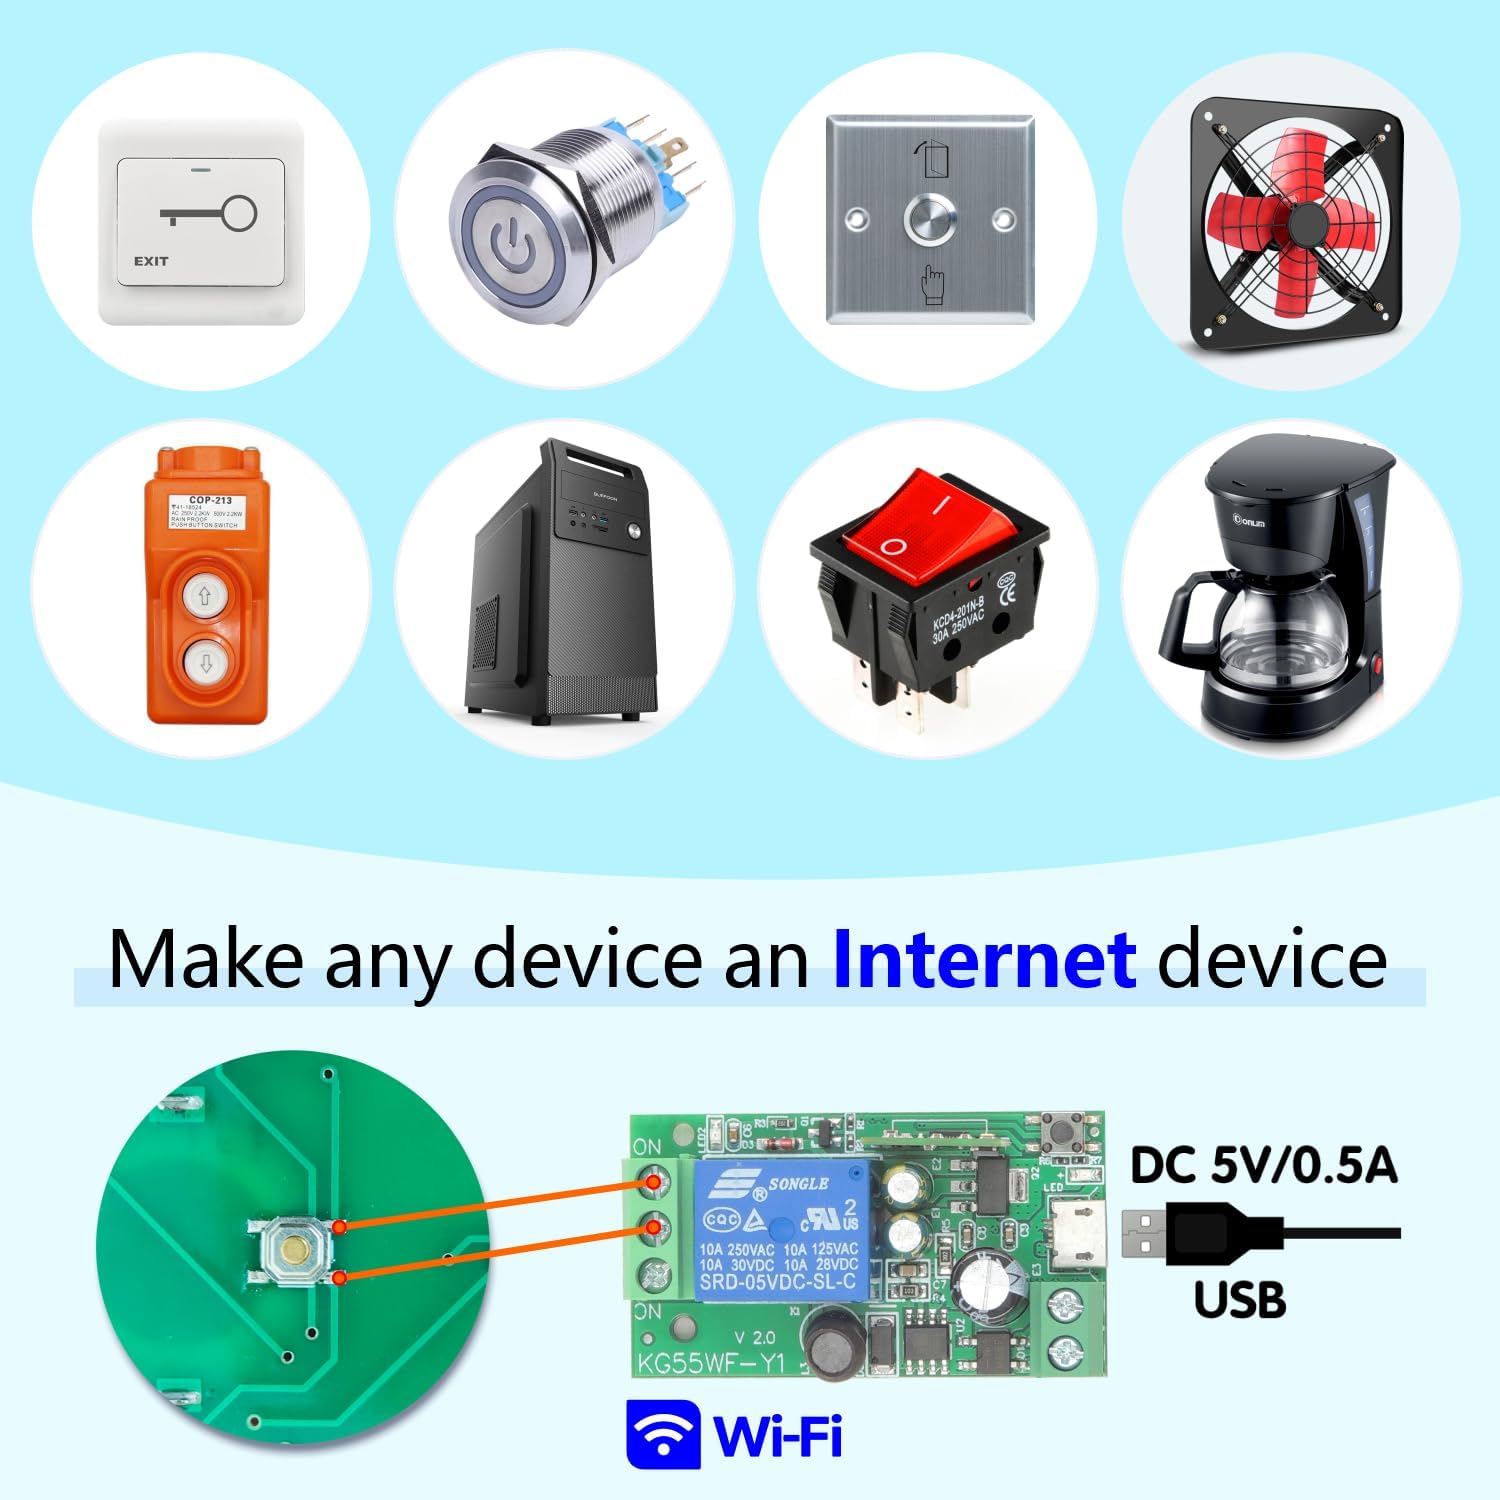
Image 5.2: This image shows a smartphone displaying the eWelink app interface, controlling a device remotely. The text indicates 'No distance limit', emphasizing the global control capability.
5.5 Voice Control (Alexa/Google Home)
Integrate the relay module with Amazon Alexa or Google Home for convenient voice control. After linking your eWelink account to your voice assistant, you can use commands such as:
- "Alexa, turn on the light."
- "Hey Google, turn off the fan."

Image 5.3: This image demonstrates voice control functionality, showing Amazon Alexa and Google Home devices. A speech bubble indicates a command: "Alexa, open the light!"
6. Applications
The DieseRC Smart WiFi Relay Module can be used in a variety of settings, including homes, farms, factories, offices, and laboratories. Common applications include:
- Garage door opener systems.
- Electric locks and electromagnetic doors.
- Lighting control.
- Controlling contactors.
- DIY remote control switches for various devices.
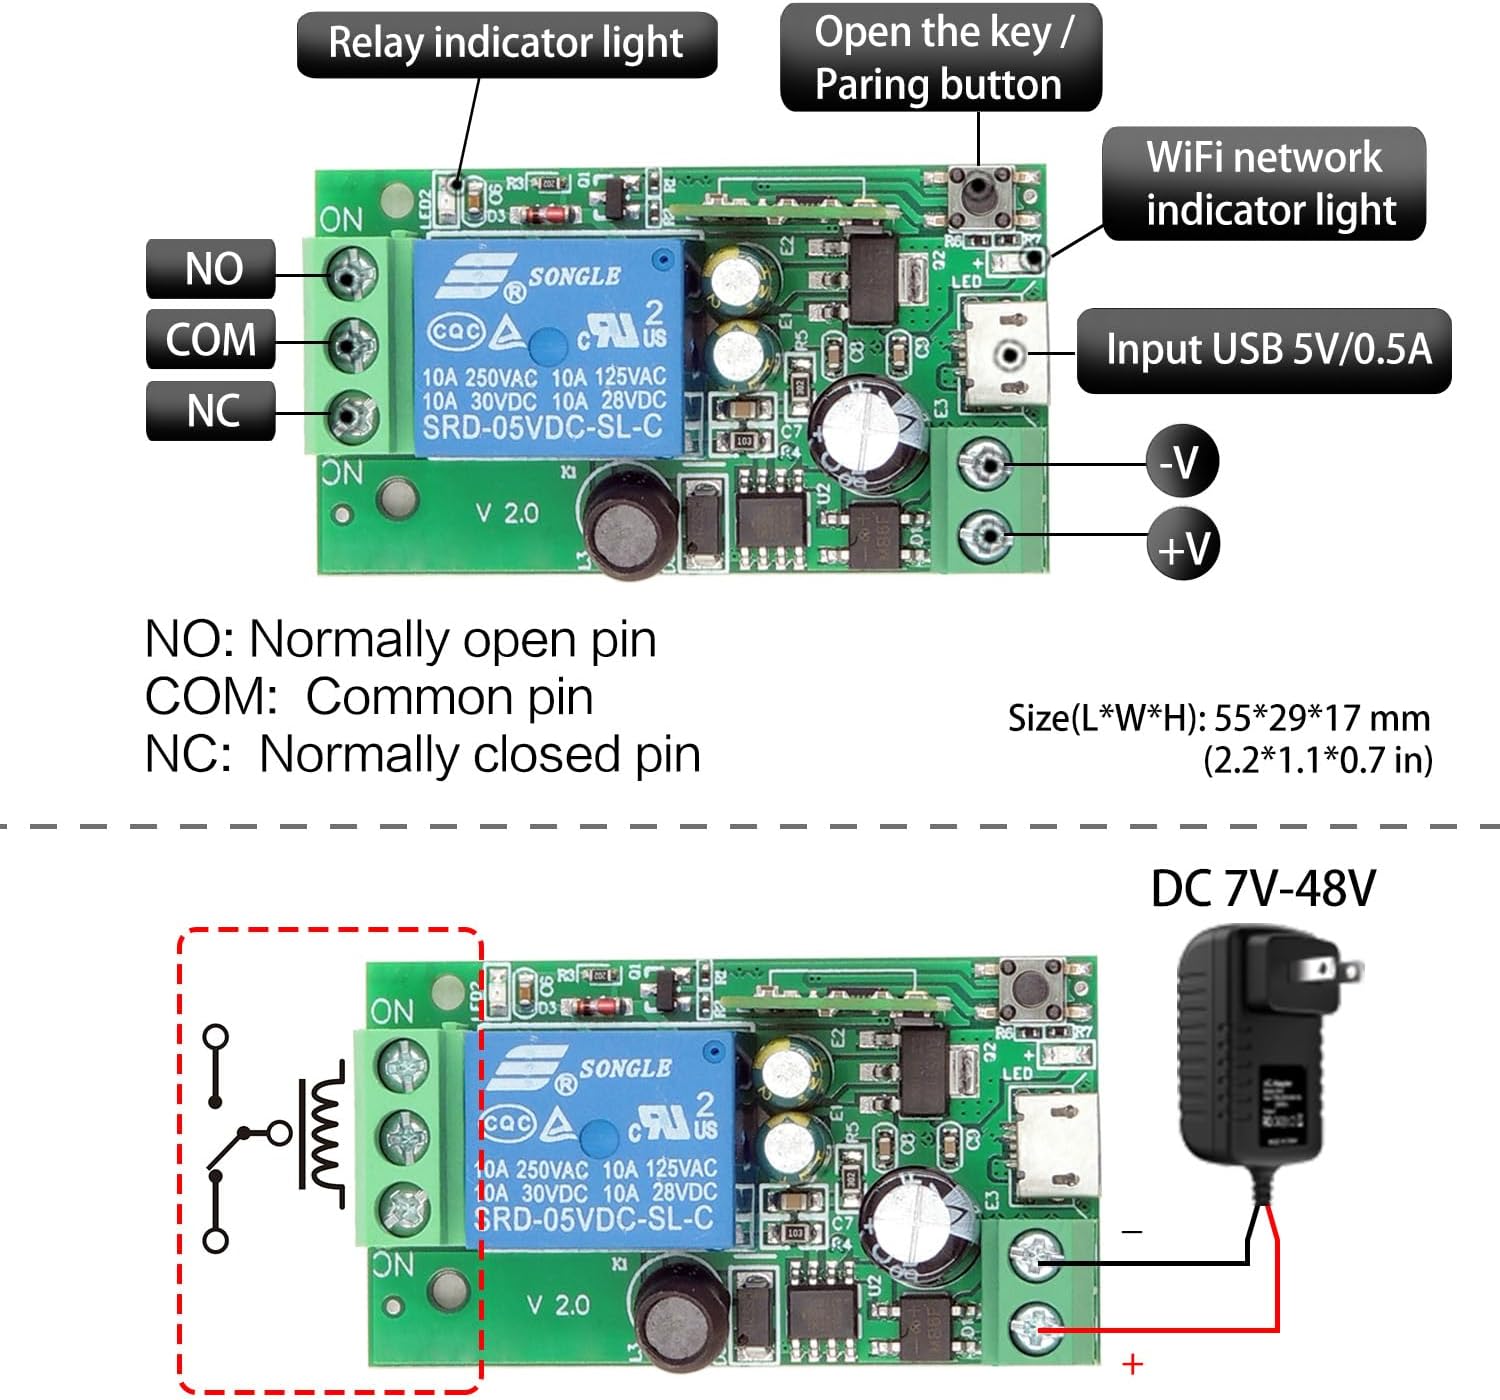
Image 6.1: This image displays various devices that can be controlled by the relay module, including an exit button, a power button, a fan, a coffee maker, and other switches, illustrating its versatility in making any device an internet-connected device.
7. Maintenance
To ensure the longevity and optimal performance of your DieseRC Smart WiFi Relay Module, follow these maintenance guidelines:
- Keep Clean: Regularly clean the module and its surroundings to prevent dust accumulation, which can affect performance.
- Proper Ventilation: Ensure the module is installed in a location with adequate ventilation to prevent overheating.
- Avoid Moisture: Protect the module from water and excessive humidity.
- Secure Connections: Periodically check all wiring connections to ensure they are secure and free from corrosion.
- Firmware Updates: Check the eWelink app for any available firmware updates for the module and install them to benefit from improvements and bug fixes.
8. Troubleshooting
If you encounter issues with your DieseRC Smart WiFi Relay Module, refer to the following troubleshooting tips:
- Module Not Powering On:
- Verify that the power supply (DC 5V USB or DC 7V-48V) is correctly connected and providing the specified voltage.
- Check for any loose wiring or damaged cables.
- Unable to Connect to Wi-Fi:
- Ensure your Wi-Fi network is 2.4 GHz. The module does not support 5 GHz networks.
- Check your Wi-Fi password for accuracy.
- Make sure the module is within range of your Wi-Fi router.
- Try resetting the module and re-attempting the pairing process.
- App Control Not Responding:
- Check your internet connection on your smartphone.
- Ensure the module's Wi-Fi indicator light is solid, indicating a stable connection.
- Restart the eWelink app.
- Voice Control Not Working:
- Confirm that your eWelink account is correctly linked to Amazon Alexa or Google Home.
- Check the device name in the eWelink app and ensure it matches the name used in voice commands.
- Verify that your voice assistant device is connected to the internet.
- Bluetooth Remote Not Working:
- Ensure the remote's battery is functional.
- Confirm the remote is paired with the module according to the pairing instructions (if applicable, usually automatic for included remotes).
- Ensure the remote is within effective range of the module.
9. Warranty and Support
DieseRC is committed to providing quality products and customer satisfaction. For any technical support or warranty inquiries, please contact DieseRC customer service through the platform where you purchased the product or refer to the official DieseRC website for contact information.
Please retain your proof of purchase for warranty claims. Specific warranty terms and conditions may vary by region and retailer.


