1. Introduction
This manual provides essential instructions for the safe operation, setup, and maintenance of your ELECTROPRIME HELIWAY DM-1803 2.4GHz Remote Control Vehicle. Please read this manual thoroughly before operating the vehicle to ensure proper function and to prevent damage.
2. Safety Information
- This product is recommended for users aged 2 months to 14 years. Adult supervision is advised for younger users.
- Do not operate the vehicle near people, pets, or obstacles.
- Avoid operating in wet conditions or on public roads.
- Ensure batteries are installed correctly with the correct polarity.
- Do not mix old and new batteries, or different types of batteries.
- Always turn off the vehicle and remote control when not in use.
- Keep small parts away from young children to prevent choking hazards.
3. Package Contents
Carefully unpack the box and ensure all items listed below are present:
- Off-road Vehicle (x1)
- Remote Control (x1)
- USB Charger (x1)
- 6V 500mAh Battery (x1)
- Instruction Manual (x1)
- Screwdriver (x1)
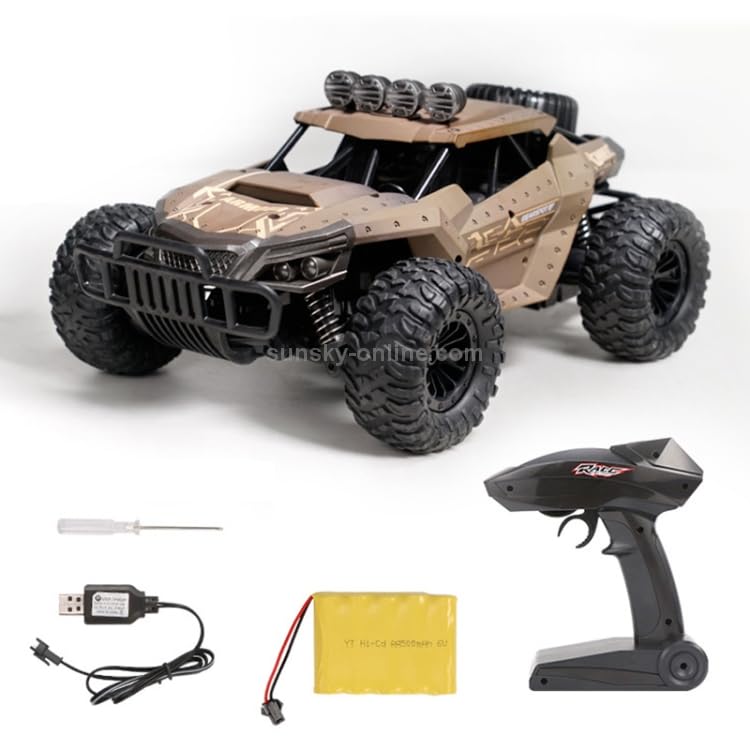
Figure 3.1: All components included in the package.
4. Product Overview
The ELECTROPRIME HELIWAY DM-1803 is a 2.4GHz four-way remote control vehicle designed for off-road use. It features robust construction and intuitive controls.
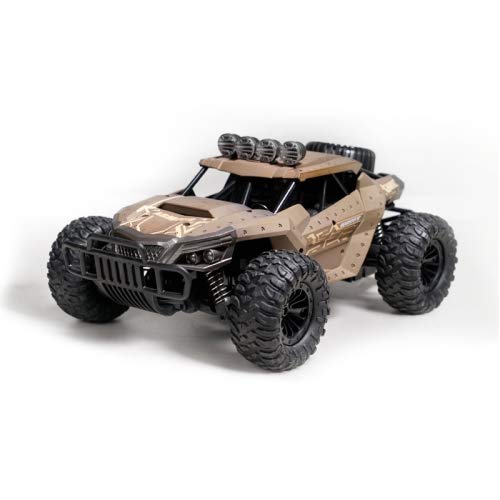
Figure 4.1: Front view of the DM-1803 Remote Control Vehicle.

Figure 4.2: Side view of the DM-1803 Remote Control Vehicle.
5. Setup
5.1. Battery Installation
Vehicle Battery Installation:
- Using the provided screwdriver, open the battery compartment located on the underside of the vehicle.
- Connect the 6V 500mAh battery to the vehicle's power connector, ensuring correct polarity.
- Place the battery inside the compartment and securely close the cover with the screwdriver.
Remote Control Battery Installation:
- Open the battery compartment on the back of the remote control.
- Insert two AA batteries (not included) into the compartment, observing the correct polarity (+/-).
- Close the battery compartment cover.
5.2. Charging the Vehicle Battery
- Connect the 6V 500mAh vehicle battery to the USB charger.
- Plug the USB charger into a standard USB power source (e.g., computer USB port, USB wall adapter).
- The charging indicator light on the USB charger will illuminate during charging.
- Charging typically takes approximately 120-150 minutes. Disconnect the charger once the battery is fully charged.
6. Operating Instructions
6.1. Pairing the Remote Control
- Ensure the vehicle battery is charged and installed, and the remote control has fresh batteries.
- Turn on the vehicle using the power switch.
- Turn on the remote control. The indicator light on the remote will flash.
- The remote control and vehicle will automatically pair. Once paired, the remote control indicator light will become solid.
6.2. Driving Controls
The remote control allows for four-way movement and drift capabilities:
- Forward/Backward: Use the trigger on the remote control. Pull to move forward, push to move backward.
- Left/Right Turn: Use the steering wheel on the remote control. Turn left to steer left, turn right to steer right.
- Drift: The vehicle is designed with drift functionality. Practice combining steering and acceleration for controlled drifts.
The remote control distance is approximately 80 meters, and the WIFI transmission distance for FPV (if applicable) is 35-40 meters.
7. Maintenance
- Clean the vehicle regularly with a soft, dry cloth. Avoid using water or harsh chemicals.
- Inspect tires and suspension for any damage or debris after each use.
- Remove batteries from both the vehicle and remote control if storing for extended periods.
- Store the vehicle in a cool, dry place away from direct sunlight.
8. Troubleshooting
- Vehicle not responding: Ensure both vehicle and remote control are powered on. Check battery levels in both devices and replace/recharge if necessary. Re-pair the remote control.
- Short operating time: Ensure the vehicle battery is fully charged. Battery performance may decrease over time.
- Poor range: Ensure there are no significant obstructions between the remote control and the vehicle. Avoid areas with strong electromagnetic interference.
9. Specifications
| Feature | Detail |
|---|---|
| Model | HELIWAY DM-1803 |
| Product Code | CHT2057Z |
| Material | POM, ABS, PP, Hardware, Electronic Components |
| Product Size | 32 x 19.5 x 12 cm |
| Vehicle Battery | 6V 500mAh (1.2Vx5) Lithium-Ion Polymer |
| Remote Control Battery | 2x AA (not included) |
| Charging Time | Approx. 120-150 minutes |
| Operating Time | Approx. 15 minutes |
| Maximum Speed | 25 km/h |
| Remote Control Distance | Approx. 80 meters |
| WIFI Transmission Distance | Approx. 35-40 meters |
| Recommended Age | 2 months - 14 years |
| Item Weight | 1.42 kg |
| Color | Beige |
10. Warranty and Support
For warranty information and customer support, please refer to the contact details provided at the point of purchase or visit the official ELECTROPRIME website. Keep your purchase receipt as proof of purchase.


