
1. Product Overview
The BETTERI 10-inch Electric Concrete Floor Grinder Polishing Machine (Model DFG-250E) is designed for efficient surface preparation and finishing of concrete, stone, terrazzo, and epoxy floors. It is suitable for grinding adhesive residue, paint, and spackle on large concrete areas, as well as for restoring the flatness of new floors and renovating old ones.

The BETTERI DFG-250E Electric Concrete Floor Grinder.
Key Features
- High Performance Motor: Equipped with a 1.5 HP pure copper motor, providing a rotating speed of 1730 RPM for stable and efficient operation.
- Ergonomic Design: Features a rubber handle for comfortable operation and a foldable arm that adjusts to various height requirements.
- Adjustable Grinding Chassis: The grinding chassis can be adjusted 45° left/right, allowing for grinding close to walls.
- Wet and Dry Operation: Supports both wet and dry grinding modes. Includes a dust guard and vacuum port for effective dust collection.
- Universal Mounting Plate: Standard universal 3/8-inch multi-hole mounting plate facilitates quick changes of grinding discs and heads.
2. Safety Instructions
Always prioritize safety when operating power tools. Read and understand all instructions before use. Failure to follow these safety guidelines may result in serious injury or property damage.
- Personal Protective Equipment (PPE): Always wear appropriate PPE, including safety glasses, hearing protection, dust mask, and sturdy work gloves.
- Work Area: Ensure the work area is clean, well-lit, and free from obstructions. Keep bystanders, especially children, away from the operating machine.
- Electrical Safety: Connect the machine to a properly grounded outlet. Do not operate in wet conditions unless specifically designed for it and proper precautions are taken. Inspect the power cord for damage before each use.
- Machine Inspection: Before operation, check the machine for any loose parts, damage, or wear. Ensure all fasteners are tight and the grinding head is securely attached.
- Stability: Ensure the machine is stable on a level surface before starting.
- Emergency Stop: Familiarize yourself with the location and operation of the power switch for quick shutdown in emergencies.
- Ventilation: When operating in dry mode, ensure adequate ventilation to minimize dust inhalation, even with the dust collection system.
3. Package Contents
Verify that all items listed below are included in your package. If any components are missing or damaged, contact customer support immediately.
- 1x Electric Concrete Floor Grinder (DFG-250E)
- 1x Redi-Lock Shoe Plate
- 1x 10-inch Grinding Head (10 segments)
- 4x 3/8-inch Threaded Bolts
- 1x 590-inch (15m) Extended Power Line
- 1x User Manual
- Hardware (Countersunk screws, Allen wrenches: M6, M8, M10)

Illustration of included components.
4. Setup and Assembly
4.1 Component Identification
Familiarize yourself with the main parts of the grinder before assembly and operation.
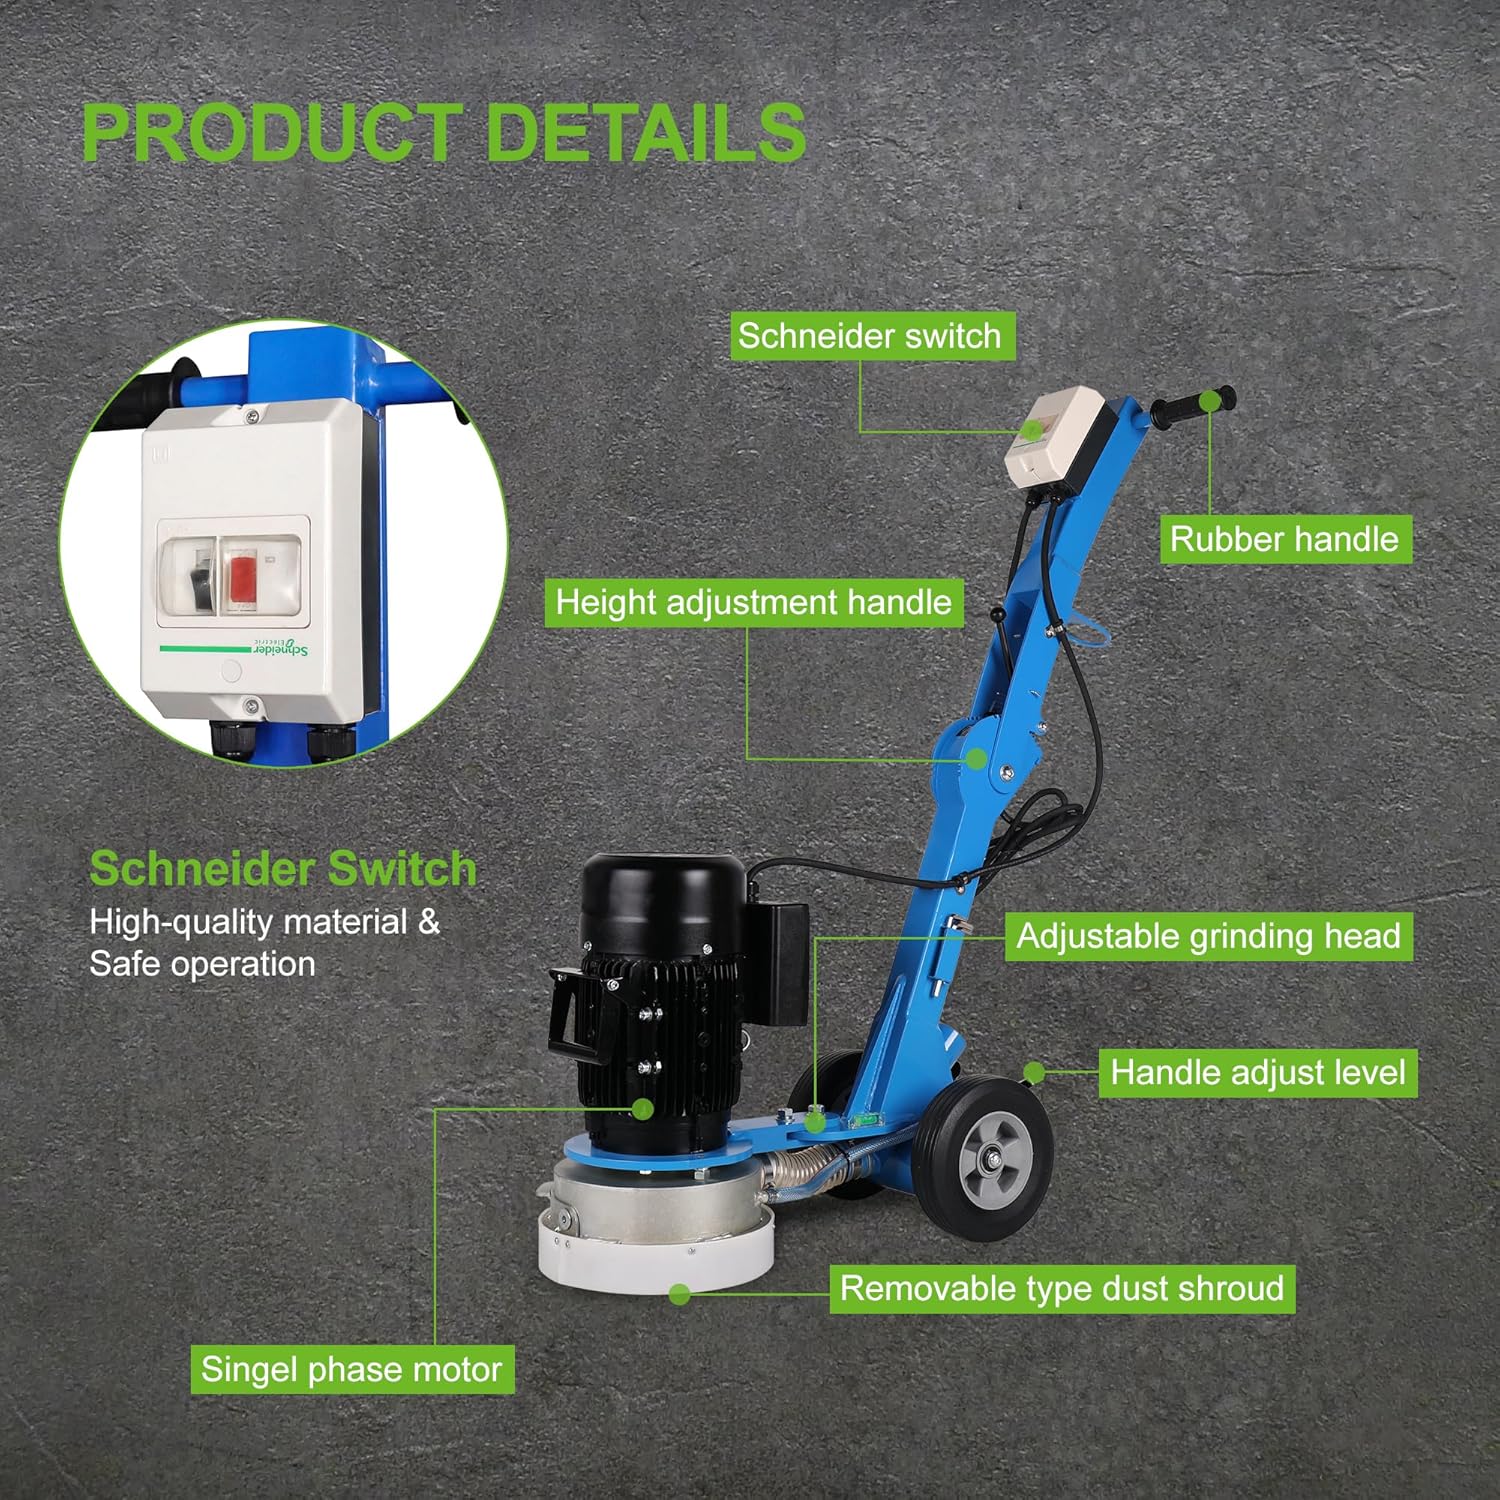
Key components of the DFG-250E grinder.
4.2 Handle Adjustment
The machine's arm is foldable and can be adjusted to suit various user heights and storage requirements.
- Locate the handle adjust level or locking mechanism on the main arm.
- Release the mechanism to allow the handle to pivot.
- Adjust the handle to a comfortable operating height.
- Securely lock the handle in position before operation.

Adjusting the handle for comfortable use.
4.3 Grinding Head Installation
The 10-inch grinding head is installed using the Redi-Lock shoe plate and threaded bolts.
- Ensure the machine is unplugged from the power source.
- Attach the Redi-Lock shoe plate to the grinding chassis using the provided hardware.
- Securely mount the 10-inch grinding head onto the Redi-Lock shoe plate using the 3/8-inch threaded bolts. Ensure it is centered and tightened properly.
- Verify that the dust shroud is correctly positioned around the grinding head to facilitate dust collection.
5. Operating Instructions
5.1 Pre-Operation Checklist
- Confirm all safety instructions have been reviewed.
- Ensure the grinding head is correctly installed and secured.
- Check the power cord for any damage.
- Verify the work area is clear and appropriate PPE is worn.
- If using wet grinding, ensure water supply is ready. If dry grinding, connect a suitable vacuum to the dust port.
5.2 Grinding Process
- Plug the machine into a grounded 110V/60Hz power outlet.
- Turn on the Schneider switch to start the motor.
- Gently lower the grinding head onto the surface to be worked on.
- Move the machine steadily across the surface, applying even pressure. Avoid prolonged grinding in one spot to prevent uneven wear or damage to the floor.
- Overlap passes slightly to ensure complete coverage.
- Monitor the grinding head for wear and replace as needed.
5.3 Wet and Dry Operation
The DFG-250E supports both wet and dry grinding. Choose the appropriate method based on the application and material.
- Dry Grinding: Ideal for general surface preparation. Always connect a high-efficiency dust extractor to the vacuum port to minimize airborne dust.
- Wet Grinding: Recommended for finer finishes and to reduce dust significantly. Ensure a continuous water supply to the grinding head. Water also helps cool the grinding segments, extending their life.
5.4 Edge Grinding (45° Adjustment)
The grinding chassis can be adjusted 45° left or right to allow for grinding right up to walls and edges.
- Ensure the machine is off and unplugged before making adjustments.
- Locate the adjustment mechanism for the grinding chassis.
- Adjust the chassis to the desired 45° angle (left or right).
- Securely lock the chassis in the adjusted position.
- Proceed with grinding edges carefully.

The 45° adjustable grinding chassis for edge work.
5.5 Applications
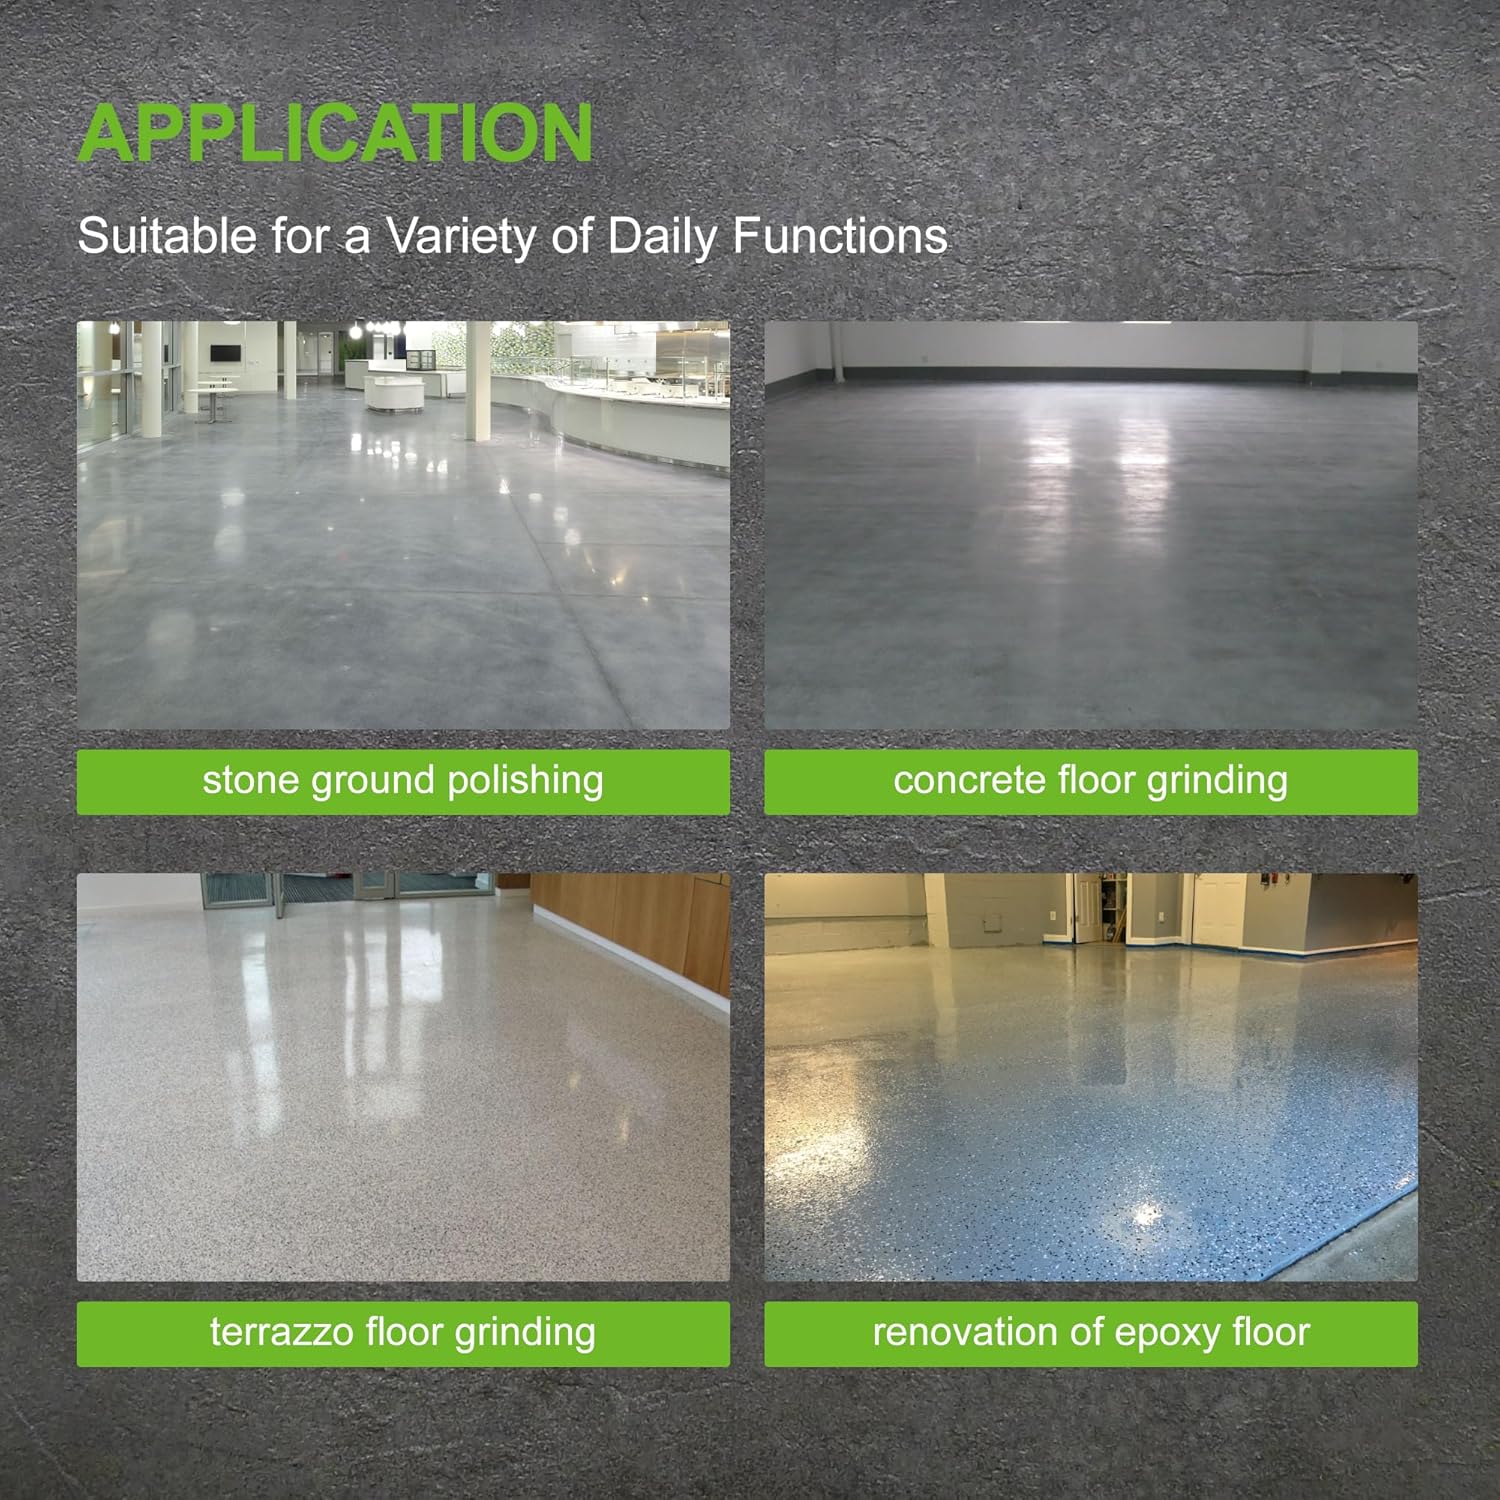
The DFG-250E is suitable for various floor types and applications:
- Stone ground polishing
- Concrete floor grinding
- Terrazzo floor grinding
- Renovation of epoxy floors

Examples of floor types suitable for the DFG-250E.
6. Maintenance
Regular maintenance ensures the longevity and optimal performance of your BETTERI floor grinder.
- Cleaning: After each use, clean the machine thoroughly. Remove any dust, debris, or slurry from the grinding head, dust shroud, and motor housing. Use a damp cloth for external surfaces.
- Grinding Head Inspection: Regularly inspect the grinding head for wear. Replace worn-out segments or heads to maintain grinding efficiency and prevent damage to the machine or floor.
- Power Cord: Check the power cord for cuts, abrasions, or other damage. Replace damaged cords immediately.
- Fasteners: Periodically check all bolts and screws for tightness. Tighten any loose fasteners.
- Storage: Store the machine in a clean, dry, and secure location, away from direct sunlight and extreme temperatures. The foldable handle allows for more compact storage.
7. Troubleshooting
This section addresses common issues you might encounter during operation. For problems not listed here, contact customer support.
| Problem | Possible Cause | Solution |
|---|---|---|
| Machine does not start | No power supply; Damaged power cord; Faulty switch | Check power connection and outlet; Inspect power cord; Contact service for switch replacement. |
| Poor grinding performance | Worn grinding head; Incorrect grinding head for surface; Insufficient pressure | Replace grinding head; Ensure correct head is used; Apply even, appropriate pressure. |
| Excessive dust during dry grinding | Vacuum not connected or insufficient; Dust shroud not sealed; Worn dust shroud | Connect appropriate vacuum; Check dust shroud for proper seal; Replace worn dust shroud. |
| Machine vibrates excessively | Unbalanced grinding head; Loose components; Damaged motor | Inspect and re-seat grinding head; Tighten all fasteners; Contact service for motor inspection. |
8. Technical Specifications
Detailed specifications for the BETTERI DFG-250E Electric Concrete Floor Grinder.
| Specification | Value |
|---|---|
| Brand | BETTERI |
| Model Number | DFG-250E |
| Power Source | AC/DC |
| Voltage | 110 Volts |
| Motor Power | 1.5 HP (1.1 KW) |
| Disc Diameter | 10 inches |
| Speed | 1730 RPM |
| Max Rated Current | 14.5A |
| Net Weight | 116.84 lbs (53 kg) |
| Product Size (L x W x H) | 27.6 x 13.4 x 47 inches |
| Material | Metal |
Product dimensions and key specifications.
9. Warranty and Support
BETTERI is committed to providing quality products and customer satisfaction.
9.1 Return Policy
This product is eligible for a 30-day easy return policy. Please refer to your purchase documentation for specific terms and conditions.
9.2 Protection Plans
Extended protection plans may be available for purchase, including a 4-Year Protection Plan and a Complete Protect monthly plan. Review available options at the time of purchase or contact your retailer for details.
9.3 Customer Support
For technical assistance, parts, or warranty inquiries, please contact BETTERI customer support. You can also visit the official BETTERI store for more information and product resources: BETTERI Store