
1. Introduction
Thank you for choosing the Mulcort 1080P Dual Dash Cam. This manual provides essential information for the proper installation, operation, and maintenance of your device. Please read this manual thoroughly before using the dash cam to ensure optimal performance and safety. Keep this manual for future reference.
2. Safety Information
- Do not expose the dash cam to extreme temperatures, direct sunlight for prolonged periods, or high humidity.
- Ensure the dash cam is securely mounted and does not obstruct the driver's view or interfere with vehicle controls.
- Use only the power adapter provided with the device. Using unauthorized adapters may damage the product and void the warranty.
- Do not attempt to disassemble or repair the dash cam yourself. Contact customer support for assistance.
- Keep the lens clean to ensure clear video recordings.
- Always format the memory card regularly to prevent data corruption and ensure smooth recording.
3. Package Contents
Verify that all items are present in your package:
- 1 x Mulcort 1080P Dual Dash Cam
- 1 x User Manual
- 1 x Power Cable (Car Charger)
- 1 x Windshield Mount
Note: A rear camera and TF memory card are not included and must be purchased separately.
4. Product Overview
The Mulcort 1080P Dual Dash Cam features a front-facing camera for road recording and an interior camera for cabin surveillance. It is equipped with a 3.16-inch IPS screen for real-time viewing and easy navigation.
Product Dimensions

This image illustrates the physical dimensions of the dash cam, providing measurements in both centimeters and inches for reference.
5. Setup
5.1 Mounting the Dash Cam
- Clean the area on your windshield where you intend to mount the dash cam.
- Attach the suction cup mount to the dash cam.
- Press the suction cup firmly against the windshield and lock it into place.
- Adjust the angle of the dash cam to ensure a clear view of the road ahead and the vehicle interior.

A general view of the dash cam, typically mounted on a windshield, showing its front camera and display.
5.2 Power Connection
- Connect the provided car charger to the dash cam's power input port.
- Plug the other end of the car charger into your vehicle's cigarette lighter socket.
- The dash cam will automatically power on and begin recording when your vehicle starts.
5.3 Inserting a Memory Card
- Ensure the dash cam is powered off.
- Insert a TF (microSD) card (Class 10 or higher, up to 32GB) into the memory card slot until it clicks into place.
- To remove, gently push the card in until it springs out.
5.4 Initial Settings
- Upon first power-on, you may need to set the date, time, and language.
- Navigate through the menu using the physical buttons on the device.
- It is recommended to format the memory card through the dash cam's settings menu before first use.
6. Operating Instructions
6.1 Recording Modes
The dash cam supports simultaneous recording from both the front and interior cameras. You can switch between display modes on the 3.16-inch IPS screen to view front, interior, or both camera feeds.
6.2 Loop Recording
The dash cam records video in continuous loops. When the memory card is full, the oldest unlocked files are automatically overwritten by new recordings. This ensures continuous recording without manual intervention.
6.3 G-Sensor (Collision Detection)
The built-in G-sensor detects sudden impacts or collisions. When a significant shock is detected, the current video segment is automatically locked and saved to prevent it from being overwritten by loop recording. This protects critical evidence in case of an accident.

This image illustrates the G-sensor's function, which automatically locks video footage upon detecting a collision to prevent it from being overwritten.
6.4 Night Vision
Equipped with infrared night vision technology, the dash cam provides clear video recordings even in low-light conditions or complete darkness. This feature ensures reliable surveillance at all times.

This image highlights the dash cam's HD night vision capabilities, featuring a 3.16-inch IPS screen and 1080p resolution for clear recordings in the dark.

This image showcases the 'Super Night Vision' feature, detailing technologies like a 6-Glass Lens, WDR Tech, and f1.6 Aperture for enhanced clarity in low-light conditions.
6.5 Exposure Compensation
The dash cam features exposure compensation to adjust for varying light conditions, ensuring balanced and clear video footage. This helps to prevent overexposed bright areas and underexposed dark areas.
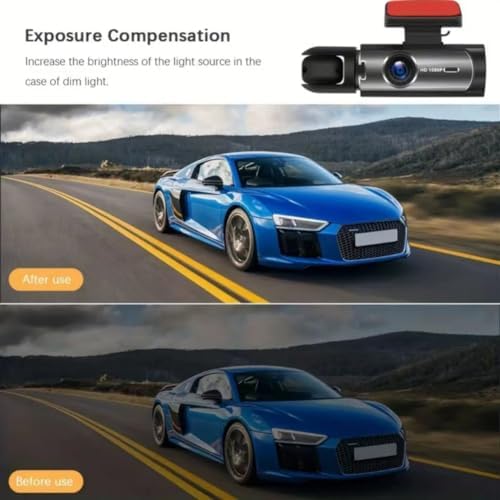
This image demonstrates the effect of exposure compensation, showing a brighter, clearer image 'After use' compared to a dimmer 'Before use' image.
6.6 Parking Assist (with optional rear camera)
While a rear camera is not included, this dash cam is designed to be compatible with one. When connected to an optional rear camera and a signal is detected, the display will automatically switch to the rear camera feed, assisting you with parking maneuvers.
7. Maintenance
- Cleaning the Lens and Screen: Use a soft, lint-free cloth to gently wipe the camera lenses and the IPS screen. Do not use abrasive cleaners or solvents.
- Memory Card Management: Regularly format your TF card (at least once a month) through the dash cam's settings menu to maintain optimal recording performance and prevent data corruption.
- Firmware Updates: Check the manufacturer's website periodically for any available firmware updates to improve performance and add new features.
8. Troubleshooting
If you encounter issues with your dash cam, refer to the following common problems and solutions:
- Dash Cam Not Turning On:
- Ensure the power cable is securely connected to both the dash cam and the car's power outlet.
- Check if the car's power outlet is functioning correctly.
- Verify that the vehicle's ignition is on.
- Recording Stops or Freezes:
- Format the memory card regularly.
- Ensure you are using a high-speed (Class 10 or higher) TF card.
- The memory card may be full; enable loop recording or replace the card.
- Poor Video Quality:
- Clean the camera lenses.
- Ensure the protective film has been removed from the lens.
- Check video resolution settings in the menu.
- G-Sensor Too Sensitive/Not Sensitive Enough:
- Adjust the G-sensor sensitivity setting in the dash cam's menu.
9. Specifications
| Model Number | PGJ7746827433534FG |
| Brand | Mulcort |
| Front Camera Resolution | 1080P |
| Interior Camera Resolution | 480P |
| Display | 3.16-inch IPS Screen |
| View Angle | 170 Degrees |
| G-Sensor | Supported |
| Loop Recording | Supported |
| Night Vision | Supported |
| Memory Card Support | Max. 32GB TF Card (not included) |
| Battery | Built-in 150mAh Lithium Battery |
| Color | Black |
| Material | Plastics |
| Weight | 300 Grams |
| Frame Rate | 30 FPS |
| Mount Type | Windshield Mount |
10. Warranty and Support
Mulcort products are designed for reliability and performance. For warranty information, technical support, or any questions regarding your dash cam, please refer to the contact information provided with your purchase or visit the official Mulcort website.
Please note that information regarding spare parts availability and guaranteed software updates is not available at this time.