
soundmaster MCD5600
User Manual
Soundmaster MCD5600 Stereo System
Model: MCD5600
Introduction
Thank you for purchasing the Soundmaster MCD5600 Stereo System. This comprehensive audio system combines classic and modern playback options, including a turntable, double cassette deck, CD player, USB port, and Bluetooth connectivity. It also features a DAB+ and FM radio tuner and the ability to digitize your audio recordings to a USB stick. Please read this manual carefully before operating the unit to ensure proper use and to maximize your listening experience.
Important Safety Instructions
- Read these instructions.
- Keep these instructions.
- Heed all warnings.
- Follow all instructions.
- Do not use this apparatus near water.
- Clean only with a dry cloth.
- Do not block any ventilation openings. Install in accordance with the manufacturer's instructions.
- Do not install near any heat sources such as radiators, heat registers, stoves, or other apparatus (including amplifiers) that produce heat.
- Protect the power cord from being walked on or pinched, particularly at plugs, convenience receptacles, and the point where they exit from the apparatus.
- Only use attachments/accessories specified by the manufacturer.
- Unplug this apparatus during lightning storms or when unused for long periods of time.
- Refer all servicing to qualified service personnel. Servicing is required when the apparatus has been damaged in any way, such as power-supply cord or plug is damaged, liquid has been spilled or objects have fallen into the apparatus, the apparatus has been exposed to rain or moisture, does not operate normally, or has been dropped.
Package Contents
Please check that all items listed below are included in your package:
- Soundmaster MCD5600 Main Unit
- Two Stereo Speakers
- Remote Control
- Power Cord
- Instruction Manual (this document)
- FM/DAB+ Antenna
Product Overview
Familiarize yourself with the components and controls of your Soundmaster MCD5600 system.
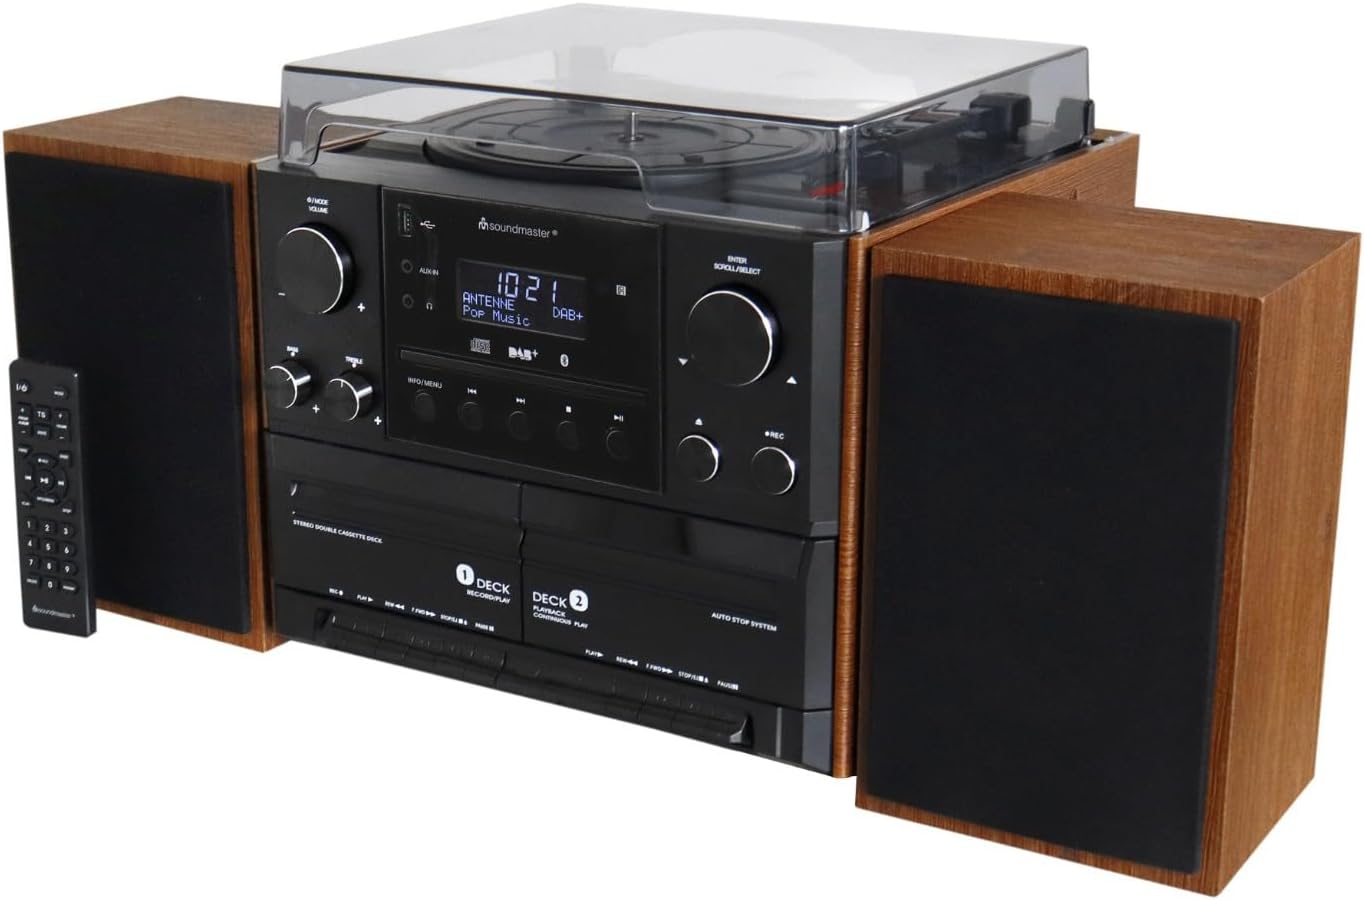
Figure 1: Front view of the Soundmaster MCD5600 Stereo System, including the main unit, two external speakers, and the remote control. The turntable is visible on top, and the CD tray and cassette decks are on the front panel.

Figure 2: Close-up front view of the Soundmaster MCD5600 Stereo System, showing the central control panel with display, volume and tuning knobs, and various function buttons for CD, USB, Bluetooth, and radio.
Main Unit Controls:
- Power Button: Turns the unit on or off.
- Function Selector: Switches between Turntable, CD, Cassette, USB, Bluetooth, DAB+, and FM modes.
- Volume Knob: Adjusts the master volume level.
- Tuning/Scroll Knob: Used for radio tuning, menu navigation, and track selection.
- Display Screen: Shows current mode, track information, radio frequency, etc.
- CD Tray: For inserting audio CDs.
- Cassette Decks (Deck 1 & Deck 2): For playing and recording cassette tapes.
- USB Port: For USB playback and recording.
- Headphone Jack: For private listening.
- Aux-In: For connecting external audio devices.
Rear Panel Connections:
- Speaker Terminals: Connect the included stereo speakers.
- FM/DAB+ Antenna Input: Connect the supplied antenna for radio reception.
- AC Power Input: Connect the power cord.
Setup
1. Unpacking and Placement:
- Carefully remove all components from the packaging.
- Place the main unit on a stable, flat surface. Ensure adequate ventilation around the unit.
- Position the speakers on either side of the main unit, ensuring they are on a stable surface.
2. Connecting the Speakers:
- Connect the speaker wires from the left speaker to the "L" speaker terminals on the rear of the main unit. Ensure correct polarity (+ to + and - to -).
- Connect the speaker wires from the right speaker to the "R" speaker terminals on the rear of the main unit, observing polarity.
3. Connecting the Antenna:
- Connect the supplied FM/DAB+ antenna to the 75 Ohm antenna input on the rear of the unit.
- Extend the antenna fully and position it for optimal reception.
4. Power Connection:
- Ensure the unit is switched off before connecting the power cord.
- Insert the power cord into the AC power input on the rear of the unit.
- Plug the other end of the power cord into a standard wall outlet.
Operating Instructions
General Operation:
- Power On/Off: Press the Power button on the front panel or remote control.
- Volume Adjustment: Rotate the Volume knob or use the VOL+/- buttons on the remote.
- Function Selection: Press the Function button repeatedly on the unit or use the dedicated function buttons on the remote (e.g., CD, PHONO, TAPE, USB, BT, DAB/FM).
Turntable Operation:
- Select "PHONO" mode.
- Lift the dust cover.
- Place a record on the platter.
- Select the appropriate speed (33, 45, or 78 RPM) using the speed selector switch.
- Move the tone arm to the desired position on the record and gently lower it.
- At the end of the record, manually return the tone arm to its rest.
CD Player Operation:
- Select "CD" mode.
- Press the Eject button to open the CD tray.
- Place a CD (CD/CD-MP3/CD-R/CD-RW/MP3/WMA compatible) with the label side facing up.
- Press the Eject button again to close the tray. Playback will start automatically or after pressing Play.
- Use the Skip/Search buttons to navigate tracks.
Cassette Deck Operation:
- Select "TAPE" mode.
- Open the cassette deck door (Deck 1 for playback/recording, Deck 2 for playback only).
- Insert a cassette tape.
- Press Play to begin playback. Use Fast Forward/Rewind buttons as needed.
- To record, ensure you are in the desired source mode (e.g., PHONO, CD, RADIO) and then press the Record button on Deck 1.
Radio Operation (DAB+/FM):
- Select "DAB" or "FM" mode.
- For DAB+: The system will automatically scan for available stations on first use. Use the Tuning/Scroll knob to navigate through stations.
- For FM: Use the Tuning/Scroll knob to manually tune to a station or press the Scan button for automatic scanning.
- Press the Preset button to save or recall favorite stations.
USB Playback:
- Insert a USB flash drive into the USB port.
- Select "USB" mode.
- The system will automatically detect and play compatible audio files (MP3/WMA).
- Use the Play/Pause, Skip, and Folder navigation buttons to control playback.
Bluetooth Connectivity:
- Select "BT" (Bluetooth) mode. The display will show "Pairing" or "Waiting for connection".
- On your Bluetooth-enabled device (smartphone, tablet, etc.), search for "MCD5600" in the Bluetooth settings.
- Select "MCD5600" to pair. Once connected, you can stream audio from your device to the stereo system.
Encoding (Digitization to USB):
- Insert a USB flash drive into the USB port.
- Select the desired source for recording (e.g., PHONO, CD, TAPE, DAB/FM).
- Start playback of the source material (e.g., start playing a record, CD, or cassette).
- Press the "RECORD" button on the main unit or remote control. The recording indicator will light up.
- Press "RECORD" again to stop recording. The recorded audio will be saved as an MP3 file on the USB drive.
Maintenance
Cleaning the Unit:
- Always unplug the unit from the power outlet before cleaning.
- Use a soft, dry cloth to wipe the exterior surfaces.
- Do not use abrasive cleaners, waxes, or solvents as they may damage the finish.
Turntable Care:
- Keep the dust cover closed when not in use to prevent dust accumulation.
- Clean the stylus regularly with a soft brush designed for turntable styli.
- Handle records by their edges to avoid fingerprints and dirt.
CD and Cassette Care:
- Wipe CDs from the center outwards with a soft, lint-free cloth.
- Store cassettes in their cases to protect them from dust and magnetic fields.
- Periodically clean the cassette deck's heads and pinch rollers with a specialized cleaning cassette.
Troubleshooting
| Problem | Possible Cause | Solution |
|---|---|---|
| No power | Power cord not connected; Power outlet not active. | Ensure power cord is securely plugged in; Try a different outlet. |
| No sound | Volume too low; Speakers not connected; Incorrect function selected. | Increase volume; Check speaker connections; Select correct input source. |
| Turntable not spinning | Speed selector incorrect; Belt dislodged (rare). | Check speed setting; Contact service if belt issue is suspected. |
| CD not playing | CD inserted incorrectly; CD is scratched/dirty; Disc format not supported. | Reinsert CD correctly; Clean CD; Ensure CD is compatible (CD/MP3/WMA). |
| Poor radio reception | Antenna not connected or positioned poorly. | Connect and adjust antenna position; Try auto-scan for DAB+. |
| Bluetooth pairing failed | Device too far; Bluetooth not enabled on device; Incorrect mode. | Ensure device is within range; Enable Bluetooth on device; Select "BT" mode on system. |
| USB recording not working | USB drive full or incompatible format; Source not playing. | Check USB drive capacity and format (FAT32 recommended); Ensure source is playing before pressing record. |
Specifications
| Feature | Detail |
|---|---|
| Model | MCD5600 |
| Brand | Soundmaster |
| Product Dimensions (L x W x H) | 40 x 50 x 39 millimetres |
| Weight | 7.7 kg |
| Connectivity Technology | Bluetooth, Auxiliary, USB |
| Speaker Type | Stereo |
| Turntable Speeds | 33/45/78 rpm |
| CD Compatibility | CD/CD-MP3/CD-R/CD-RW/MP3/WMA |
| Cassette Decks | Double Cassette Deck |
| Radio Tuner | DAB+, FM |
| Encoding Function | Recording from Disk, CD, Cassette to USB (MP3 format) |
Warranty and Support
Soundmaster products are designed and manufactured to the highest quality standards. In the unlikely event that you experience any issues with your MCD5600 Stereo System, please refer to the troubleshooting section first.
For warranty information and technical support, please refer to the warranty card included in your package or visit the official Soundmaster website. Keep your proof of purchase for warranty claims.
Note: Specifications and design are subject to change without notice for product improvement.
Related documentsMCD5600


Ask a question about this manual
Ask about setup, troubleshooting, compatibility, parts, safety, or missing instructions. Manuals+ will review the question and use this page’s manual context to help answer it.