
1. Introduction
Thank you for choosing the ZONADAH Smart Life WiFi GSM Home Security Alarm System. This manual provides detailed instructions for the installation, operation, and maintenance of your new security system. Please read this manual thoroughly before use to ensure proper functionality and to maximize the system's benefits. Keep this manual for future reference.
2. Product Overview
The ZONADAH Smart Life WiFi GSM Home Security Alarm System is an advanced anti-theft solution designed to provide comprehensive protection for your home or property. It combines WiFi and GSM connectivity for reliable communication, allowing remote control via a smartphone application. The system features an intuitive LCD display, voice prompts, and support for both wired and wireless sensors, ensuring a secure and user-friendly experience.
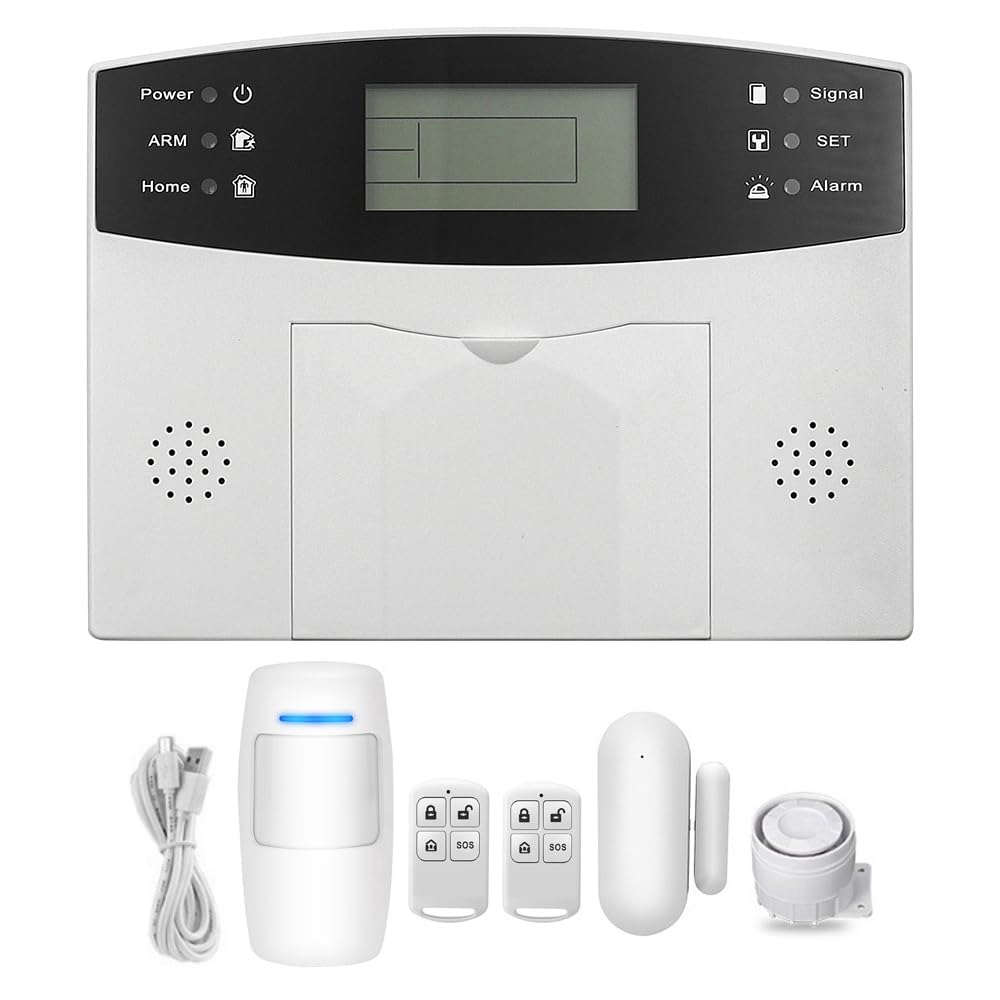
Figure 2.1: Front view of the ZONADAH Smart Life WiFi GSM Home Security Alarm System main panel.
3. Key Features
- Dual Connectivity: Supports both WiFi and GSM networks for reliable alarm transmission.
- Extensive Zone Support: Features 7 wired defense zones and 99 wireless defense zones.
- LCD Display: Integrated LCD screen with clock for easy status monitoring and configuration.
- Voice Prompts: Provides clear voice prompts throughout operation for user guidance.
- Scheduled Arming/Disarming: Configure up to three groups of scheduled times for automatic arming and disarming.
- Automatic Alarm Calls: Supports 6 groups of predefined alarm numbers for automatic voice calls upon alarm activation.
- SMS Notifications: Set 3 groups of SMS numbers for automatic text message notifications.
- Voice Recording: 10-second manual voice recording function for personalized messages.
- Digital Voice Detector: Integrated for automatic alarm transmission.
- Telephone Dialing: Allows direct phone calls via the main unit keypad.
- One-Key Control: Easy arming/disarming for home, away, and remote modes.
- Precise Zone Location: Displays alarm zone locations (e.g., emergency, fire, gas, door locks, corridors, windows, balconies, perimeter) for quick identification.
- Flexible Zone Programming: Options include instant, delayed, 24-hour, and bypass functions.
- Wireless Learning: Simple and secure method for adding new wireless accessories.
- Remote Control: Full control (arm, disarm, monitor, intercom) via smartphone app or remote control.
- Backup Battery: Integrated rechargeable AAA NI-HM battery with power failure alarm function ensures continuous operation.
4. System Components
The ZONADAH Smart Life WiFi GSM Home Security Alarm System typically includes the following components:
- Main Control Panel: The central unit of the alarm system, featuring an LCD display, keypad, and communication modules.
- Power Adapter: For powering the main control panel.
- Wireless Sensors: (e.g., door/window sensors, PIR motion detectors) to detect intrusions.
- Remote Controls: Key fobs for convenient arming and disarming.
- Siren: An external or internal siren for audible alerts.
- User Manual: This document.

Figure 4.1: Main Control Panel with Keypad Open.
5. Setup Guide
5.1 Unpacking and Initial Inspection
Carefully unpack all components and verify that all items listed in the package contents are present and undamaged. If any items are missing or damaged, contact your retailer immediately.
5.2 Main Panel Installation
Choose a central location for the main control panel, away from direct sunlight, heat sources, and moisture. Ensure it is within range of your WiFi network and has good GSM signal reception. The panel can be mounted on a wall using screws (not included) or placed on a flat surface.

Figure 5.1: Main Control Panel Dimensions (approx. 18cm x 13.5cm).
5.3 SIM Card Installation
The system requires a GSM SIM card for cellular communication. Open the back cover of the main panel. Locate the SIM card slot and insert a standard-sized SIM card with an active plan. Ensure the SIM card is inserted correctly as shown in the diagram below. Close the back cover securely.

Figure 5.2: Back view of the Main Control Panel with SIM card slot and wired terminals.
5.4 Power Connection and Backup Battery
Connect the provided power adapter to the DC input port on the main panel and then plug it into a standard wall outlet. The system includes an integrated rechargeable AAA NI-HM battery. This battery will automatically charge when the system is powered and provides backup power during outages. Ensure the battery is properly connected inside the panel.
5.5 Wireless Sensor Pairing
- On the main panel, enter the programming mode (refer to the on-screen prompts or specific menu option).
- Select the 'Add Wireless Sensor' option.
- Trigger the wireless sensor (e.g., open a door/window sensor, wave hand in front of a motion sensor). The panel will confirm successful pairing with a voice prompt or display message.
- Assign the sensor to a specific defense zone (e.g., 'Front Door', 'Living Room').
- Repeat for all wireless sensors.
5.6 Wired Sensor Connection
The main panel supports 7 wired defense zones. Connect wired sensors (e.g., magnetic contacts, PIR detectors) to the designated terminals on the back of the panel (refer to Figure 5.2). Ensure correct polarity and wiring according to the sensor's instructions. Each wired zone typically requires a specific resistor configuration for proper operation. Consult the detailed wiring diagram in the included assembly instructions for specific resistor values and connection methods. Incorrect wiring may lead to false alarms or system malfunction.
5.7 Smart Life App Setup
- Download the 'Smart Life' app from your smartphone's app store (iOS or Android).
- Register for a new account or log in if you already have one.
- Add a new device in the app. Select 'Security & Sensor' and then 'Alarm (Wi-Fi)'.
- Follow the in-app instructions to connect the alarm system to your home WiFi network. This usually involves putting the alarm panel into pairing mode and entering your WiFi credentials into the app.
- Once connected, you can control and monitor your alarm system remotely via the app.
6. Operating Instructions
6.1 Arming and Disarming
The system offers several arming modes:
- Arm Away: Activates all defense zones. Use when leaving the property. Press the 'Arm' button on the panel, remote, or app.
- Arm Home: Activates perimeter zones (e.g., door/window sensors) while allowing movement within the property. Press the 'Home' button on the panel, remote, or app.
- Disarm: Deactivates all defense zones. Enter your password on the keypad, press the 'Disarm' button on the remote, or use the app.
6.2 Scheduled Arm/Disarm
You can program up to three groups of scheduled arming and disarming times:
- Access the system settings menu on the main panel.
- Navigate to 'Scheduled Arm/Disarm' or 'Timer Settings'.
- Set the desired time and arming mode (Away/Home) for each group.
- Save the settings.
6.3 Alarm Notifications
Upon an alarm event, the system will:
- Activate the siren.
- Initiate automatic voice calls to the 6 predefined alarm numbers.
- Send SMS notifications to the 3 predefined SMS numbers.
- Send push notifications to the Smart Life app on your smartphone.
6.4 Keypad Usage
The keypad is used for entering passwords, programming settings, and direct dialing. The LCD display provides visual feedback for all operations.

Figure 6.1: Main Control Panel with active LCD display.
6.5 Remote Control and Intercom Function
The Smart Life app allows full remote control of the system. You can arm/disarm, check status, and even use the intercom function to communicate through the main panel's built-in speaker and microphone.
7. Maintenance
7.1 Battery Replacement
The main panel's internal rechargeable battery has a limited lifespan. If the system frequently reports low battery or power failure alarms despite being connected to power, the battery may need replacement. Use only specified AAA NI-HM rechargeable batteries. Consult a qualified technician if unsure.
7.2 Cleaning
Clean the main panel and sensors regularly with a soft, dry cloth. Do not use abrasive cleaners, solvents, or spray directly onto the devices, as this may damage the electronics.
7.3 Regular Checks
Periodically test your alarm system to ensure all components are functioning correctly:
- Test each sensor by triggering it while the system is armed.
- Verify that alarm calls and SMS notifications are received.
- Check the backup battery by temporarily disconnecting main power and observing if the system remains operational.
8. Troubleshooting
| Problem | Possible Cause | Solution |
|---|---|---|
| System does not power on. | No power from adapter; faulty adapter; battery depleted. | Check power adapter connection and outlet. Ensure backup battery is charged. Replace adapter if faulty. |
| Cannot connect to WiFi. | Incorrect WiFi password; weak signal; router issues; panel not in pairing mode. | Verify WiFi password. Move panel closer to router. Restart router. Ensure panel is in WiFi pairing mode as per app instructions. |
| No GSM signal or calls/SMS not sent. | SIM card not inserted correctly; SIM card inactive/no credit; poor GSM reception. | Reinsert SIM card. Check SIM card status with your mobile provider. Relocate panel for better reception. |
| Wireless sensor not triggering alarm. | Sensor battery low; sensor out of range; sensor not paired correctly. | Replace sensor battery. Move sensor closer to main panel. Re-pair the sensor. |
| Wired sensors not functioning correctly. | Incorrect wiring; missing/incorrect resistors; faulty sensor. | Review wiring diagram in the assembly instructions. Ensure correct resistor values are used. Test individual sensors. |
| False alarms. | Improper sensor placement; environmental factors (pets, drafts); faulty sensor. | Adjust sensor sensitivity or placement. Ensure sensors are not obstructed. Test and replace faulty sensors. |
| System is hard to set up. | Complex configuration steps; unclear instructions. | Carefully re-read each step in the setup guide. Watch online tutorials if available. Contact customer support for assistance. |
9. Technical Specifications
| Feature | Detail |
|---|---|
| Model Number | sensor-alm-gsm015 |
| Dimensions (L x W x H) | 10 x 10 x 5 cm (approx. 18 x 13.5 cm for main panel) |
| Weight | 640 grams |
| Brand | ZONADAH |
| Color | White |
| Power Source | Battery powered (with AC adapter) |
| Backup Battery | Integrated rechargeable AAA NI-HM battery |
| Compatible Devices | Smartphone (via Smart Life App) |
| Connectivity Technology | Wireless (WiFi, GSM) |
| Installation Type | DIY Wireless |
| Alert Type | Audio and Motion |
| Control Method | Application, Remote Control, Keypad |
| Wired Defense Zones | 7 |
| Wireless Defense Zones | 99 |
| Spare Parts Availability | 10 Years |
10. Warranty and Support
10.1 Product Warranty
ZONADAH products are manufactured to high-quality standards. This product comes with a standard manufacturer's warranty against defects in materials and workmanship. Please refer to the warranty card included in your package for specific terms and conditions. Keep your purchase receipt as proof of purchase.
Spare parts for this model are available for a period of 10 years from the date of purchase.
10.2 Customer Support
If you encounter any issues during installation or operation, or if you have questions about your ZONADAH Smart Life WiFi GSM Home Security Alarm System, please contact our customer support team. For the most up-to-date contact information, please visit the official ZONADAH website or refer to the contact details provided with your product packaging.
When contacting support, please have your product model number (sensor-alm-gsm015) and purchase details ready.