
1. Safety Information
Please read all instructions carefully before assembly and use. Keep this manual for future reference.
- Weight Capacity: Do not exceed a total weight of 1200 pounds on the bed frame.
- Assembly: Ensure all parts are securely fastened before use. Keep children and pets away from the assembly area.
- Placement: Place the bed frame on a flat, stable, and level surface.
- Electrical Safety: Do not overload the charging station. Ensure cables are not pinched or damaged. Unplug the charging station when not in use or during cleaning.
- Maintenance: Periodically check all bolts and connections to ensure they remain tight.
2. Package Contents
Verify that all components are present before beginning assembly. If any parts are missing or damaged, please contact customer support.
- Headboard
- Footboard
- Side Rails (2)
- Support Slats
- Center Support Legs
- Hardware Pack (bolts, washers, Allen wrench)
- LED Light Strip
- Charging Station Unit
- Remote Control for LED Lights
- User Manual
3. Setup and Assembly Instructions
This bed frame is designed for easy assembly with numbered parts and a quick lock-on installation system. Two people are recommended for assembly.
- Unpack and Identify Parts: Carefully remove all components from the packaging. Lay them out and compare them with the parts list in your manual to ensure everything is present. Each part is labeled with a corresponding number.
- Assemble Headboard and Footboard: Attach the headboard and footboard sections according to the diagrams in your included manual, using the specified bolts and tools from the hardware pack.
- Connect Side Rails: Securely attach the side rails to the assembled headboard and footboard using the provided hardware. Ensure all connections are tight.
- Install Support Slats: Place the metal support slats across the bed frame. The quick lock-on system allows for easy and secure installation. Ensure all slats are properly seated and locked into place to provide robust mattress support.
- Attach Center Support Legs: Install any required center support legs to the frame for added stability.
- Install LED Light Strip: Carefully attach the LED light strip to the designated areas on the headboard and footboard. Ensure the adhesive is clean and dry for optimal adhesion. Connect the LED strip to its power source.
- Install Charging Station: Mount the charging station unit to the designated location on the headboard. Connect its power cable to a wall outlet.
- Final Check: Double-check all connections and ensure the frame is stable and secure before placing a mattress on it.

Image: Detailed view of the bed frame's metal slat support system and reinforced legs, highlighting the sturdy construction.

Image: Full view of the assembled bed frame with LED lights illuminated, showcasing the headboard and footboard lighting.
4. Operating Instructions
4.1 LED Lights
The integrated LED lights offer customizable ambiance for your bedroom.
- Power On/Off: Use the remote control or the dedicated smartphone app to turn the lights on or off.
- Color Selection: Choose from over 60,000 colors using the remote or app.
- Modes: Explore various lighting modes including Music Mode (lights react to sound), Mic Mode (lights react to voice), and Timing Mode (set schedules for lights to turn on/off).

Image: RGB LED lights with remote control and smartphone app interface for color and mode selection.
4.2 Charging Station
The built-in charging station provides convenient power access.
- Power Connection: Ensure the charging station's power cord is securely plugged into a functional wall outlet.
- Charging Devices: Utilize the two standard AC outlets, one USB-A port, and one Type-C port to charge your electronic devices.

Image: Close-up of the integrated charging station on the headboard, featuring AC outlets, USB, and Type-C ports.
5. Maintenance
- Cleaning: Wipe the bed frame with a dry cloth to remove dust and debris. Avoid using harsh chemicals or abrasive cleaners.
- Hardware Check: Periodically (e.g., every 3-6 months) inspect all bolts and screws. Tighten any loose connections to maintain stability and prevent squeaking.
- LED Lights: If the LED strip becomes dirty, gently wipe it with a soft, dry cloth. Do not immerse in water.
6. Troubleshooting
- Problem: Bed frame is squeaking.
- Solution: Ensure all bolts and screws are tightened. Check that the bed frame is placed on a level surface. Consider placing a non-slip mat between the mattress and the slats if the mattress is sliding, which can sometimes contribute to noise.
- Problem: LED lights are not working.
- Solution: Verify that the LED light strip is properly connected to its power source and that the power source is active. Check the remote control battery. If using the app, ensure your device is correctly paired with the LED controller.
- Problem: Charging station is not providing power.
- Solution: Confirm that the charging station's power cord is securely plugged into a functional wall outlet. Test the outlet with another device. Try charging a different device or using a different cable to rule out device/cable issues.
- Problem: Mattress slides on the frame.
- Solution: Place a non-slip mattress pad or grip mat directly on top of the bed slats before placing your mattress. This will help prevent movement.
7. Specifications
| Size | Twin |
| Material | Metal |
| Product Dimensions (L x W x H) | 79.8" x 39.5" x 39.4" |
| Maximum Weight Recommendation | 1200 lbs (544.3 kg) |
| Included Components | Bed frame, Slats, LED Light Strip, Charging Station |
| Assembly Required | Yes |
| Product Care Instructions | Wipe with Dry Cloth |
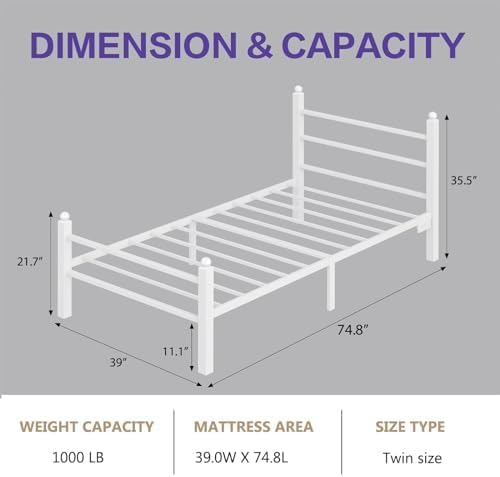
Image: Diagram illustrating the dimensions and weight capacity of the Twin bed frame.
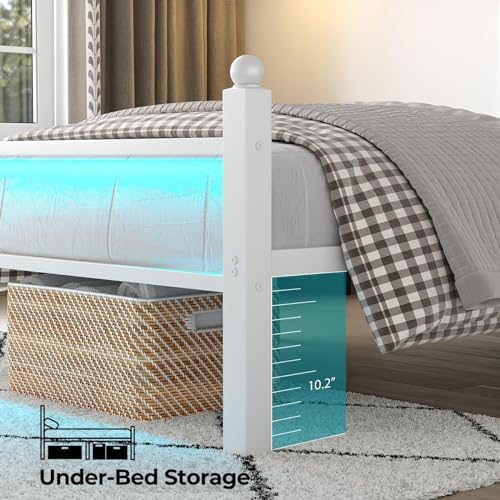
Image: Illustration of the under-bed storage space, demonstrating how items can be stored beneath the frame.
8. Warranty and Support
For warranty information, technical support, or to report missing/damaged parts, please contact PUNICE customer service. Refer to your purchase documentation for specific contact details.
Manufacturer: PUNICE