Important Safety Instructions
Please read all instructions carefully before operating the dehumidifier and retain this manual for future reference. Failure to follow these instructions may result in electric shock, fire, or serious injury.
- Always connect the dehumidifier to a grounded power outlet.
- Do not operate the unit if the power cord or plug is damaged.
- Ensure the dehumidifier is placed on a level, stable surface to prevent water spillage.
- Maintain a minimum clearance of 8 inches (20 cm) around the unit for proper airflow.
- Do not insert fingers or foreign objects into the air inlet or outlet.
- Unplug the unit before cleaning or performing any maintenance.
- Do not use the dehumidifier in areas where flammable gases or liquids are present.
- This appliance is not intended for use by persons (including children) with reduced physical, sensory or mental capabilities, or lack of experience and knowledge, unless they have been given supervision or instruction concerning use of the appliance by a person responsible for their safety.
Product Overview
The hOmeLabs 1,000 Sq. Ft Portable Dehumidifier is designed to efficiently remove excess moisture from your indoor environment, improving air quality and comfort. It is ideal for small spaces such as bedrooms, bathrooms, offices, and closets, covering up to 1,000 square feet.

Image: The hOmeLabs 1,000 Sq. Ft Portable Dehumidifier, a compact white unit, shown next to its blue product packaging. The unit features a top handle and a visible water level indicator on the front.
This compact unit is capable of removing up to 8 pints of moisture per day (at 89.6°F, 80% RH) and operates at an ultra-quiet 33dB, making it suitable for noise-sensitive environments. It offers both manual bucket drainage and continuous drainage options for convenience.

Image: A diagram illustrating the dimensions of the hOmeLabs 8 Pint Dehumidifier. The unit measures 15.2 inches in height, 11.0 inches in width, and 7.7 inches in depth. The handle adds an additional 2.5 inches to the height.
Setup
1. Unpacking and Placement
- Carefully remove the dehumidifier from its packaging.
- Place the unit upright on a firm, level surface in the area where dehumidification is desired.
- Ensure there is at least 8 inches (20 cm) of space around all sides of the unit for proper air circulation. Do not block the air inlet or outlet.
- Avoid placing the unit near heat sources, direct sunlight, or in areas exposed to freezing temperatures.
2. Power Connection
- Plug the power cord into a grounded 120V/60Hz electrical outlet.
- Do not use extension cords or power strips.
3. Drainage Options
Your dehumidifier offers two drainage methods: manual bucket drainage or continuous drainage using the included hose.

Image: A split image demonstrating the two drainage options. On the left, a person is shown removing the built-in water tank for manual emptying. On the right, the dehumidifier is connected to a gravity drain hose, illustrating continuous drainage into a floor drain.
Manual Drainage (Built-in Tank)
- The dehumidifier will collect water in its internal water tank.
- When the tank is full, the unit will automatically shut off and an indicator light will illuminate.
- Carefully remove the water tank from the front of the unit.
- Empty the collected water into a sink or drain.
- Replace the empty water tank firmly back into the unit until it clicks into place. The unit will resume operation.
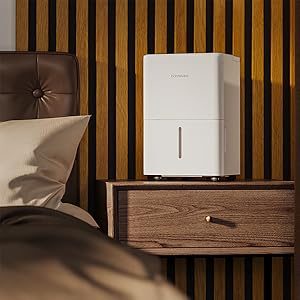
Image: A close-up view of the hOmeLabs dehumidifier's water collection tank being pulled out from the bottom front of the unit for emptying.
Continuous Drainage (Drain Hose)
- For continuous operation without needing to empty the tank, attach the included 3.3 ft drain hose.
- Locate the drain outlet on the back or side of the dehumidifier (refer to diagram in manual if available).
- Connect one end of the drain hose to the drain outlet. Ensure a secure connection to prevent leaks.
- Direct the other end of the hose to a suitable drain, such as a floor drain, large sink, or bucket. Ensure the hose is sloped downwards to allow gravity drainage.
- Do not allow the end of the hose to be submerged in water, as this can cause backflow.
Operating Instructions
Control Panel

Image: A close-up view of the hOmeLabs dehumidifier's top control panel. It features a digital display showing "35", and buttons for "TIMER", "MODE", power, and humidity adjustment (+/-). Indicator lights for "Comfort", "Continuous Drain", "Turbo", "Auto Defrost", and "Tank Full" are also visible.
- Power Button (⏻): Turns the dehumidifier ON or OFF.
- Mode Button: Cycles through different operating modes:
- Comfort Mode: Automatically sets the humidity level for optimal comfort.
- Turbo Mode: Operates at maximum fan speed for faster moisture removal.
- Continuous Drain Mode: Runs continuously, ideal when using the drain hose.
- Humidity Adjustment Buttons (+/-): Used to set your desired humidity level (typically between 35% and 80% Relative Humidity).
- Timer Button: Sets a timer for the unit to turn ON or OFF (1-24 hours).
- Tank Full Indicator: Illuminates when the water tank is full and needs to be emptied.
- Auto Defrost Indicator: Illuminates when the unit is performing an auto-defrost cycle.
Setting Desired Humidity Level
- Turn on the dehumidifier using the Power button.
- Press the Humidity Adjustment buttons (+/-) to select your desired humidity level. The display will show the set humidity.
- The unit will operate until the ambient humidity reaches the set level, then it will cycle on and off to maintain it.
Using the Timer Function
- To set a timer for the unit to turn OFF: While the unit is ON, press the Timer button. Use the +/- buttons to select the desired number of hours (1-24) after which the unit will turn off.
- To set a timer for the unit to turn ON: While the unit is OFF, press the Timer button. Use the +/- buttons to select the desired number of hours (1-24) after which the unit will turn on.
Maintenance
Regular maintenance ensures optimal performance and longevity of your dehumidifier.
Cleaning the Air Filter
The air filter should be cleaned every two weeks or more frequently depending on usage and air quality.
- Unplug the dehumidifier from the power outlet.
- Locate the air filter, typically on the back or side of the unit. Gently pull it out.
- Rinse the filter under running tap water (not hot water) or use a vacuum cleaner to remove dust and debris.
- Allow the filter to air dry completely before reinserting it into the unit. Do not expose it to direct sunlight or heat.
- Once dry, slide the filter back into its slot.

Image: A white air filter from the dehumidifier is shown being cleaned under running water in a kitchen sink, demonstrating the washable nature of the filter.
Cleaning the Water Tank
Clean the water tank regularly to prevent mold and mildew growth.
- Remove the water tank from the unit.
- Wash the tank with mild detergent and warm water.
- Rinse thoroughly and dry completely before placing it back into the dehumidifier.
External Cleaning and Storage
- Wipe the exterior of the unit with a soft, damp cloth. Do not use harsh chemicals or abrasive cleaners.
- For long-term storage, ensure the unit is completely dry, including the water tank and internal components. Store in a cool, dry place, covered to protect from dust.
Troubleshooting
Before contacting customer support, please refer to the following table for common issues and their solutions.
| Problem | Possible Cause | Solution |
|---|---|---|
| Dehumidifier does not turn on. | No power; Water tank full or not properly seated; Temperature too low. | Check power connection; Empty and re-seat water tank; Ensure room temperature is above 41°F (5°C). |
| No water collected. | Humidity level too low; Air filter clogged; Room temperature too low; Unit in fan-only mode. | Adjust desired humidity lower; Clean air filter; Ensure room temperature is suitable; Select dehumidifying mode. |
| Unit is noisy. | Unit not on a level surface; Air filter clogged; Obstruction in fan. | Place on a level surface; Clean air filter; Check for and remove any obstructions. |
| Frost on coils. | Low room temperature. | This is normal; the unit has an auto-defrost function. If persistent, increase room temperature. |
| Error Codes (e.g., E1, E2). | Sensor malfunction or other internal issue. | Unplug the unit for 10 minutes, then plug back in. If the error persists, contact customer support. |
Specifications
| Feature | Detail |
|---|---|
| Brand | hOmeLabs |
| Model Name | HME010081N (Product Model: HME0081) |
| Dehumidification Capacity | 8 Pints per Day (at 89.6°F, 80% RH) |
| Coverage Area | Up to 1000 Square Feet |
| Water Tank Capacity | 0.8 Gallons (approx. 6.4 pints) |
| Product Dimensions (DxWxH) | 7.7"D x 11"W x 15.2"H |
| Item Weight | 24 pounds |
| Operation Mode | Sleep (also Comfort, Turbo, Continuous) |
| Color | White |
| UPC | 810049721725 |
Warranty and Support
For warranty information and customer support, please refer to the warranty card included with your product packaging or visit the official hOmeLabs website. You may also contact hOmeLabs customer service directly for assistance with product inquiries, troubleshooting, or parts replacement.
Please have your model number (HME0081) and purchase date available when contacting support.


