1. Introduction
This manual provides detailed instructions for the installation, operation, and maintenance of your ALIBELL Wireless Strobe Siren Kit. This system is designed to provide an emergency alert with a loud siren and flashing light, activated by remote panic buttons. Please read this manual thoroughly before use to ensure proper functionality and safety.
2. Product Overview and Package Contents
The ALIBELL Wireless Strobe Siren Kit includes a main siren unit and two wireless panic buttons. The siren features both audible and visual alerts, while the panic buttons allow for remote activation.

Image 2.1: The ALIBELL Wireless Strobe Siren Kit, showing the main siren unit and two remote panic buttons.
Package Contents:
- 1 x ALIBELL Strobe Siren Unit
- 2 x Wireless Panic Buttons
- 3 x AAA Batteries (for siren)
- Power Adapter (for siren plug-in option)
- Mounting Screws and Wall Anchors
- Adhesive Stickers (for panic buttons)
- User Manual (this document)
3. Setup and Installation
Follow these steps to set up your ALIBELL Strobe Siren Kit.
3.1 Powering the Siren Unit
The siren unit can be powered by either AAA batteries or the included power adapter.
- Battery Power: Insert 3 AAA batteries into the battery compartment. Ensure correct polarity. The siren will function normally on battery power.
- Plug-in Power: Connect the power adapter to the siren unit and plug it into a standard electrical outlet. The siren will operate on AC power, and the batteries will serve as a backup in case of a power outage.
3.2 Mounting the Siren Unit
The siren unit can be mounted on a wall or placed on a flat surface.
- Choose a visible location for the siren, ensuring it is within wireless range of the panic buttons (up to 100m/328ft in open areas).
- If wall-mounting, use the provided screws and wall anchors to secure the siren unit's bracket to the wall.
- Attach the siren unit to the mounted bracket.

Image 3.1: Diagram illustrating the installation of the siren unit on a wall.
3.3 Installing Panic Buttons
The panic buttons are waterproof and can be fixed to a wall using adhesive stickers or screws.
- Choose easily accessible locations for the panic buttons, such as near beds, doors, or common areas.
- Use the provided adhesive stickers to attach the buttons to a clean, dry surface.
- Alternatively, use screws to secure the button's backplate to the wall, then attach the button.
The panic buttons are typically pre-paired with the siren unit. If re-pairing is required, refer to the product's supplementary materials or contact support.
4. Operating Instructions
This section details how to operate your ALIBELL Strobe Siren Kit.
4.1 Activating the Alarm
To activate the alarm, press the "Call" button on any of the paired panic buttons. The siren unit will emit a loud sound and flash a red light.

Image 4.1: Illustration of the alarm being activated in a home environment, showing the siren and panic button placement.

Image 4.2: The ALIBELL alarm system deployed in multiple scenarios, including a warehouse, office, retail store, and garage, demonstrating its versatility.
4.2 Canceling the Alarm
To cancel an active alarm:
- Press the "Cancel" button on any of the paired panic buttons.
- Alternatively, briefly press any button on the siren unit itself.
4.3 Adjusting Volume and Alarm Duration
The siren unit allows for adjustment of both volume and alarm duration.
- Volume Levels: The siren has four volume settings: 0 dB (silent), 80 dB, 100 dB, and 120 dB (default). Use the volume button on the siren unit to cycle through these options.
- Alarm Duration: The alarm can be set to sound for 30 seconds, 1 minute, 3 minutes, or 10 minutes. Use the alarm time setting button on the siren unit to select the desired duration.

Image 4.3: Close-up view of the siren unit, highlighting the On/Off button, Alarm Time Setting Button, and Volume/Registration Button.
4.4 Low Battery Reminder
When the siren unit's battery is low, the LED indicator will flash once every 40 seconds, and the siren will emit three short beeps. This indicates that the batteries need to be replaced promptly to ensure continuous operation.
5. Maintenance
Proper maintenance ensures the longevity and reliable performance of your ALIBELL Strobe Siren Kit.
5.1 Battery Replacement
Replace the AAA batteries in the siren unit when the low battery reminder activates. The panic buttons typically use 23A 12V batteries; replace them as needed.
- For the panic button, gently pull down the base to detach it from the main unit.
- Remove the screws from the base using a screwdriver.
- Carefully replace the old battery with a new one, ensuring correct polarity.
- Reassemble the unit.

Image 5.1: Step-by-step guide for replacing the battery in a panic button, showing how to open the unit and insert a new battery.
5.2 Cleaning
Wipe the siren unit and panic buttons with a soft, dry cloth. Do not use abrasive cleaners or solvents, as these can damage the device's surface.
6. Troubleshooting
If you encounter issues with your ALIBELL Strobe Siren Kit, refer to the following troubleshooting guide:
| Problem | Possible Cause | Solution |
|---|---|---|
| Siren does not activate when panic button is pressed. |
|
|
| Siren sounds continuously or unexpectedly. |
|
|
| Low battery reminder activates frequently. |
|
|
7. Specifications
Key technical specifications for the ALIBELL Wireless Strobe Siren Kit:
| Feature | Detail |
|---|---|
| Brand | ALIBELL |
| Model Number | SC-R18, APE220 1-2 |
| Sound Level | Up to 120 dB |
| Wireless Range | Up to 100m (328ft) in open areas |
| Power Source (Siren) | 3 x AAA Batteries (included) or 5V DC Power Adapter |
| Control Method | Tactile (button press) |
| Mounting Type | Wall Mount |
| Product Dimensions (Siren) | 20 x 12 x 7 cm; 500 grams (approx. 7.87 x 4.72 x 2.76 inches) |
| Operating Temperature | -20°C to 55°C (-4°F to 130°F) |
| Panic Button Water Resistance | IP55 |

Image 7.1: Detailed product dimensions for both the siren unit and the panic button.
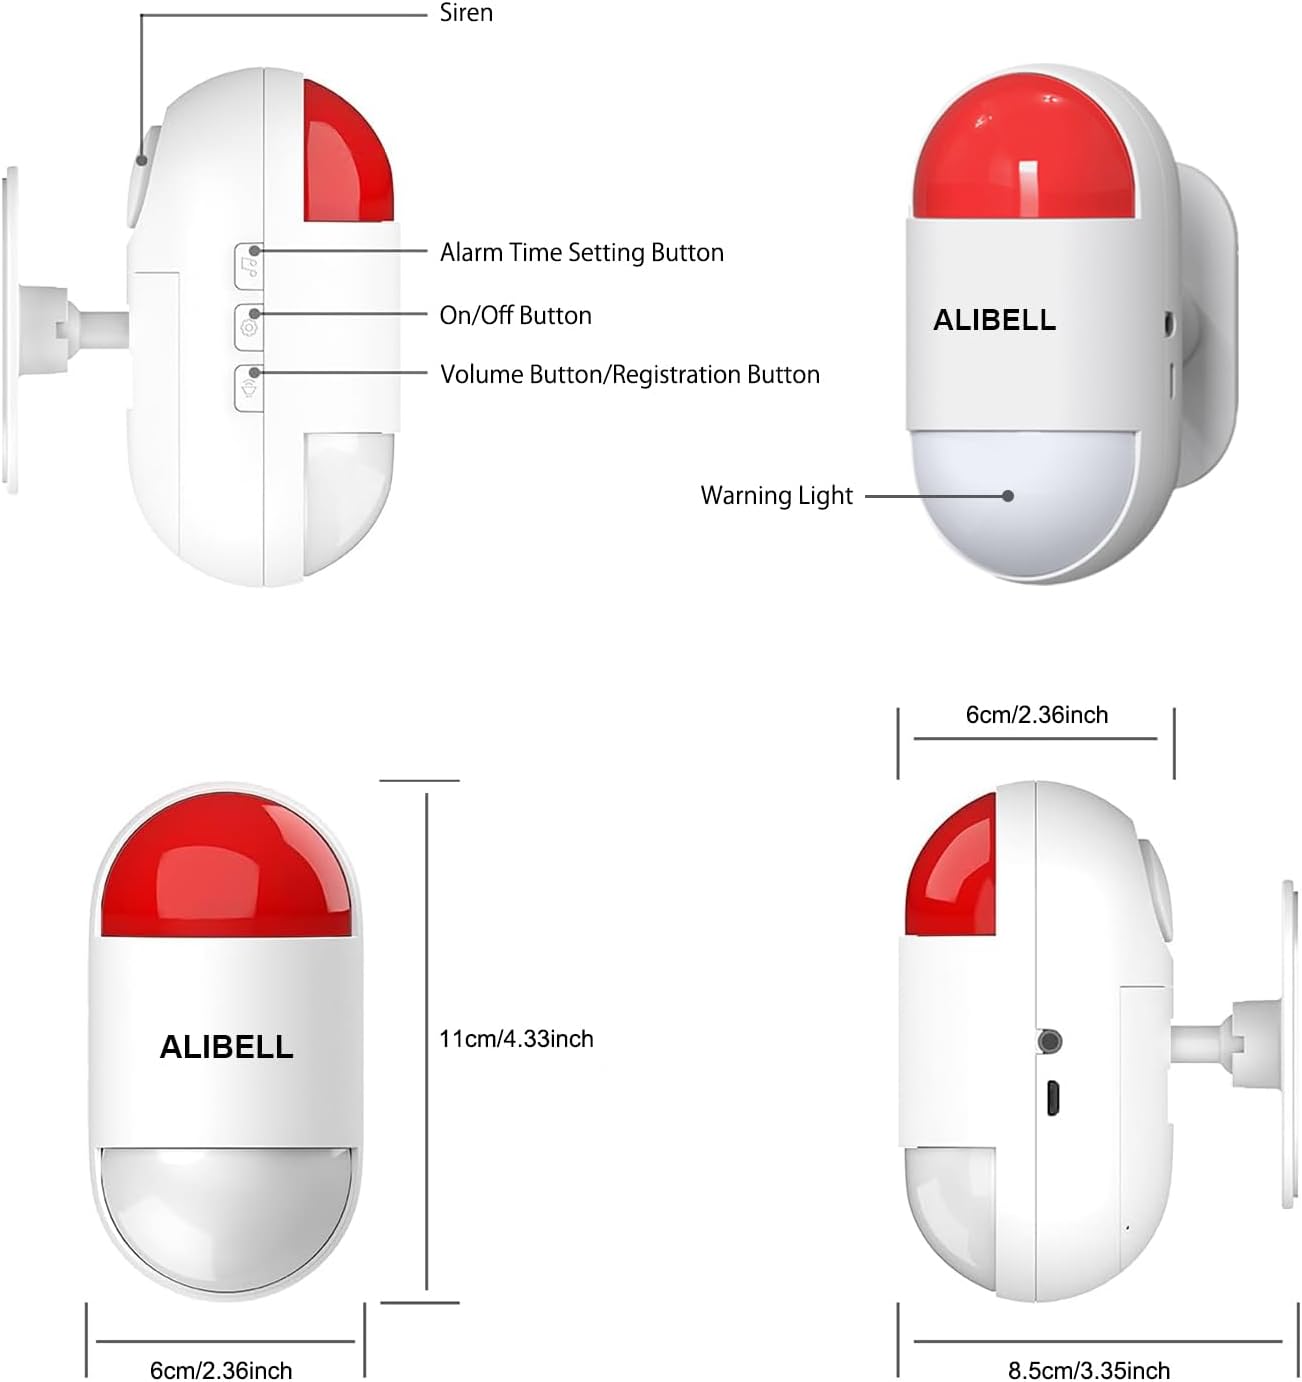
Image 7.2: The siren unit displaying its working temperature range from -4°F to 130°F (-20°C to 55°C).

Image 7.3: The panic button highlighting its IP55 water resistance rating, indicating protection against dust and low-pressure water jets.
8. Warranty and Support
For warranty information or technical support, please refer to the product packaging or contact ALIBELL customer service through the retailer where the product was purchased. Keep your purchase receipt for warranty claims.


