1. Introduction
This user manual provides detailed instructions for the safe and efficient operation, installation, and maintenance of your Elevon Compact Laundry Dryer. Please read this manual thoroughly before using the appliance and retain it for future reference.
The Elevon Compact Laundry Dryer is designed for small spaces, apartments, RVs, and homes, offering efficient drying with its 1.95 cubic feet capacity and multiple drying modes. It is compact in size, weighing approximately 34.17 pounds, making it easily movable.

Figure 1: Front view of the Elevon Compact Laundry Dryer.
2. Important Safety Instructions
To reduce the risk of fire, electric shock, or injury to persons when using your appliance, follow basic precautions, including the following:
- Read all instructions before using the dryer.
- Do not dry articles that have been previously cleaned in, washed in, soaked in, or spotted with gasoline, dry-cleaning solvents, or other flammable or explosive substances, as they emit vapors that could ignite or explode.
- Do not allow children to play on or in the appliance. Close supervision of children is necessary when the appliance is used near children.
- Before the appliance is removed from service or discarded, remove the door to the drying compartment.
- Do not reach into the appliance if the drum is moving.
- Do not install or store this appliance where it will be exposed to the weather.
- Do not tamper with controls.
- Do not repair or replace any part of the appliance or attempt any servicing unless specifically recommended in this user-maintenance instructions or in published user-repair instructions that you understand and have the skills to carry out.
- Do not use fabric softeners or products to eliminate static unless recommended by the manufacturer of the fabric softener or product.
- Do not use heat to dry articles containing foam rubber or similarly textured rubber-like materials.
- Clean lint screen before or after each load.
- Keep area around the exhaust opening and adjacent surrounding areas free from the accumulation of lint, dust, and dirt.
- The interior of the appliance and exhaust ducting should be cleaned periodically by qualified service personnel.
- Do not place items exposed to cooking oils in your dryer. Items contaminated with cooking oils may contribute to a chemical reaction that could cause a load to catch fire.
- Do not use this appliance for purposes other than its intended use.
- Always disconnect the appliance from the power supply before attempting any service.

Figure 2: Important safety warnings located on the side of the dryer, emphasizing lint filter cleaning and fire prevention.
3. Setup and Installation
Your Elevon Compact Laundry Dryer offers flexible installation options to suit various living spaces. Ensure the chosen location is level, well-ventilated, and has access to a power outlet.
3.1 Unpacking
- Carefully remove the dryer from its packaging.
- Inspect the dryer for any shipping damage. Report any damage to your retailer immediately.
- Remove all packing materials, including any tape or protective films.
3.2 Placement Options
The dryer can be installed in several ways:
- Freestanding: Place the dryer on a flat, stable surface.
- Stacking: The dryer can be stacked on top of a compatible washing machine. Ensure proper stacking kit is used (not included).
- Wall-mounted: The dryer can be mounted on a wall using a wall bracket (not included). Ensure the wall can support the dryer's weight.
- Side by Side: Place the dryer next to a washing machine on a flat surface.

Figure 3: Illustration of various installation methods including freestanding, stacking, wall-mounted, and side-by-side placement.
3.3 Ventilation
The dryer comes with an exhaust pipe. Ensure proper ventilation to prevent moisture buildup and ensure efficient drying. The exhaust pipe should be directed outdoors or into a well-ventilated area.
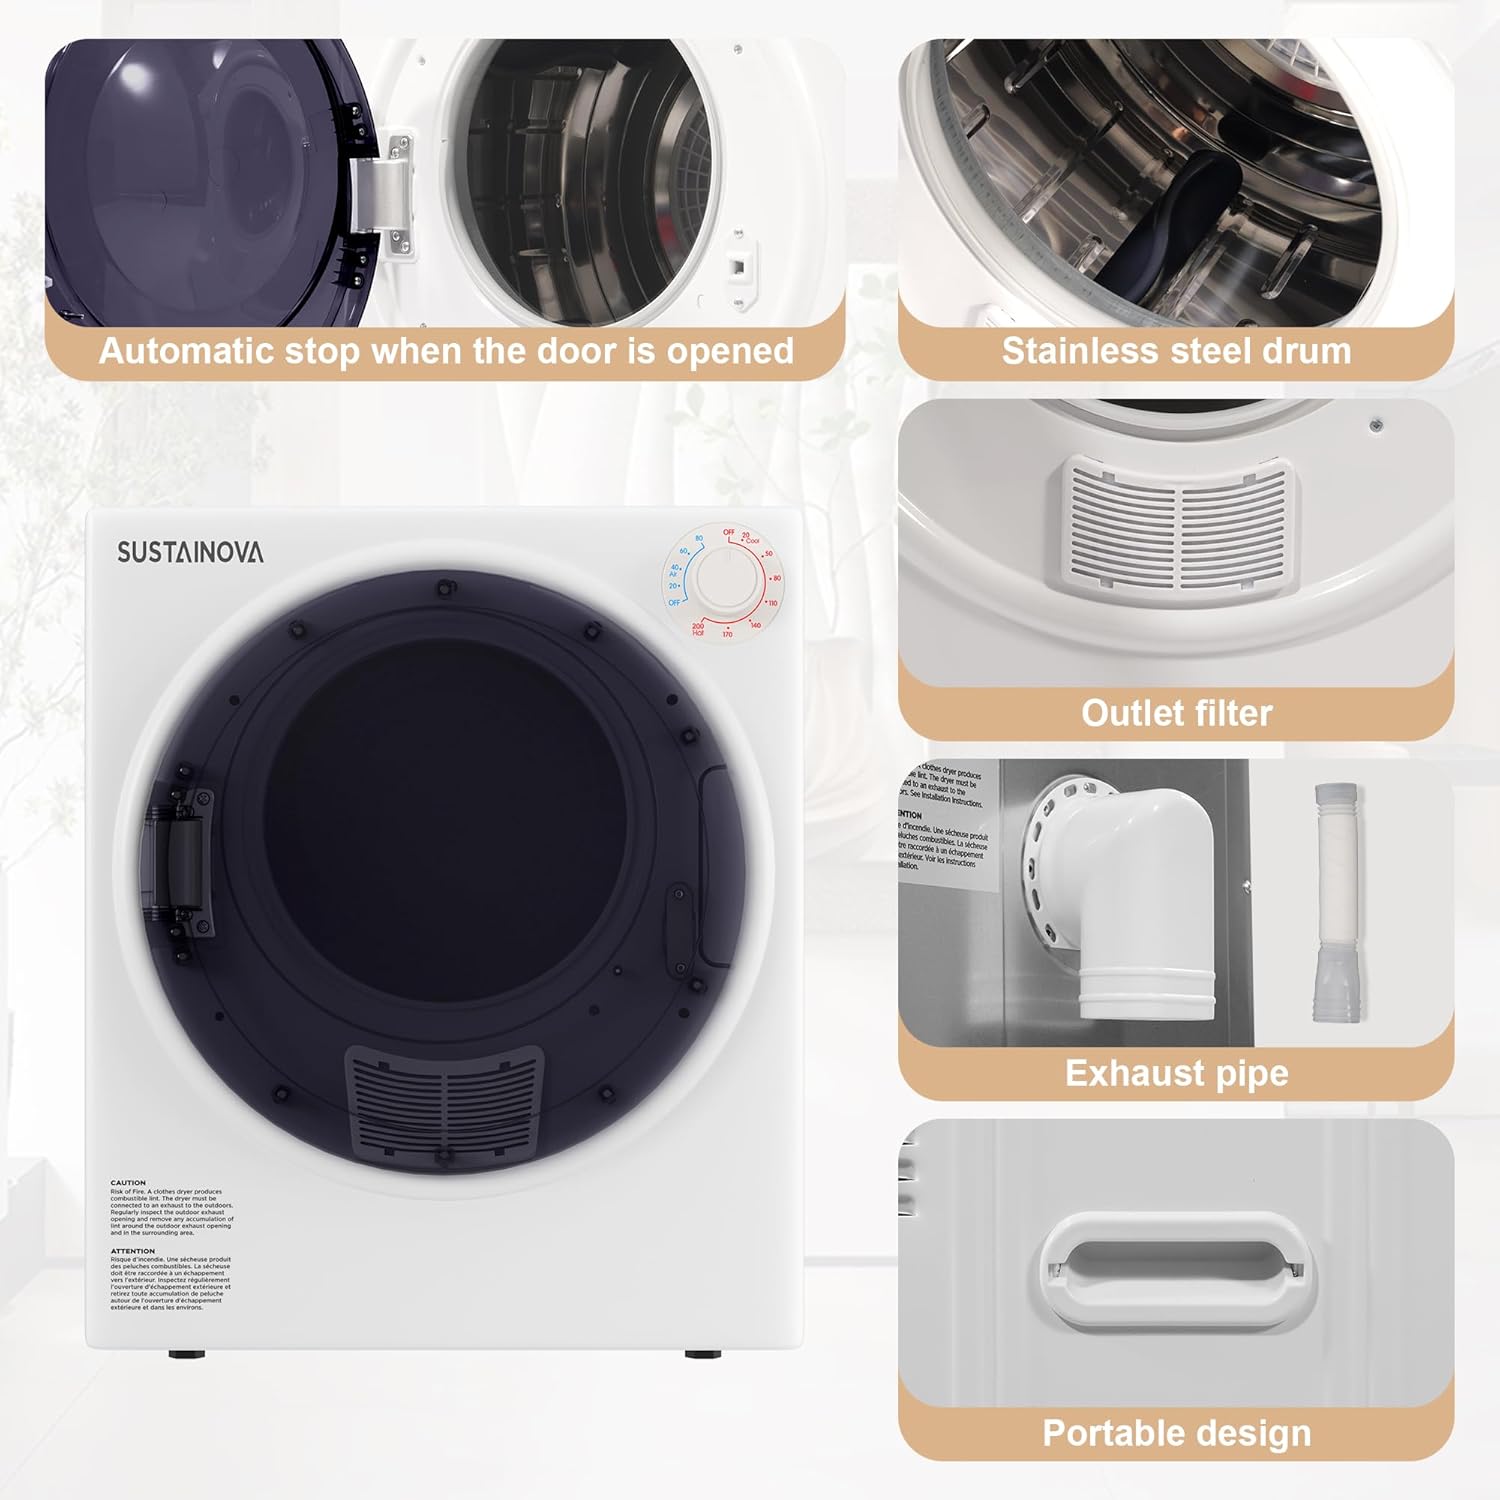
Figure 4: Detail of the exhaust pipe connection and outlet filter.
4. Operating Instructions
The Elevon Compact Laundry Dryer features a user-friendly control panel with a rotary dial for selecting drying modes and time.
4.1 Control Panel Overview

Figure 5: The control panel features a rotary dial for selecting drying time and heat settings.
4.2 Drying Modes
The dryer offers 5 drying modes:
- Cooling (0-20 mins): For cooling down clothes after a hot cycle or for delicate items.
- Anti-Wrinkle (30-60 mins): Helps reduce wrinkles in fabrics.
- Air Dry (0-80 mins): Dries clothes without heat, suitable for very delicate items or refreshing clothes.
- Warm (60-150 mins): Standard drying for most fabric types.
- Hot (150-200 mins): For heavy fabrics or larger loads requiring maximum drying.
4.3 Loading the Dryer
- Do not overload the dryer. The maximum capacity is 10 lbs (wet clothes weight). For faster drying, do not exceed 6.6 lbs.
- Ensure clothes are properly spun in a washing machine to remove excess water.
- The stainless steel inner tub is designed for durability and efficient drying.

Figure 6: The dryer's interior showing clothes in the stainless steel drum during operation, illustrating the powerful drying process.
4.4 Starting a Cycle
- Load clothes into the dryer.
- Close the door securely. The dryer has an automatic stop feature when the door is opened.
- Select the desired drying mode and time using the control dial.
- The dryer will begin operation. It runs quietly to minimize disturbance.
5. Maintenance and Care
Regular maintenance ensures the longevity and efficient performance of your dryer.
5.1 Cleaning the Lint Filter
Clean the lint filter before or after each load to maintain drying efficiency and prevent fire hazards. The dryer features a multi-filtration system including an air inlet filter, inner cylinder filter, and air outlet filter.
- Locate the lint filter inside the drum.
- Remove the filter and clean off any accumulated lint.
- Reinsert the filter securely before the next use.
- The filters can be easily cleaned with a soft brush or vacuum.

Figure 7: Exploded view of the multi-filtration system, highlighting the air inlet, inner cylinder, and air outlet filters.
5.2 Exterior Cleaning
Wipe the exterior of the dryer with a soft, damp cloth. Do not use abrasive cleaners or solvents.
5.3 Interior Cleaning
Periodically wipe the interior of the drum with a damp cloth. For stubborn stains, a mild detergent can be used, followed by wiping with a clean, damp cloth.
6. Troubleshooting
Before contacting customer service, please refer to the following table for common issues and their solutions.
| Problem | Possible Cause | Solution |
|---|---|---|
| Dryer does not start. | Power cord unplugged; Door not closed properly; Circuit breaker tripped. | Ensure power cord is securely plugged in; Close door firmly; Reset circuit breaker. |
| Clothes not drying completely. | Overloaded dryer; Lint filter clogged; Incorrect drying mode/time selected. | Reduce load size; Clean lint filter; Select appropriate drying mode and longer time. |
| Dryer is noisy. | Dryer not level; Foreign object in drum. | Adjust dryer feet to ensure it is level; Check drum for any loose items. |
| Overheat protection activated. | Restricted airflow; Overloaded. | Ensure exhaust pipe is clear and not blocked; Reduce load size. The PTC ceramic heating element will maintain a safe temperature. |
7. Product Specifications
| Feature | Specification |
|---|---|
| Brand | Elevon |
| Model Number | QD-DY-DRYER2 |
| Capacity | 1.95 Cubic Feet (Rated), Max 10 lbs (wet clothes) |
| Rated Power | 830 Watts |
| Material | Plastic, Stainless Steel (Inner Tub) |
| Color | White/Black |
| Item Weight | 34.2 pounds |
| Package Dimensions | 24.5 x 22 x 19 inches |
| Certification | ETL Certified |
| Special Features | Portable, Overheat Protection, 5 Drying Modes |

Figure 8: Product dimensions for the compact dryer.
8. Warranty Information
The Elevon Compact Laundry Dryer comes with a 1-year warranty from the date of purchase. This warranty covers defects in materials and workmanship under normal use. Please retain your proof of purchase for warranty claims.
For detailed warranty terms and conditions, please refer to the documentation included with your product or contact Elevon customer support.
9. Customer Support
If you have any questions, require technical assistance, or need to make a warranty claim, please contact Elevon customer support. Visit the official Elevon store on Amazon for more information and contact details:


