
1. Introduction
This manual provides detailed instructions for the installation, operation, maintenance, and troubleshooting of the YOURRYONG NY-D08 Spot Welding Machine Controller. The NY-D08 is designed to control spot welding processes, featuring a pneumatic multi-point linkage system, a color LCD display, and a 100A current capacity. Please read this manual thoroughly before using the device to ensure safe and efficient operation.
2. Safety Information
Always adhere to the following safety guidelines to prevent injury or damage to the equipment:
- Electrical Safety: Ensure all power connections are secure and correctly rated. Disconnect power before performing any maintenance or making connections.
- Welding Safety: Spot welding involves high currents and temperatures. Wear appropriate personal protective equipment (PPE), including welding gloves, eye protection, and protective clothing.
- Ventilation: Operate the welding machine in a well-ventilated area to disperse fumes.
- Pneumatic System: If connecting to a pneumatic system, ensure air lines are properly secured and rated for the pressure.
- Children and Unauthorized Personnel: Keep children and unauthorized personnel away from the welding area.
- Environmental Conditions: Do not operate the controller in wet or damp conditions. Avoid exposure to flammable materials.
3. Package Contents
Verify that all components listed below are present in your package:
- NY-D08 Main Control Board
- Color LCD Display Module
- Ribbon Cable for Display Connection
- Temperature Sensor
- Rotary Encoder with Push Button (Control Knob)
- USB Cable (for power/data, if applicable)
- Terminal Blocks and Connectors

Figure 3.1: Overview of the NY-D08 Spot Welding Machine Controller kit components. This image displays the main control board, the color LCD display, connecting cables, a temperature sensor, and the rotary encoder knob.
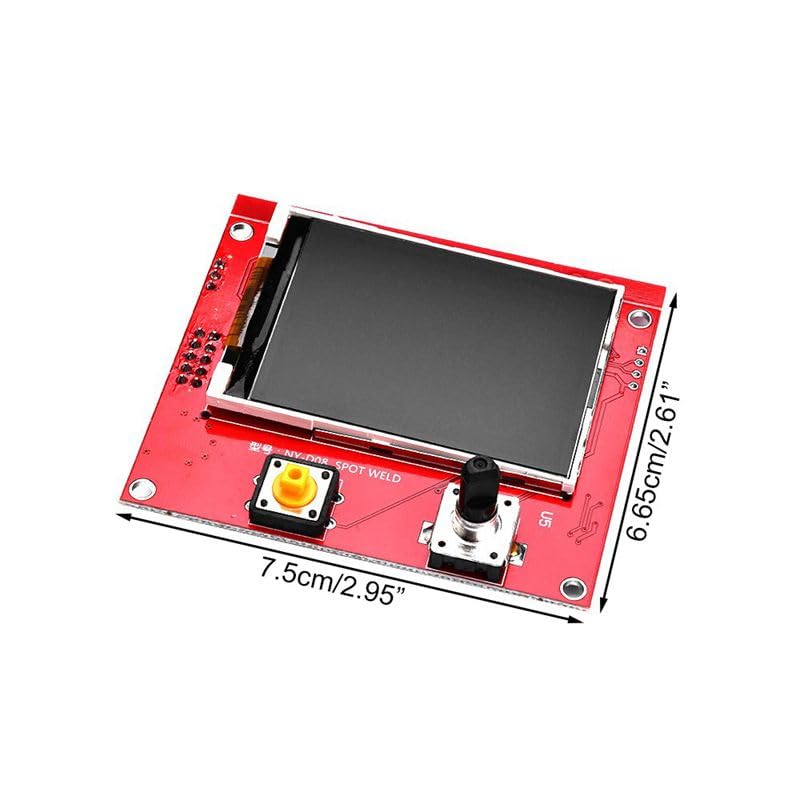
Figure 3.2: Detailed view of the NY-D08 display module, showing its physical dimensions (7.5cm/2.95" by 6.65cm/2.61"). This helps in planning for enclosure integration.
4. Setup and Installation
Follow these steps to correctly set up your NY-D08 controller:
- Mounting: Securely mount the main control board and the LCD display module within an appropriate enclosure, ensuring proper ventilation and protection from environmental factors. Refer to Figure 3.2 for display dimensions.
- Display Connection: Connect the ribbon cable from the main control board to the LCD display module. Ensure the orientation is correct to avoid damage.
- Power Supply Connection: Connect a suitable DC power supply (typically 9-12V, check product specifications for exact voltage and current requirements) to the designated power input terminals on the main control board. Observe correct polarity.
- Welding Transformer Connection: Connect the primary side of your spot welding transformer to the output terminals on the NY-D08 main control board. Ensure the transformer's current rating is compatible with the controller's 100A capacity.
- Temperature Sensor Connection: Connect the provided temperature sensor to its dedicated input on the main control board. This sensor is crucial for monitoring the welding transformer's temperature and preventing overheating.
- Pneumatic Valve Connection (Optional): If using a pneumatic welding setup, connect the control wires from your pneumatic solenoid valve to the designated pneumatic output terminals on the NY-D08 board. This allows the controller to manage electrode pressure.
- Foot Switch/Trigger Connection: Connect a foot switch or external trigger button to the appropriate input terminals for initiating the welding cycle.
- Initial Power-On: After all connections are verified, apply power to the controller. The LCD display should illuminate and show the initial operating screen.
5. Operating Instructions
The NY-D08 controller features an intuitive interface for setting welding parameters.
5.1. Navigation
- Rotary Encoder: Rotate the knob to scroll through menu options or adjust parameter values.
- Push Button: Press the knob to select an option, confirm a setting, or enter a submenu.
5.2. Parameter Settings
Access the main menu to configure the following welding parameters:
- Current (A): Adjust the welding current intensity. Start with lower values and increase gradually.
- Pulse Time (ms): Set the duration of the welding pulse. This determines how long the current flows.
- Pre-Pressure Time (ms): For pneumatic systems, this sets the time the electrodes apply pressure before the welding current is initiated.
- Hold Time (ms): For pneumatic systems, this sets the time the electrodes remain closed after the welding current stops, allowing the weld to solidify.
- Multi-Point Linkage: Configure settings for sequential welding operations if supported by your setup.
- Temperature Threshold: Set the maximum allowable temperature for the welding transformer. The controller will halt operation if this threshold is exceeded.
5.3. Welding Operation
- Ensure the workpiece is clean and properly positioned between the welding electrodes.
- Verify all parameters are set according to your welding requirements.
- Activate the welding cycle using the foot switch or trigger button.
- The controller will execute the pre-pressure, welding pulse, and hold time sequence.
- Monitor the weld quality and adjust parameters as needed.
6. Maintenance
Regular maintenance ensures the longevity and reliable operation of your NY-D08 controller:
- Cleaning: Periodically clean the control board and display with a soft, dry cloth. Ensure no dust or debris accumulates on the components, especially around heat sinks.
- Connections: Regularly inspect all electrical and pneumatic connections for tightness and signs of wear or corrosion.
- Environmental Check: Ensure the operating environment remains within specified temperature and humidity ranges.
- Software Updates: Check the manufacturer's website for any available firmware updates for improved performance or new features.
7. Troubleshooting
Refer to the table below for common issues and their potential solutions:
| Problem | Possible Cause | Solution |
|---|---|---|
| Controller does not power on. | No power supply, incorrect voltage, reversed polarity, loose connection. | Check power supply connection and voltage. Ensure correct polarity. Verify all power cables are securely connected. |
| LCD display is blank or shows errors. | Loose ribbon cable, damaged display, software issue. | Ensure the ribbon cable is firmly connected at both ends. Restart the controller. If the problem persists, contact support. |
| Welding current is too weak or inconsistent. | Incorrect current setting, poor electrode contact, transformer issue, loose welding cables. | Increase the current setting. Clean or replace electrodes. Check connections to the welding transformer and output cables. |
| Pneumatic system not responding. | Incorrect wiring of solenoid valve, no air pressure, faulty valve. | Verify solenoid valve wiring. Check air supply and pressure. Test the solenoid valve independently. |
| Overheat warning on display. | Welding transformer overheating, faulty temperature sensor. | Allow the welding transformer to cool down. Check for adequate ventilation. Verify temperature sensor connection and functionality. |
8. Specifications
Technical specifications for the YOURRYONG NY-D08 Spot Welding Machine Controller:
- Model: NY-D08
- Brand: YOURRYONG
- Maximum Welding Current: 100A (Primary side of transformer)
- Display: Color LCD Screen
- Control Method: Pneumatic Multi-Point Linkage
- Input Voltage: (Typically 9-12V DC, specific voltage not provided in source, user should verify with product documentation or seller)
- Manufacturer Reference: 764921336722
- ASIN: B0CZF9TZL5
- First Available: March 29, 2024
9. Warranty and Support
Specific warranty information for the YOURRYONG NY-D08 Spot Welding Machine Controller is not provided in this manual. For warranty details, technical support, or service inquiries, please contact the seller or manufacturer directly through the platform where the product was purchased.