
Snenblume CP-510
Snenblume 16'x32' Heavy Duty Carport Instruction Manual
Model: CP-510
Introduction
Thank you for choosing the Snenblume 16'x32' Heavy Duty Carport. This manual provides essential information for the safe and efficient assembly, operation, and maintenance of your new portable garage. Please read this manual thoroughly before beginning assembly and retain it for future reference.
This carport is designed to provide spacious and reliable shelter for vehicles such as full-size pickup trucks, SUVs, motorboats, or compact travel trailers, and can also serve as a versatile outdoor shelter for various activities.
Important Safety Information
It is essential to ensure the carport is securely fastened to a stable foundation. Overloading the structure may lead to damage or injury. Always take precautions when assembling or disassembling the product, and refer to the assembly manual for detailed instructions.
Always wear appropriate safety gear during assembly. Do not attempt assembly in high winds or severe weather conditions.
Product Overview
The Snenblume Heavy Duty Carport is engineered for durability and ease of use, featuring a robust metal frame and a waterproof, UV-resistant canopy.

Figure 1: The Snenblume 16'x32' Heavy Duty Carport providing shelter for a vehicle.

Figure 2: Front view of the carport highlighting its spacious design, capable of housing large vehicles.

Figure 3: The carport features convenient roll-up doors and removable side panels for easy access and ventilation. The canopy is made from 160g thickened PE fabric.
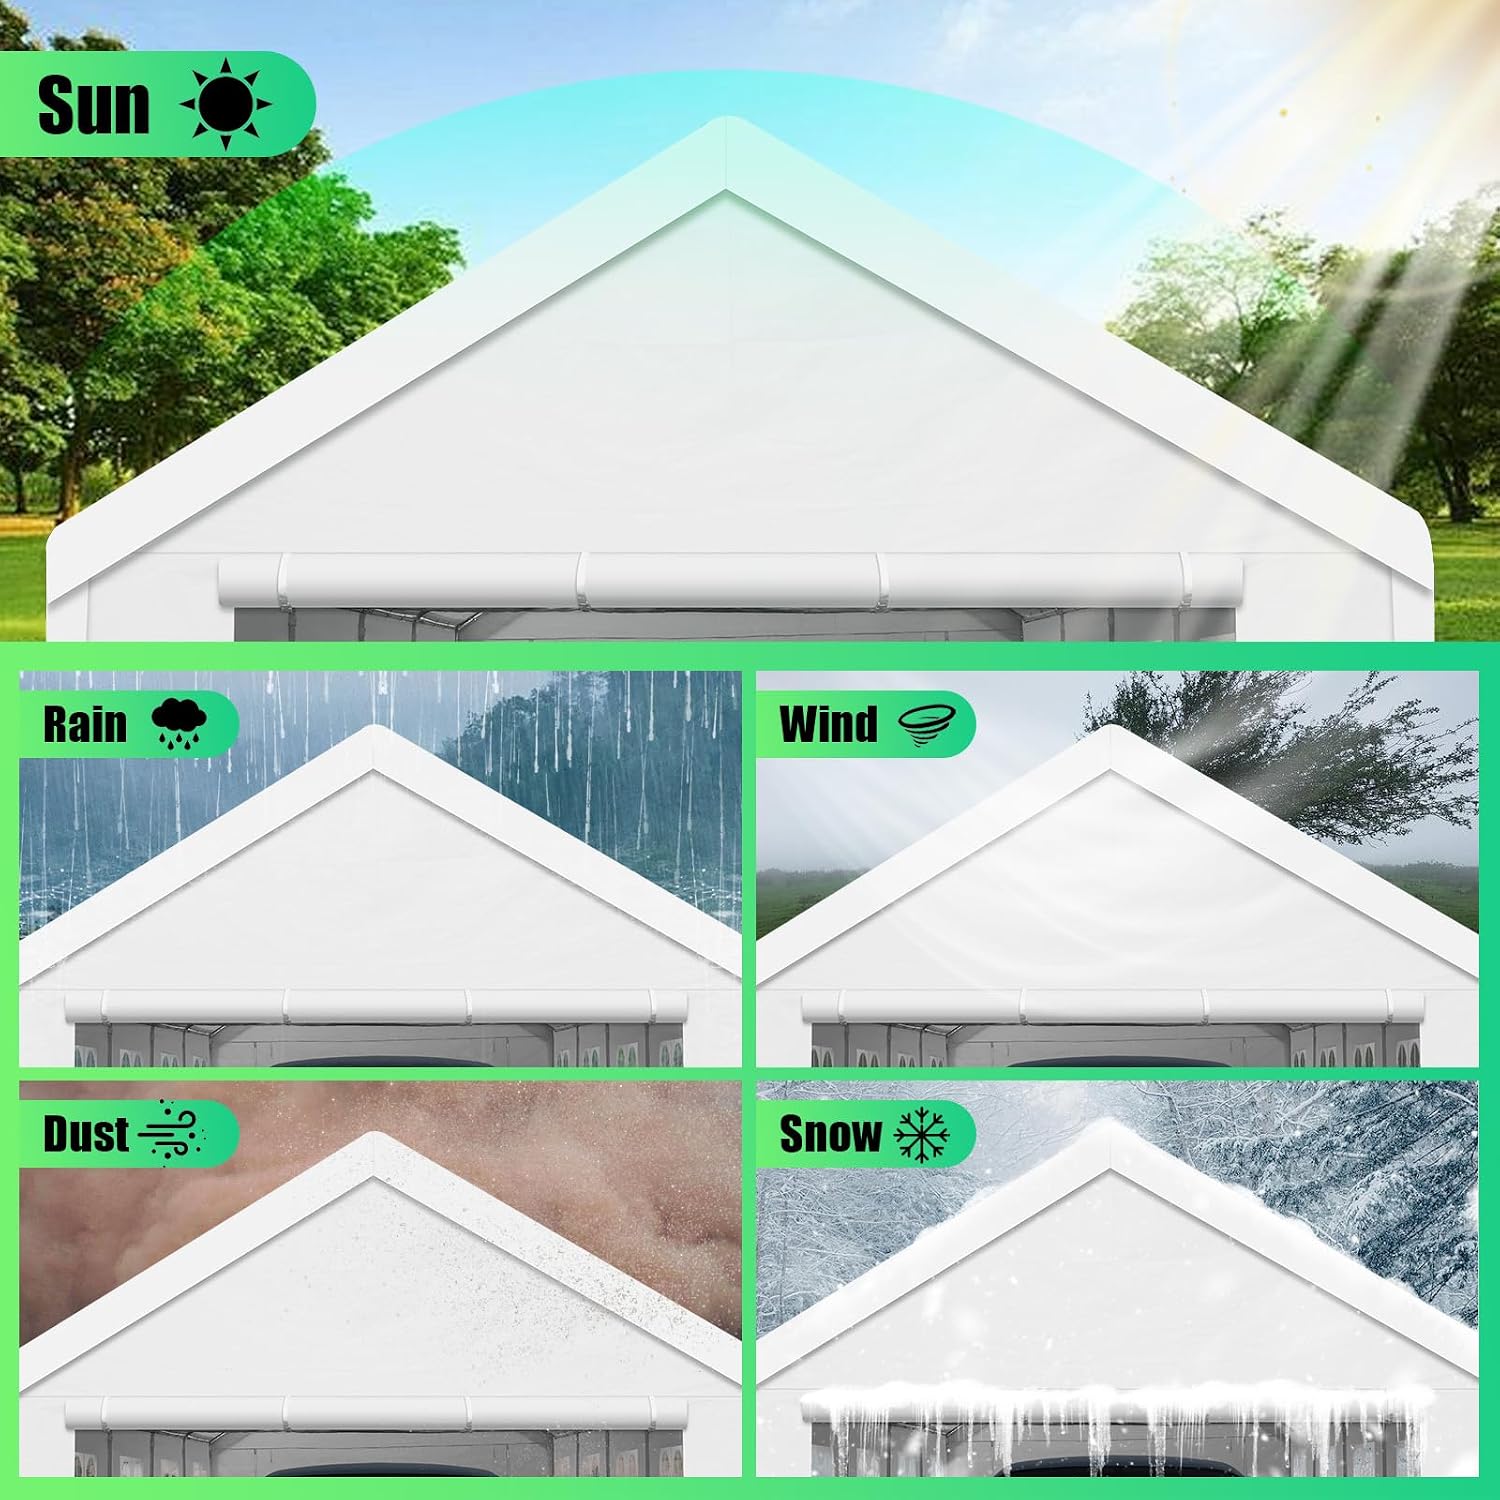
Figure 4: The carport's all-weather resistance, protecting against sun, rain, wind, dust, and snow.
Components List
Before beginning assembly, ensure all parts are present and undamaged. Refer to the packing list included in your cartons for specific part numbers and quantities. The carport arrives in 3 cartons.
- Frame Components: Numbered metal tubes, connectors, spring buttons.
- Cover Components: 160g UV-resistant PE Tarp cover, roll-up doors, removable side panels with PVC windows.
- Anchoring Hardware: Ground nails, windproof ropes, high quality elastic buckles balls.

Figure 5: Key components of the reinforced frame construction, including connection points, anchoring hardware, and window details.

Figure 6: Detail of a robust metal frame joint, ensuring structural integrity.

Figure 7: Illustration of the heavy-duty metal tubes used for the carport frame.

Figure 8: Detail of an elastic buckle ball, used for securing the canopy to the frame.

Figure 9: Detail of a PVC window, providing light and visibility.
Setup and Assembly
Assembly of the Snenblume Carport is designed to be straightforward, typically requiring a minimum of 4 people and approximately 2 hours. All parts are numbered for easy identification.
- Step 01: Build the Top Frame. Begin by assembling the roof structure of the carport using the designated numbered tubes and connectors.
- Step 02: Place Top Cover on Frame. Carefully drape the main canopy cover over the assembled top frame. Ensure it is correctly oriented.
- Step 03: Assembling Ten Legged Steel Pipes. Attach the vertical support legs to the top frame, creating the full height of the carport.
- Step 04: Installation of Sidewalls. Secure the side panels and end panels (with roll-up doors) to the frame.
- Step 05: Use Wind Ropes and Ground Spikes to Keep it Stable After Installation. Once the structure is complete, use the provided wind ropes and ground spikes to firmly anchor the carport to the ground, ensuring stability against wind.
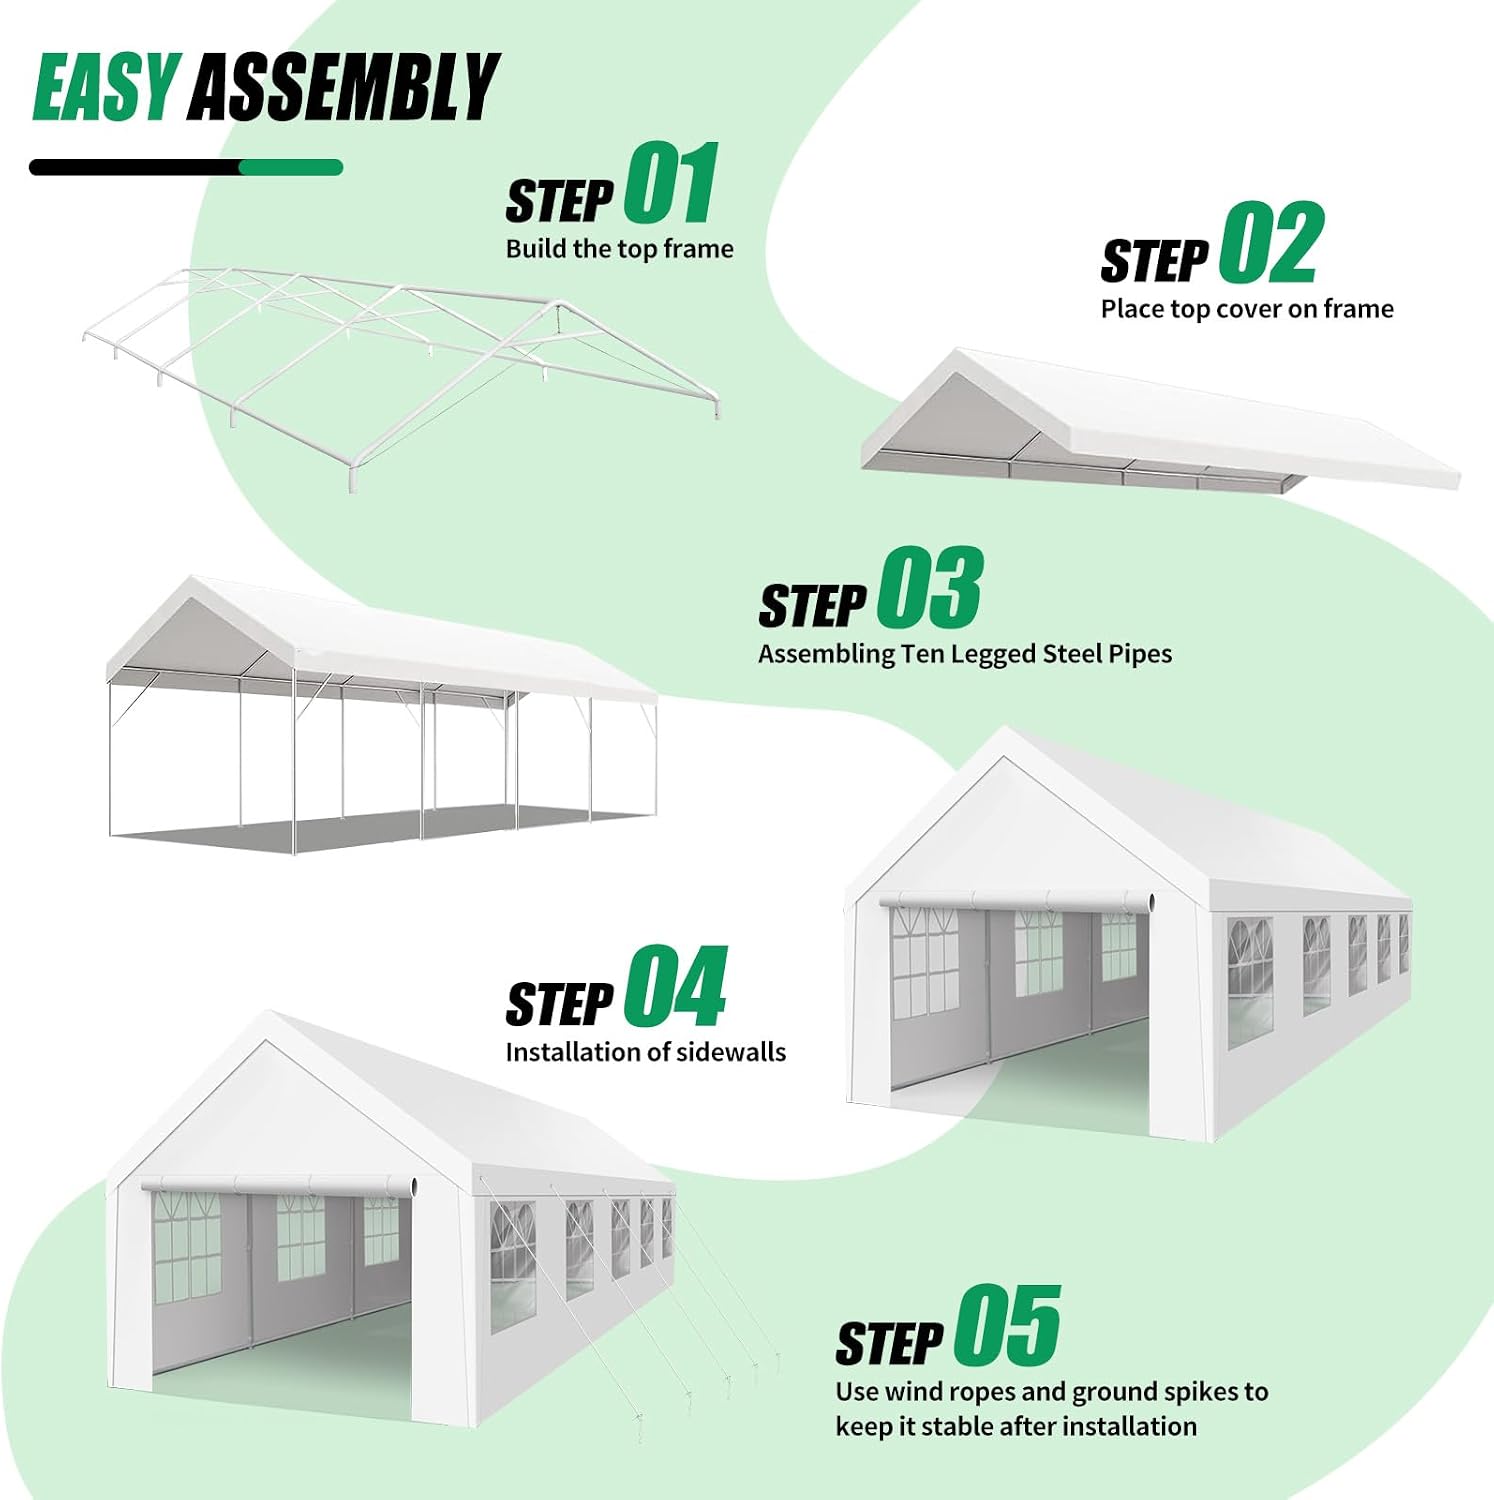
Figure 10: Visual guide to the five-step assembly process for the Snenblume Carport.
For detailed visual instructions, please refer to the comprehensive assembly manual included in your packaging.
Operating Instructions
The Snenblume Carport is designed for straightforward operation, primarily involving access and ventilation.
Roll-Up Doors
The carport features two roll-up doors at each end for easy vehicle access. To open, unfasten the securing straps at the bottom and sides, then roll the door fabric upwards. Secure the rolled door using the provided ties or buckles at the top of the frame to keep it open.
Removable Side Panels
For enhanced ventilation or to create an open-sided shelter, the side panels can be removed. Unfasten the elastic buckles or ties securing the panels to the frame. Store removed panels in a clean, dry place to prevent damage.
Ventilation
To ensure proper air circulation and prevent condensation, utilize the roll-up doors and removable side panels as needed. This is particularly important in humid conditions or when storing vehicles that may emit fumes.
Maintenance
Regular maintenance will extend the lifespan of your Snenblume Carport and ensure its continued performance.
- Cleaning: Clean the canopy and frame periodically with mild soap and water. Avoid harsh chemicals or abrasive cleaners that could damage the material. Rinse thoroughly and allow to air dry completely before re-securing panels.
- Frame Inspection: Regularly check all frame connections, bolts, and anchoring points for tightness. Re-tighten any loose connections to maintain structural integrity.
- Canopy Condition: Inspect the canopy for any tears, punctures, or signs of wear. Small repairs can often be made with appropriate patch kits. Address any damage promptly to prevent further deterioration.
- Snow Removal: In areas with heavy snowfall, regularly remove accumulated snow from the carport roof to prevent excessive weight buildup, which could lead to structural collapse. Use a soft broom or brush to avoid damaging the canopy.
- Wind Protection: Ensure all wind ropes and ground spikes are securely fastened, especially during windy conditions. Consider additional anchoring methods in areas prone to strong winds.
Troubleshooting
This section addresses common issues you might encounter with your carport.
| Problem | Possible Cause | Solution |
|---|---|---|
| Carport feels unstable or sways in wind. | Loose frame connections or inadequate anchoring. | Ensure all frame bolts are tightened. Verify ground spikes are fully inserted and wind ropes are taut. Consider adding more anchoring points or heavier weights in extremely windy areas. |
| Water pooling on canopy. | Improper canopy tension or frame misalignment. | Re-tension the canopy to ensure a tight fit. Check frame for any bending or unevenness and adjust if possible. Ensure proper drainage around the base. |
| Difficulty rolling up doors. | Obstruction or fabric caught. | Check for any debris or fabric caught in the rolling mechanism. Ensure the door is unfastened completely before attempting to roll up. |
| Condensation inside carport. | Insufficient ventilation. | Open roll-up doors or remove side panels to increase airflow, especially during humid conditions or when vehicles are stored. |
Specifications
| Feature | Detail |
|---|---|
| Brand | Snenblume |
| Model Number | CP-510 |
| Product Dimensions (L x W x H) | 32.5' x 16' x 10' (Length x Width x Peak Height) |
| Cover Material | 160g UV-resistant Polypropylene (PE Fabric) |
| Frame Material | Metal |
| Water Resistance Level | Waterproof |
| UV Protection | Yes |
| Color | White |
| Assembly Required | Yes (Minimum 4 people, approx. 2 hours) |

Figure 11: Unfolded dimensions of the carport, illustrating its large footprint and height.
Warranty and Support
For warranty information, please refer to the documentation included with your purchase. Snenblume stands behind the quality of its products.
If you encounter any issues during assembly or use, or if you have questions regarding your Snenblume Carport, please contact Snenblume customer support. Contact details can typically be found on the product packaging or on the official Snenblume website. Please have your model number (CP-510) and purchase details ready when contacting support.
We are committed to providing a hassle-free experience and are here to assist you every step of the way.
Additional Uses
Beyond vehicle storage, the Snenblume Carport's spacious and versatile design makes it suitable for a variety of other applications:
- Outdoor Events: Ideal for parties, gatherings, or temporary event shelters.
- Temporary Storage: Provides protected space for equipment, tools, or seasonal items.
- Work Area: Offers a shaded or covered area for outdoor projects.

Figure 12: Examples of the carport's multifunctional uses, from social events to storage.
Ask a question about this manual
Ask about setup, troubleshooting, compatibility, parts, safety, or missing instructions. Manuals+ will review the question and use this page’s manual context to help answer it.