Leadfan 10.1-inch Car Stereo System User Manual
Model: B0CZ8FMKRP
Brand: Leadfan
1. Introduction
Thank you for choosing the Leadfan 10.1-inch Car Stereo System. This manual provides detailed instructions for installation, operation, maintenance, and troubleshooting to ensure optimal performance and user experience. Please read this manual thoroughly before using the product.

Figure 1: Leadfan 10.1-inch Car Stereo System with included accessories.
2. Applicable Models
This car stereo is compatible with the following vehicle models:

Figure 2: Compatible vehicle models for the car stereo.
- Chevrolet: Silverado 1500 2500HD 3500HD (2007-2013), Avalanche (2007-2013), Express Van (2008-2019), Impala (2006-2013), Traverse (2008-2012), Suburban (2007-2012), Tahoe (2007-2014)
- GMC: Acadia (2007-2012), Yukon (2007-2014), Sierra (2007-2013), Savana (2008-2019)
- Buick: Enclave (2008-2012)
Note: Please confirm the shape and size of your vehicle's center console before installation. Does not support SiriusXM Compatible systems.
3. Key Features
- Android 12 System & 10.1" IPS Screen: Enjoy a smooth and responsive user experience with the Android 12 operating system, 4-core processor, 2GB RAM, and 32GB ROM. The 10.1-inch 1024*600 IPS touchscreen provides clear visuals. Connect to Wi-Fi for web browsing and app downloads.
- Wireless Carplay & Android Auto: Seamlessly integrate your smartphone for navigation, music, calls, and more. Supports both wireless Apple CarPlay and Android Auto. Voice control via Siri or Google Assistant is also available.
- GPS Navigation & Wi-Fi: Built-in GPS module supports free offline maps (e.g., Waze). Online maps and app downloads (YouTube, Spotify, TikTok) are available with Wi-Fi/Hotspot connection.
- Bluetooth 5.1 & FM Radio: Bluetooth 5.1 enables hands-free calls and high-quality wireless audio streaming. Includes a built-in microphone and external mic jack. FM radio offers unlimited preset stations.
- Backup Camera & SWC: Supports a backup camera for safer parking. Compatible with original steering wheel controls for convenient operation (song switching, volume adjustment, call answering).
- Mirror Link: Wirelessly mirror your iOS device screen or wired/wirelessly mirror your Android device screen onto the stereo display, accessing phone features like navigation and music.
- Split-Screen Functionality: Run two applications simultaneously on the screen, such as navigation and music.

Figure 3: Wireless Carplay and Android Auto functionality.

Figure 4: Split-screen mode for multitasking.
4. Installation Guide
This section provides a step-by-step guide for installing your Leadfan Car Stereo System. For a visual demonstration, please refer to the official installation video below.
Video 1: How to Install Leadfan Car Stereo in Chevy Silverado/GMC Sierra 2007-2013.
This video demonstrates the complete installation process, including trim removal, wiring, and unit placement.
Installation Steps:
- Remove the Trim Around the Radio: Carefully use a plastic pry tool to remove the dashboard trim surrounding the factory radio. Start from the top as the dash is hooked on the bottom.
- Remove the 6 Screws Holding AC Controls and Radio: Use a 7mm socket to remove the six screws securing both the AC controls and the factory radio unit.
- Add the New Radio Bezel: Install the new radio bezel, ensuring it clicks securely into place. This bezel is designed for a perfect fit.
- Put the AC Controls Back: Reinsert the AC control unit into its original position.
- Connect the Radio Antenna: Connect the factory radio antenna to the new unit.
- Connect the Power Harness: Connect the main power harness to the new radio. For non-Bose models, only connect the larger plug at the bottom of the Canbus box. If you have a Bose system, the maroon Canbus box connects on both sides, and the other plug is used.
- Connect USB 1 & USB 2: Connect the two USB cables to the corresponding ports on the new radio.
- Connect the RCA Jack (if needed): If adding an amplifier, external microphone, or other accessories, connect the appropriate RCA jacks.
- Connect the Camera Input (if adding a reverse camera): Plug in the video input from your reverse camera.
- Place the GPS Module: Securely place the GPS module behind the radio, ensuring it has a clear view of the sky for optimal signal reception.
- Mount the New Radio: Carefully insert the new radio into the dashboard opening. Ensure the GPS antenna is clear and all wires are not in the way. Make sure all 6 clips click into the new frame for a secure fit.

Figure 5: Visual comparison of the dashboard before and after installation.
5. Operating Instructions
5.1. Basic Navigation (GPS)
The unit comes with a built-in GPS module. You can use pre-installed navigation apps or download others from the Play Store. Ensure the GPS antenna is properly placed for accurate positioning.
5.2. Wireless Carplay & Android Auto
To use Wireless Carplay or Android Auto, simply pair your phone via Bluetooth and connect to the unit's Wi-Fi hotspot. Once connected, the respective interface will launch, allowing access to maps, music, messages, and voice assistants.
5.3. Bluetooth Pairing
Go to the Bluetooth settings on the stereo, enable Bluetooth, and search for your phone. Pair the devices to enable hands-free calling and audio streaming.
5.4. FM Radio
Access the FM Radio application from the main menu. You can manually tune to stations or use the auto-scan feature to find and save available frequencies.
5.5. Mirror Link
Connect your smartphone to the stereo via Wi-Fi and Bluetooth. For iOS, wireless connection is supported. For Android, both wireless and wired connections are available. This feature mirrors your phone's screen onto the stereo display.
5.6. Split-Screen
To activate split-screen, open an application, then swipe from the side or use the dedicated split-screen button (if available) to select a second application to run simultaneously.
5.7. Steering Wheel Control (SWC)
After proper wiring, access the SWC learning function in the settings menu. Follow the on-screen prompts to assign functions to your steering wheel buttons (e.g., volume, track skip, call answer).
5.8. Backup Camera
When the vehicle is put into reverse gear, the display will automatically switch to the backup camera view, providing visual assistance for parking and maneuvering.
6. Maintenance
- Screen Cleaning: Use a soft, lint-free cloth to clean the touchscreen. For stubborn smudges, slightly dampen the cloth with water or a screen-safe cleaner. Avoid abrasive materials.
- Software Updates: Periodically check for software updates via the system settings or the manufacturer's website to ensure optimal performance and access to new features.
- General Care: Avoid exposing the unit to extreme temperatures, direct sunlight for prolonged periods, or excessive moisture.
7. Troubleshooting
| Problem | Possible Cause | Solution |
|---|---|---|
| Unit does not power on | Incorrect wiring; Blown fuse | Check power connections; Inspect and replace fuse if necessary. |
| No sound | Volume too low; Speaker wires disconnected | Increase volume; Check speaker wiring connections. |
| GPS signal lost/inaccurate | GPS antenna obstructed or disconnected | Ensure GPS antenna is properly connected and has a clear view of the sky. |
| Wireless Carplay/Android Auto not connecting | Bluetooth/Wi-Fi not enabled; Software outdated | Ensure Bluetooth and Wi-Fi are enabled on both devices; Update stereo software. |
| Steering Wheel Controls not working | Incorrect wiring; Not programmed | Check SWC wiring; Perform SWC learning in settings. |
8. Specifications
| Feature | Specification |
|---|---|
| Display Size | 10.1 Inches |
| Resolution | 1024 x 600 |
| Operating System | Android 12 |
| Processor | 4-core |
| RAM | 2GB |
| ROM | 32GB |
| Bluetooth Version | 5.1 |
| Connectivity Technology | Bluetooth, Wi-Fi |
| Item Weight | 2.5 pounds |
| Product Dimensions | 10.1 x 10.1 x 10.1 inches |
| Mounting Type | Dashboard Mount |
9. What's in the Box
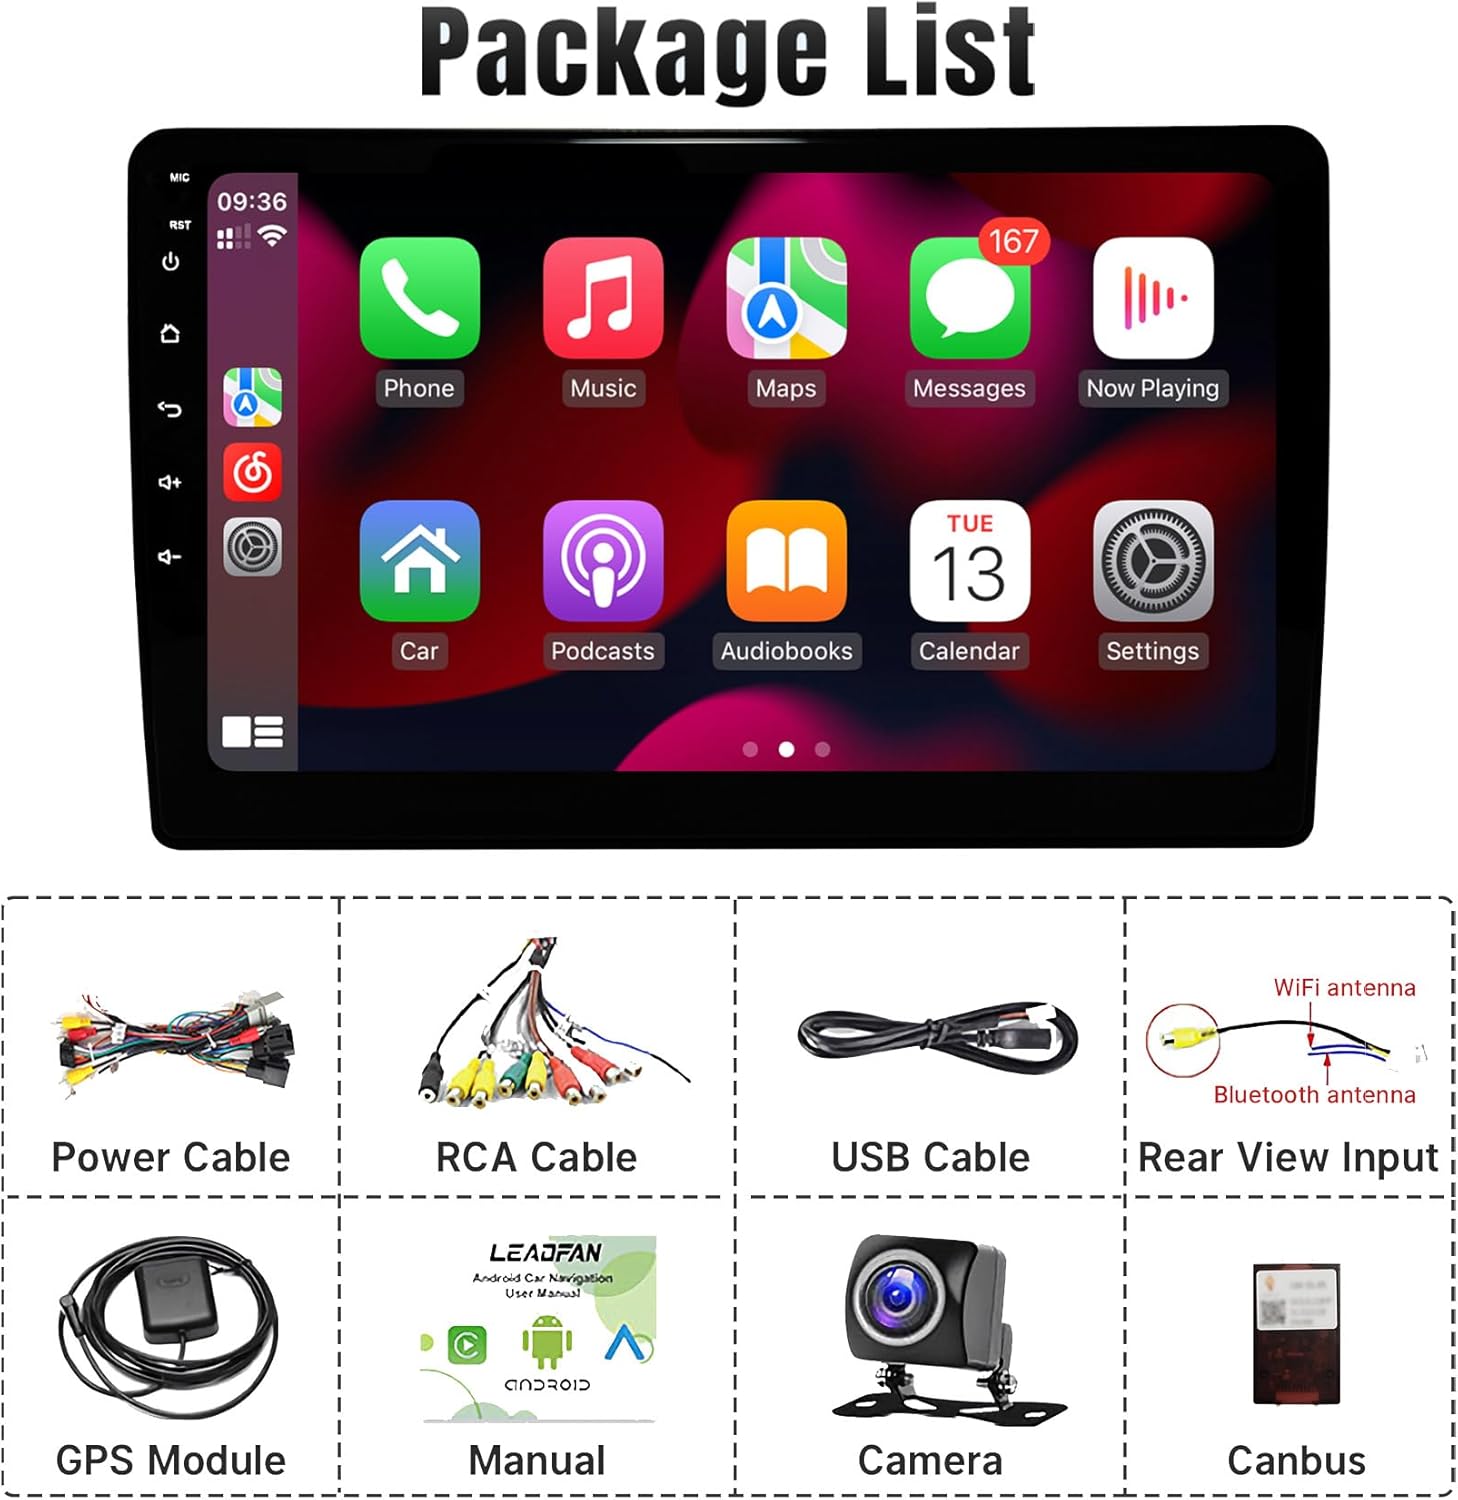
Figure 6: All items included in the product package.
- Leadfan 10.1-inch Car Stereo Unit
- Power Cable
- RCA Cable
- GPS Antenna
- Back-up Camera
- Rear View Camera Cable
- USB Cables
- User Manual
10. Warranty & Support
Leadfan offers comprehensive customer support for your product:
- 30-day Money-Back Guarantee: If you are not satisfied with your purchase.
- 12-month Replacement: For any manufacturing defects or issues within the first year.
- Lifetime Technical Support: Professional technical assistance is available for installation, wiring, and any operational questions.
For assistance, please click "sold by Leadfan" and "ask a question" on the product page to contact customer service or technical support.


