
Introduction
This manual provides detailed instructions for the installation, operation, and maintenance of the LGIDTECH HR5 5 in 1 LED Strip Light Controller. Please read this manual thoroughly before use to ensure proper functionality and safety.
The HR5 controller is a versatile device designed to manage various types of LED strip lights, including single color, CCT dual white, RGB, RGBW, and RGB+CCT configurations. It utilizes 2.4GHz wireless technology for efficient control.

Image: Top view of the LGIDTECH HR5 5 in 1 LED Controller, showing input/output terminals, model number, input voltage, output current, and indicator output modes.
Key Features
- 5-in-1 Compatibility: Supports single color (2 wires), CCT dual white (3 wires), RGB (4 wires), RGBW (5 wires), and RGB+CCT (6 wires) LED strip lights. Output mode can be set by pressing the [SET] key.
- Smartphone Control: Control via the Tuya smartphone APP when connected to a WL-Box2 gateway (sold separately).
- Remote Control Compatibility: Can be controlled by various MiBoxer/Mi.Light 2.4G RF remote controllers (e.g., FUT092, FUT089, B0, B4, B8), sold separately.
- Timer Function: Allows for automatic turn on/off of LED strip lights (requires the APP to remain active).
- High Output Capacity: Maximum output current of 30A, supporting up to 360W for DC 12V LED strips and 720W for DC 24V LED strips.
- DMX512 Functionality: Available for RGB+CCT LED strip lights via FUTD01 (sold separately).

Image: Diagram illustrating key features such as 16 million colors, color temperature adjustment, dimming, 2.4G RF wireless, remote control, auto-transmitting & synchronization, smartphone app control, third-party voice control, and DMX512 controllability.
Specifications
| Parameter | Value |
|---|---|
| Model Number | HR5 |
| Input Voltage | DC12~48V |
| Output Current | 15A/Channel |
| Total Output | Max 30A |
| Control Distance | 30 meters (98 ft) |
| Working Temperature | -10~40°C |
| Output Connection | Common anode |
| Manufacturer | Miboxer |
| Item Weight | 5.9 ounces |
| Product Dimensions | 5.28 x 3.19 x 0.95 inches |
| Country of Origin | China |
Setup and Installation
1. Wiring Connection
Ensure all power is disconnected before making any wiring connections. The HR5 controller uses a common anode connection. Connect the positive (+) wire from your power supply to the V+ terminal and the negative (-) wire to the V- terminal on the input side.
Connect your LED strip light(s) to the output terminals according to their type:
- Single Color: Connect V+ and W (White) to the LED strip.
- CCT Dual White: Connect V+, CW (Cool White), and WW (Warm White) to the LED strip.
- RGB: Connect V+, R (Red), G (Green), and B (Blue) to the LED strip.
- RGBW: Connect V+, R, G, B, and W (White) to the LED strip.
- RGB+CCT: Connect V+, R, G, B, CW, and WW to the LED strip.
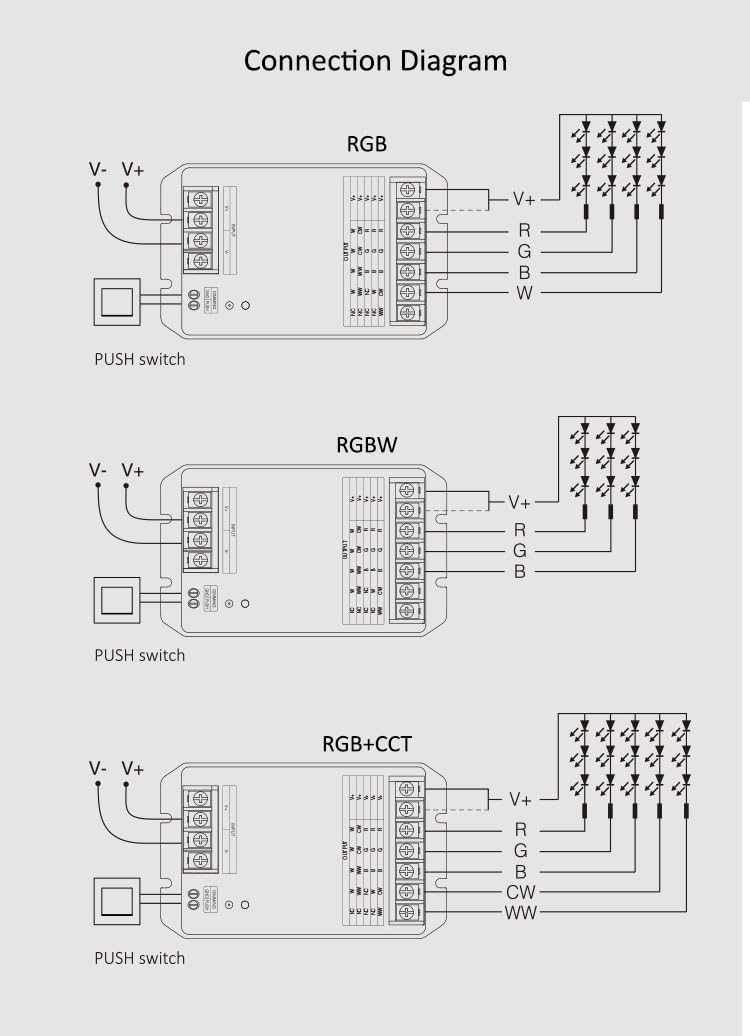
Image: Wiring diagrams for connecting single color and dual white LED strips to the HR5 controller, including optional PUSH switch connection.

Image: Wiring diagrams for connecting RGB, RGBW, and RGB+CCT LED strips to the HR5 controller, including optional PUSH switch connection.
2. Setting Output Mode
Before operation, set the correct output mode on the controller to match your LED strip light type. This is crucial for proper functionality.
- Ensure the controller is powered on.
- Press the "SET" button continuously to cycle through the output modes.
- Observe the indicator light color to identify the current mode:
| Indicator Color | Output Mode |
|---|---|
| White Light | Single Color |
| Yellow Light | Dual White |
| Red Light | RGB |
| Green Light | RGBW |
| Blue Light | RGB+CCT |
The controller will log out of operation within 3 seconds if no button is pressed.

Image: Instructions for setting the output mode using the SET button and a table showing indicator light colors for each output mode. Also includes instructions for PUSH dimming.
Operating Instructions
1. PUSH Dimming (Optional)
If an external PUSH switch is connected to the controller's "DIMMING" terminals:
- Short Press: Turns the LED strip light ON or OFF.
- Long Press: Initiates stepless dimming. Press and release, then press and hold again to increase or decrease brightness.
2. Remote Control Operation (Sold Separately)
The HR5 controller is compatible with various 2.4G RF remote controllers from MiBoxer/Mi.Light. These remotes offer functions such as color selection, brightness adjustment, color temperature control, and mode changes.

Image: A selection of compatible 2.4G RF remote controls (FUT100, FUT089S, FUT089, FUT088, FUT092, FUT096, B8, B0/B0-B, B4/B4-B/T4, B3/B3-B/T3, S2W+, WL-Box2) that can be used with the HR5 controller.
2.1. Linking Remote Control
To link a remote control to the HR5 controller:
- Power off the LED controller for 10 seconds.
- Power on the controller. Within 3 seconds of powering on, short press the "I" button on the remote control 3 times.
- The connected LED strip light will blink 3 times slowly, indicating successful linking.
Note: If the light does not blink slowly, linking has failed. Repeat the steps. A light that has already been linked cannot be linked again.

Image: Step-by-step visual guide for linking a 2.4G RF remote control to the LED controller, showing power cycling and pressing the 'I' button.
2.2. Unlinking Remote Control
To unlink a remote control from the HR5 controller:
- Power off the LED controller for 10 seconds.
- Power on the controller. Within 3 seconds of powering on, short press the "I" button on the remote control 5 times.
- The connected LED strip light will blink 10 times quickly, indicating successful unlinking.
Note: If the light does not blink quickly, unlinking has failed. Repeat the steps. A light that hasn't been linked cannot be unlinked.
3. Smartphone APP Control (Requires WL-Box2 Gateway)
For smartphone control, the LGIDTECH HR5 controller requires a separate WL-Box2 gateway. Once connected to the gateway, you can use the Tuya Smart APP to control your LED lights.
- Download the Tuya Smart APP from your smartphone's app store.
- Follow the instructions provided with the WL-Box2 gateway to set it up and connect it to your home Wi-Fi network.
- Add the HR5 controller to the Tuya Smart APP via the WL-Box2 gateway.
- Once added, you can control brightness, color, modes, and set timers directly from your smartphone.
The WL-Box2 gateway also enables compatibility with voice assistants like Amazon Alexa and Google Home for voice control of your LED lights.

Image: Illustration showing smartphone app control via a gateway (sold separately) and compatibility with Amazon Alexa and Google Assistant for voice control.
Maintenance
- Keep the controller in a dry environment, away from moisture and direct sunlight.
- Clean the controller with a soft, dry cloth. Do not use harsh chemicals or abrasive cleaners.
- Ensure proper ventilation around the controller to prevent overheating, especially during prolonged use at high loads.
- Regularly check wiring connections to ensure they are secure and free from corrosion.
Troubleshooting
- LEDs not lighting up:
- Check power supply connection to the controller.
- Verify LED strip light connection to the controller's output terminals.
- Ensure the correct output mode is set on the controller (refer to "Setting Output Mode").
- Check if the remote control is properly linked (if applicable).
- Confirm the LED strip itself is functional.
- Incorrect colors or flickering:
- Ensure the output mode matches the LED strip type.
- Check for loose or incorrect wiring connections.
- Verify the power supply voltage and current capacity are sufficient for the connected LED strip.
- Remote control not responding:
- Check the remote control's battery.
- Ensure the remote is within the 30-meter control distance.
- Re-link the remote control to the controller (refer to "Linking Remote Control").
- Smartphone APP control not working:
- Ensure the WL-Box2 gateway is properly set up and connected to your network.
- Verify the HR5 controller is added correctly in the Tuya Smart APP.
- Check your smartphone's network connection.
- Ensure the Tuya Smart APP is not shut down if using the timer function.
Warranty and Support
For warranty information and technical support, please contact LGIDTECH customer service or refer to the official LGIDTECH website. Keep your purchase receipt as proof of purchase for any warranty claims.
For additional resources and product updates, visit the LGIDTECH store on Amazon: LGIDTECH Amazon Store.