
SINOTIMER TM-615
SINOTIMER TM-615 Digital Programmable Timer User Manual
Model: TM-615
1. Introduction
The SINOTIMER TM-615 is a versatile digital programmable timer designed for precise control of electrical appliances and systems. It features 28 ON/OFF programs, a clear LCD display, and a built-in battery for memory backup. This manual provides detailed instructions for the safe and efficient operation of your TM-615 timer.

Figure 1: Front view of the SINOTIMER TM-615 Digital Programmable Timer, showing the display and control buttons.
2. Key Features
- Digital time switch with weekly program.
- 28 ON/OFF programs for daily and weekly scheduling.
- LCD display for clear time and program viewing.
- Built-in rechargeable battery for memory backup (power-off memory).
- DIN rail mounting for easy installation.
- Manual ON/AUTO/OFF control.
- Keypad lock function to prevent accidental changes.
3. Safety Information
WARNING: Risk of electric shock. Installation and wiring should only be performed by a qualified electrician.
- Ensure the power supply is disconnected before installation or maintenance.
- Do not exceed the maximum load rating of the timer (16A).
- Install the timer in a dry, well-ventilated area, away from direct sunlight and extreme temperatures.
- Verify all connections are secure to prevent loose wiring and potential hazards.
4. Setup
4.1 Mounting
The TM-615 is designed for standard 35mm DIN rail mounting. Simply clip the timer onto the DIN rail in your electrical panel.
4.2 Wiring
Connect the timer according to the wiring diagram provided on the unit and in this manual. Ensure correct input voltage (220V AC) and load connections.

Figure 2: Rear view of the TM-615 showing the terminal connections (L, N, 1, 2, 3, 4, 5) and basic wiring diagram.

Figure 3: Example wiring diagram for connecting the TM-615 timer with an external contactor for controlling higher loads (127V or 220V).
4.3 First Power-Up
Upon initial power-up, the display may be blank or show random characters. This is normal. The internal battery will charge automatically when the timer is connected to power. Press the 'Reset' button (a small hole, use a pointed object) to clear all settings and initialize the timer.
5. Operating Instructions
5.1 Button Functions
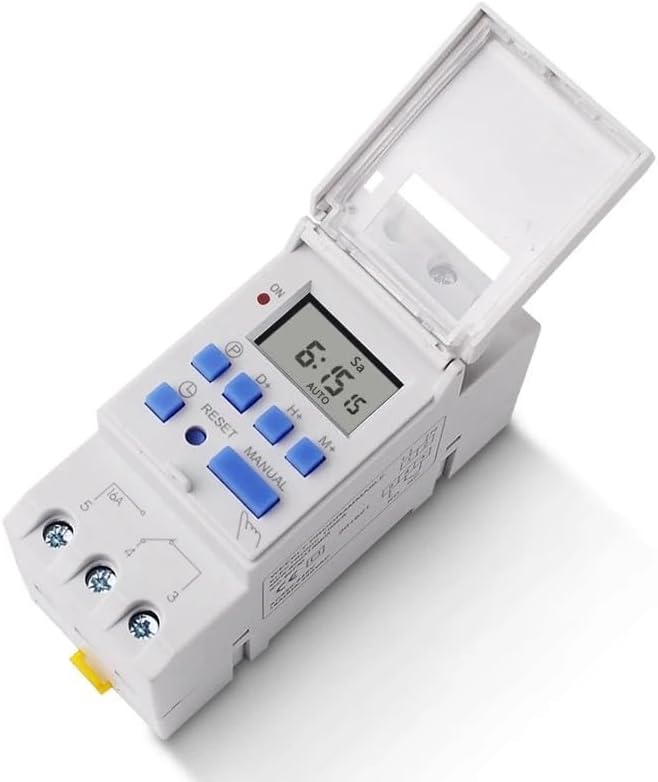
Figure 4: Top view of the TM-615 with the protective cover open, revealing the control buttons.
- P (Program): Enters/exits programming mode.
- D+ (Day): Adjusts day of the week in time setting or program setting.
- H+ (Hour): Adjusts hour in time setting or program setting.
- M+ (Minute): Adjusts minute in time setting or program setting.
- MANUAL: Toggles output mode (ON/AUTO/OFF).
- RESET: Resets all settings (use a pointed object).
- Clock Symbol: Used in combination with D+, H+, M+ to set current time.
5.2 Setting Current Time
- Press and hold the Clock Symbol button.
- While holding the Clock Symbol button, press D+ to set the current day of the week.
- While holding the Clock Symbol button, press H+ to set the current hour.
- While holding the Clock Symbol button, press M+ to set the current minute.
- Release the Clock Symbol button to save the time.
5.3 Programming ON/OFF Times
The TM-615 supports up to 28 ON/OFF programs.
- Press the P button once. The display will show "1 ON". This is the first ON program.
- Use D+ to select the day(s) for this program (e.g., individual days, weekdays, weekends, all days).
- Use H+ and M+ to set the desired ON time.
- Press the P button again. The display will show "1 OFF". This is the first OFF program.
- Use D+ to select the day(s) (usually matching the ON program).
- Use H+ and M+ to set the desired OFF time.
- Repeat steps 1-6 for additional ON/OFF programs (up to 28).
- After setting all desired programs, press the Clock Symbol button to exit programming mode and return to the current time display.
5.4 Manual Control
Press the MANUAL button to cycle through the output modes:
- ON: Output is continuously ON.
- AUTO: Output follows the programmed schedule.
- OFF: Output is continuously OFF.
Ensure the timer is in "AUTO" mode for programmed operations to function.
5.5 Keypad Lock/Unlock
To prevent accidental changes to settings, the keypad can be locked.

Figure 5: Image illustrating the keypad lock/unlock procedure, highlighting the Clock Symbol button.
Press the Clock Symbol button four times consecutively to lock or unlock the keypad. A lock icon may appear on the display when locked.
6. Typical Applications
The TM-615 timer is suitable for a wide range of applications requiring automated ON/OFF control.

Figure 6: Examples of common applications for the TM-615 timer, including street lights, billboards, LED screen control, timed pumping, instrumentation, and automation equipment.
- Street lighting control
- Billboard and sign illumination
- LED screen control
- Timed pumping systems
- Industrial automation equipment
- Home appliance scheduling
7. Maintenance
- Keep the timer clean and free from dust. Use a soft, dry cloth for cleaning.
- Do not use abrasive cleaners or solvents.
- The internal battery is designed for long life and recharges automatically. No user maintenance is typically required for the battery.
- Regularly check wiring connections for tightness, especially in high-vibration environments.
8. Troubleshooting
| Problem | Possible Cause | Solution |
|---|---|---|
| Display is blank. | No power supply; Internal battery discharged. | Check power connection. Allow time for battery to charge (up to 10 minutes). |
| Timer not switching ON/OFF as programmed. | Timer is not in AUTO mode; Incorrect program settings; Keypad locked. | Press MANUAL button until "AUTO" is displayed. Review and correct program settings. Unlock keypad by pressing Clock Symbol 4 times. |
| Buttons are unresponsive. | Keypad is locked. | Press Clock Symbol button 4 times to unlock. |
| Time is incorrect after power outage. | Internal battery discharged or faulty. | Allow timer to charge for several hours. If problem persists, contact support. |
9. Technical Specifications
- Model: TM-615
- Operating Voltage: 220V AC
- Frequency: 50/60Hz
- Max Load: 16A (Resistive Load)
- Programs: 28 ON/OFF programs
- Minimum Interval: 1 minute
- Time Error: < 1 second/day
- Power Consumption: < 1W
- Battery Backup: > 15 days (rechargeable)
- Mounting: 35mm DIN Rail
- Dimensions (approx.): 15 x 11 x 8 cm
- Operating Temperature: -10°C to +40°C
10. Warranty and Support
This product comes with a standard manufacturer's warranty. For warranty claims, technical support, or service inquiries, please contact your original point of purchase or the SINOTIMER customer service department. Please have your product model number and purchase date available when contacting support.
Ask a question about this manual
Ask about setup, troubleshooting, compatibility, parts, safety, or missing instructions. Manuals+ will review the question and use this page’s manual context to help answer it.