
1. Introduction
This manual provides detailed instructions for the GoolRC Flysky FS-ST8 RC Transmitter and its accompanying FS-SR8 Receiver. It covers essential information regarding product features, setup procedures, operational guidelines, maintenance tips, and troubleshooting steps. Please read this manual thoroughly before using the product to ensure safe and optimal performance.

Figure 1: GoolRC Flysky FS-ST8 RC Transmitter, FS-SR8 Receiver, and included accessories.
2. Product Overview
The GoolRC Flysky FS-ST8 is an upgraded 2.4GHz 8-10 channel digital proportional radio control system designed for a wide range of RC models, including helicopters, gliders, airplanes, multicopters, engineering vehicles, robots, cars, and boats. It utilizes the ANT protocol for reliable communication and offers extensive customization options.
Key Features:
- Channels: Supports 8 to 10 channels, with the FS-SR8 receiver providing 8 channels.
- Adaptive Receiver: Compatible with FS-SR8 and other receivers using the ANT protocol.
- RF Protocol: 2.4GHz ISM band with ANT protocol for stable and long-range communication (>1000m air distance without interference).
- Channel Resolution: High precision 4096 channel resolution.
- Data Output: Supports PWM, PPM, i-BUS, and S.BUS output signals.
- Telemetry: Provides real-time feedback for RSSI (Received Signal Strength Indicator), BVD voltage, and other sensor data.
- Customization: Allows extensive customization of switches, knobs, and keys. Features a reserved external antenna hole for upgrades and supports personalized LED integration.
- Power Options: Operates on 4x AA batteries or a 2S LiPo battery (JST interface). Type-C port can also supply power.
- Display: 128*64 black and white dot matrix LCD for clear information display.
- Ergonomic Design: Features a distinctive whale tail antenna handle and an ergonomic form factor for comfortable handling.
- Firmware Updates: Supports online firmware updates for enhanced functionality.

Figure 2: Front view of the FS-ST8 Transmitter, highlighting the display and control sticks.

Figure 3: Detailed features of the FS-ST8 Transmitter.

Figure 4: Various views of the FS-ST8 Transmitter.
3. Setup
3.1. Battery Installation
The FS-ST8 transmitter can be powered by four 1.5V AA batteries or a 2S LiPo battery. Ensure correct polarity when installing batteries.
- Open the battery compartment cover on the back of the transmitter.
- For AA batteries: Insert four 1.5V AA batteries, observing the polarity markings (+/-).
- For 2S LiPo battery: Connect a 2S LiPo battery to the JST connector inside the battery compartment. The XT30 interface hole is reserved on the battery cover for external connection if needed.
- Close the battery compartment cover securely.
Note: The Type-C port can also be used to supply power to the transmitter, but it is not a charging interface for internal batteries.

Figure 5: Battery compartment and power options for the FS-ST8.
3.2. Receiver Binding (FS-SR8)
To establish communication between the transmitter and receiver, they must be bound. The FS-SR8 receiver is designed to adapt to transmitters using the ANT protocol.
- Ensure the transmitter is powered off.
- Connect power to the FS-SR8 receiver. The receiver's LED indicator will typically flash rapidly, indicating it is in binding mode.
- While holding the bind button (if present on your specific FS-ST8 model, otherwise refer to the on-screen menu for binding initiation), power on the FS-ST8 transmitter.
- The transmitter's display will show a binding progress or confirmation message. The receiver's LED should turn solid, indicating a successful bind.
- Power off both the transmitter and receiver, then power them on again in sequence (transmitter first, then receiver) to confirm the bind.
Note: Specific binding procedures may vary slightly. Always consult the on-screen menu of your FS-ST8 transmitter for precise instructions.
3.3. Initial Configuration
After binding, configure your model type and basic settings on the transmitter.
- Model Selection: Navigate through the transmitter's menu to select the appropriate model type (e.g., fixed-wing, helicopter, multicopter).
- Channel Assignment: Assign control channels to the desired functions (e.g., aileron, elevator, rudder, throttle).
- Trim Adjustment: Adjust the digital trims to ensure all control surfaces are neutral. The Type-C interface features five-way simple trim keys for ease of use.
- Fail-Safe Settings: Configure fail-safe positions for all channels to ensure safe operation in case of signal loss.
4. Operating Instructions
4.1. Basic Controls
The FS-ST8 features standard RC control sticks, switches, and knobs for precise model control.
- Control Sticks: Used for primary flight/drive controls (e.g., throttle, rudder, aileron, elevator).
- Switches: Assignable switches for various functions like flight modes, gear retraction, or auxiliary controls.
- Knobs: Proportional knobs for fine-tuning or controlling specific functions.
- Display: The 128*64 LCD screen provides real-time information such as battery voltage, channel values, and telemetry data.
4.2. Advanced Functions and Customization
The FS-ST8 offers extensive features for advanced users and customization.
- Function Customization: Switches, knobs, and keys can be independently configured to suit specific model requirements. The knob switch can be changed between two or three levels.
- Receiver Output Settings: Adjust receiver output signals (PPM, PWM, i-BUS, S.BUS) as needed for your model's flight controller or servos.
- Sensor Support: Connect and monitor various sensors such as height, rotation speed, temperature, voltage, and the FS-CGPS01 GPS module. Telemetry data is displayed on the transmitter.
- Firmware Update: The transmitter supports online updates to ensure you have the latest features and improvements.
- DIY Options:
- Reserved external antenna hole for independent antenna upgrades.
- Transparent assembly base allows for personalized LED additions.
- Replaceable setback throttle pressure plate.
- External RF head aperture for compatibility with various Flysky RF heads.
- Optional accessories like VRC, VRD shoulder return-to-center wheel, and keys on the back can be installed.

Figure 6: DIY customization features of the FS-ST8.

Figure 7: Design features of the FS-ST8 Transmitter.

Figure 8: All-round functions and optional accessories for the FS-ST8.
5. Maintenance
Proper maintenance ensures the longevity and reliable operation of your FS-ST8 transmitter and FS-SR8 receiver.
- Cleaning: Use a soft, dry cloth to clean the transmitter and receiver. Avoid using solvents or abrasive cleaners.
- Storage: Store the unit in a cool, dry place away from direct sunlight and extreme temperatures. Remove batteries if storing for extended periods to prevent leakage.
- Battery Care: Ensure batteries are fully charged before use. Monitor battery voltage using the transmitter's display and heed low voltage warnings.
- Firmware: Regularly check for and apply firmware updates to keep your system optimized.
6. Troubleshooting
This section addresses common issues you might encounter.
- No Power:
- Check battery installation and ensure batteries are charged.
- Verify the power switch is in the ON position.
- Binding Failure:
- Ensure both transmitter and receiver are in binding mode.
- Confirm the receiver is compatible with the ANT protocol.
- Reduce distance between transmitter and receiver during binding.
- Loss of Control/Range Issues:
- Check transmitter and receiver antenna placement; ensure they are not obstructed.
- Verify battery voltage on both units.
- Avoid operating in areas with high RF interference.
- Incorrect Control Response:
- Recalibrate control sticks and check channel assignments in the transmitter menu.
- Verify servo connections and directions.
7. Specifications
7.1. Transmitter (FS-ST8)
| Parameter | Value |
|---|---|
| Model | FS-ST8 (Upgraded Version) |
| Channels | 8-10 |
| Adaptive Receiver | FS-SR8 (Adapts Receiver with ANT Protocol) |
| Model Type | Helicopters, Gliders, Delta-wing Airplanes, Multicopters, Engineering vehicles, Robots, Cars, Boats |
| RF | 2.4GHz ISM |
| 2.4GHz Protocol | ANT |
| Distance | >1000m (Air distance without interference) |
| Channel Resolution | 4096 |
| Battery | 1.5AA*4 / 2S Lipo (JST) |
| Data Output | PWM/PPM/i-BUS/S.BUS |
| Low Voltage Warning | AA battery: <4.2V / Lipo battery: <7.2V |
| Antenna Type | Built-in double antennas |
| Display | 128*64 LCD (Black and white Dot Matrix Screen) |
| Temperature Range | -10℃ ~ +60℃ |
| Humidity Range | 20% ~ 95% |
| Size | 176*210.9*82.5mm |
7.2. Receiver (FS-SR8)
| Parameter | Value |
|---|---|
| Model | FS-SR8 |
| Adaptive Transmitter | FS-ST8 (Adapts Transmitter with ANT Protocol) |
| Numbers of Channel | 8 |
| RF | 2.4GHz ISM |
| 2.4GHz Protocol | ANT |
| Distance | >1000m (Air Distance without Interference) |
| Antenna Type | Two Antennas |
| Input Power | 3.5~9V/DC |
| Data Output | PWM/PPM/i-BUS/S.BUS |
| Temperature Range | -10℃ ~ +60℃ |
| Humidity Range | 20% ~ 95% |
| Size | 44.8*26.6*11.3mm |
8. Package Contents
The following items are included in your product package:
- 1x Flysky FS-ST8 Transmitter
- 1x Flysky FS-SR8 Receiver
- Other Parts (e.g., screws, small accessories for customization)
- 2x User Manual (this document)
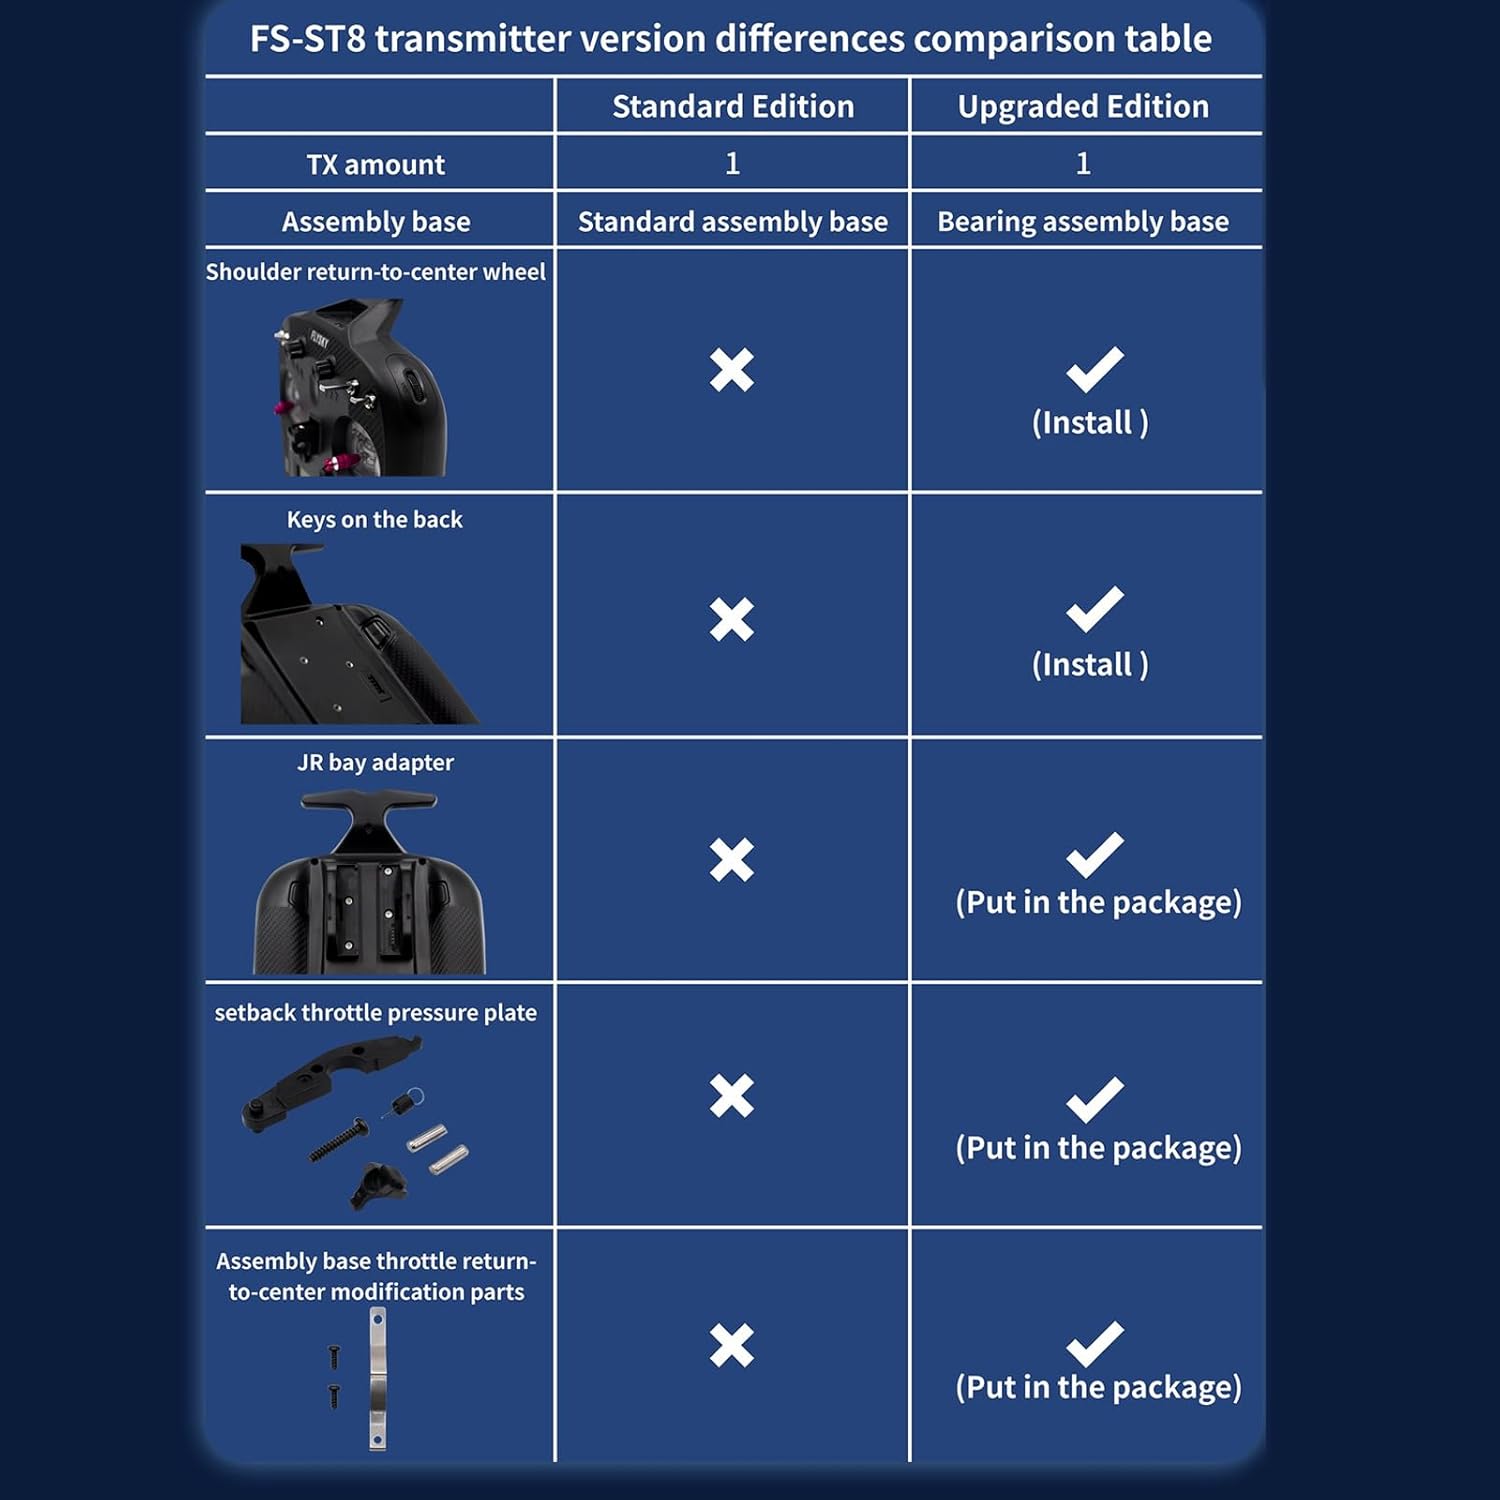
Figure 9: FS-ST8 transmitter version differences comparison table.
9. Warranty and Support
For warranty information, please refer to the documentation provided at the point of purchase or contact your retailer. GoolRC provides support for its products. For technical assistance or further inquiries, please visit the official GoolRC website or contact their customer service.
Disclaimer: GoolRC is a professional toy brand supplier focusing on remote control products. Always ensure safe operation and adhere to local regulations for RC model usage.

