
1. Introduction
Thank you for choosing the HANDSKIT 600W Mini Hot Air Gun, Model YU-156. This compact and versatile tool is designed for a wide range of applications requiring controlled heat, including soldering, DIY crafting, embossing, vinyl wrapping, and heat shrinking. This manual provides essential information for safe and effective operation, setup, maintenance, and troubleshooting.
The device features adjustable temperature and air speed settings, a digital LCD display for real-time temperature monitoring, and an intelligent auto-standby function when placed on its dedicated stand.
2. Safety Information
Please read and understand all safety instructions before operating this heat gun. Failure to follow these instructions may result in electric shock, fire, or serious personal injury.
- Personal Safety: Always wear appropriate personal protective equipment, including safety glasses and heat-resistant gloves. Keep hair, loose clothing, and jewelry away from the hot nozzle.
- Work Area Safety: Ensure your work area is clean, well-lit, and free from flammable materials. Provide adequate ventilation to disperse fumes. Do not operate in explosive atmospheres, such as in the presence of flammable liquids, gases, or dust.
- Electrical Safety: Do not expose the heat gun to rain or wet conditions. Do not abuse the cord; never use it for carrying, pulling, or unplugging the tool. Keep the cord away from heat, oil, sharp edges, or moving parts.
- Heat Hazard: The nozzle and emitted air become extremely hot during operation. Do not touch the nozzle or direct hot air at yourself or others. Allow the tool to cool completely before storing.
- Proper Use: Use the heat gun only for its intended purpose. Do not use it as a hair dryer. Never block the air intake or outlet vents.
- Storage: Unplug the heat gun when not in use and before performing any maintenance. Store it in a dry, secure place out of reach of children.
3. Product Overview and Components
The HANDSKIT Mini Hot Air Gun comes with several components designed for versatile use.

Image 3.1: The HANDSKIT 600W Mini Hot Air Gun, including the main unit, detachable stand, and a set of interchangeable nozzles.
3.1 Main Unit Features
- Digital LCD Display: Shows real-time temperature and air speed settings.
- Temperature Control Buttons: Increase (+) and Decrease (-) buttons for precise temperature adjustment.
- Air Speed Control Buttons: Integrated with temperature control, also adjusted via (+) and (-) buttons.
- On/Off Button: Powers the device on and off.
- Multi-Layer Cooling Window: Designed for fast and continuous heat dissipation, ensuring device longevity.
- Spiral Air Outlet: Provides uniform air output for consistent heating.

Image 3.2: Detail of the multi-layer cooling window, illustrating the heat dissipation design.
3.2 Included Accessories
- Heat Gun Stand: A dedicated stand for holding the hot air gun, enabling hands-free operation and activating the auto-standby feature.
- Reflector Nozzles: Seven interchangeable steel nozzles of various sizes (3mm, 4mm, 5mm, 6mm, 8mm, 10mm, 12mm) to direct and concentrate airflow for different tasks.
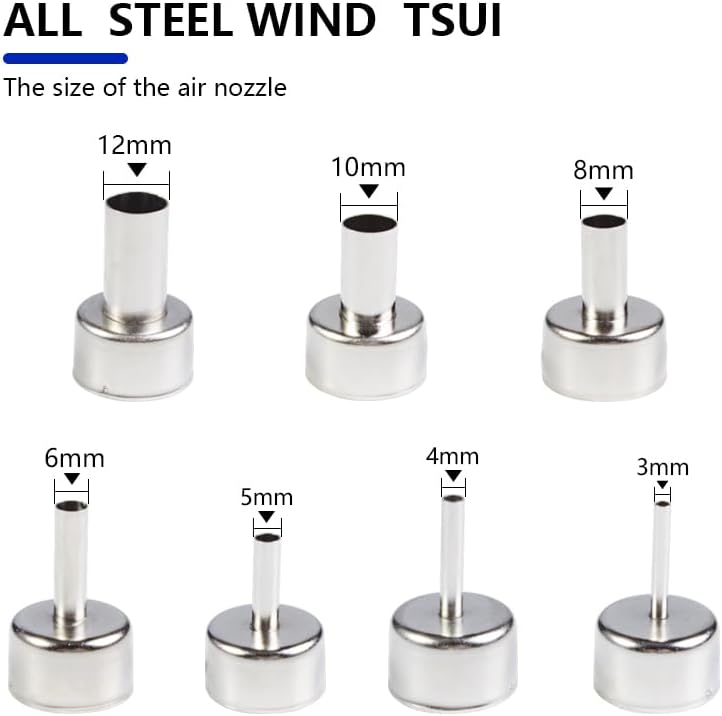
Image 3.3: The set of seven steel nozzles, each with a different diameter for varied applications.
4. Setup
- Unpack: Carefully remove all components from the packaging. Inspect the heat gun and accessories for any signs of damage.
- Attach Nozzle: Select the appropriate nozzle for your task. Align the nozzle with the heat gun's outlet and push it firmly into place. Ensure it is securely attached before operation.
- Position Stand: Place the heat gun stand on a stable, heat-resistant surface. The stand can also be mounted on a wall if desired.
- Connect Power: Plug the heat gun's power cord into a standard 110V AC power outlet.
5. Operating Instructions
The HANDSKIT Mini Hot Air Gun offers precise control over temperature and air speed.

Image 5.1: The control panel of the heat gun, highlighting the digital display and control buttons.
5.1 Powering On/Off
- To turn on, press the Set/On and Off button. The LCD display will illuminate and show the current temperature.
- To turn off, press the Set/On and Off button again. The display will show "OFF" and the unit will begin to cool down.
5.2 Adjusting Temperature and Air Speed
- The heat gun allows for temperature adjustment from 212°F to 932°F (100°C to 500°C).
- Air speed can be adjusted from F1 to F10.
- Use the Increase temperature and wind speed gear button (+) to raise the temperature or air speed.
- Use the Reduce temperature and wind speed gear button (-) to lower the temperature or air speed.
- The digital LCD display will show the real-time temperature and selected air speed.
5.3 Auto-Standby Feature
- When the heat gun is placed into its matched stand, it will automatically enter a cooldown mode and then go into standby. The display may show "OFF".
- When picked up from the stand, the heat gun will automatically turn on and heat up to the last set temperature and air speed.
5.4 Advanced Settings

Image 5.2: Instructions for advanced settings, including temperature offset and unit switching.
- Set Offset Temperature: Press and hold the (+) and (-) keys simultaneously when the unit is in OFF mode. Press (+) or (-) to modify the offset. If no key is pressed for three seconds, the setting will automatically save and exit.
- °C/°F Switching: Press (+) and (-) keys simultaneously while the unit is powered on. Plug in the power cord, then enter the temperature symbol setting. Press (+) or (-) to switch between Celsius and Fahrenheit. If no key is pressed for three seconds, the setting will automatically save and exit.
6. Applications
The HANDSKIT Mini Hot Air Gun is suitable for a variety of tasks, including but not limited to:
- Heat shrinking tubing and wire connectors.
- Craft embossing and resin curing.
- Shrink wrapping and vinyl wrap application.
- Soldering and desoldering small electronic components.
- Removing old paint or decals.
- Candle making and small repairs.
7. Maintenance
Proper maintenance ensures the longevity and safe operation of your heat gun.
- Cleaning: Ensure the heat gun is unplugged and completely cool before cleaning. Wipe the exterior with a soft, damp cloth. Do not use abrasive cleaners or solvents. Keep the air intake and outlet vents clear of dust and debris.
- Storage: Store the heat gun and its accessories in a dry, clean, and secure location, away from direct sunlight and extreme temperatures. Ensure the unit is unplugged when stored for extended periods.
- Inspection: Periodically inspect the power cord for any damage. If the cord is damaged, do not use the heat gun and contact customer support.
8. Troubleshooting
If you encounter issues with your HANDSKIT Mini Hot Air Gun, refer to the following common problems and solutions:
- No Power/Unit Not Turning On:
- Check if the power cord is securely plugged into a functional outlet.
- Ensure the power button has been pressed.
- No Heat/Insufficient Heat:
- Verify that the temperature setting is appropriate for your task and is not set to the lowest possible value.
- Ensure the air vents are not obstructed.
- Inconsistent Airflow:
- Check if the air speed setting is correct.
- Ensure the nozzle is clean and free from blockages.
- Unit Overheating/Shuts Off:
- This may indicate an internal safety mechanism. Unplug the unit and allow it to cool down completely before attempting to use it again.
- Ensure air vents are clear and the unit is not being used in an enclosed space without proper ventilation.
If problems persist after attempting these solutions, please contact HANDSKIT customer support.
9. Specifications

Image 9.1: Product dimensions and key technical specifications.
| Specification | Detail |
|---|---|
| Model | YU-156 |
| Power | 600W |
| Voltage | 110V |
| Temperature Range | 100°C - 500°C (212°F - 932°F) |
| Air Speed Adjustment | F1 - F10 |
| Item Weight | 1.28 pounds |
| Package Dimensions | 12.52 x 3.7 x 2.95 inches |
| Material | Plastic and metal |
| Power Source | AC/DC |
| Cable Length | 1.6 meters (approx. 5.25 feet) |
| Included Components | Heat gun, 7 nozzles, stand |
10. Warranty and Support
For warranty information or technical support, please refer to the product packaging or contact the retailer where the product was purchased. Keep your purchase receipt as proof of purchase.