
1. Introduction
This manual provides comprehensive instructions for the safe and efficient installation, operation, and maintenance of your EaseLife 4FT/48in Sliding Pocket Door Hardware Kit. Please read all instructions carefully before beginning installation to ensure proper function and longevity of the product. This kit is designed for interior single-door applications, offering a space-saving solution with smooth and quiet operation.

Image 1.1: The EaseLife Pocket Door Hardware Kit installed in a modern home, showcasing its invisible design and space-saving benefits.
2. Package Contents
Verify that all components listed below are present and undamaged before proceeding with installation. If any parts are missing or damaged, contact customer support.
- (1) 44.5-inch Aluminum Track Rail
- (2) Precision Ball Bearing Rollers
- (1) Door Stop
- (2) Floor Guides
- Mounting Screws
- Installation Manual (this document)
Note: Door panel is NOT included with this hardware kit.

Image 2.1: A visual representation of the hardware components included in the kit: track, rollers, door stop, and floor guides.
3. Product Specifications
| Feature | Specification |
|---|---|
| Model Number | 0501_122_1 |
| Track Rail Length | 44.5 inches (for 48-inch opening) |
| Fit Door Width | 23 - 24 inches |
| Fit Door Thickness | 1 - 1-3/4 inches (25mm - 45mm) |
| Door Weight Capacity | Up to 200 lbs |
| Material | Aluminum (Track), Metal (Handle), Plastic/Metal (Rollers) |
| Installation Method | Wall-Mounted |
| Usage | Commercial/Residential |
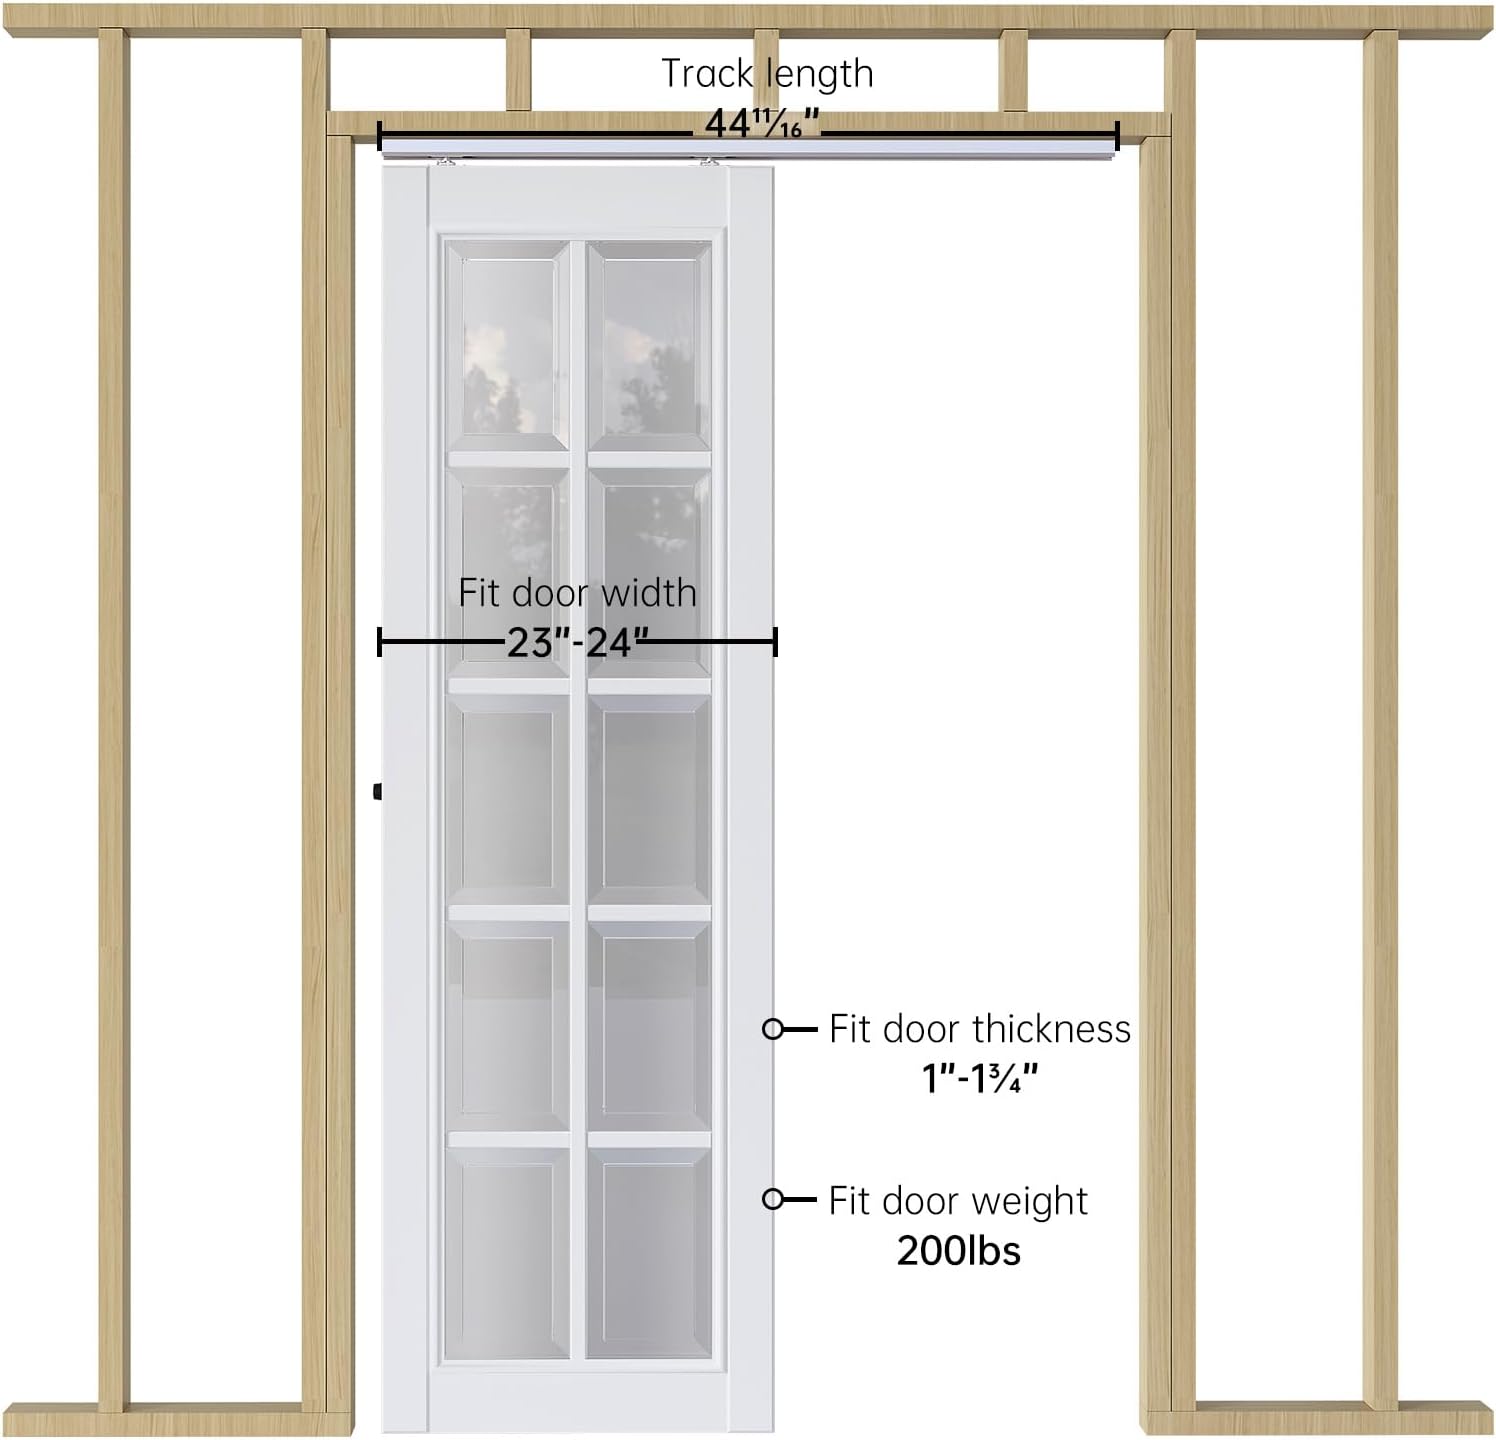
Image 3.1: A diagram illustrating the key dimensions and specifications for door compatibility with the hardware kit.
4. Installation Instructions
Proper installation is crucial for the smooth and quiet operation of your pocket door. This kit requires an open frame for installation. Ensure you have all necessary tools and safety equipment before starting.
4.1 Pre-Installation Checks
- Verify wall framing is suitable for a pocket door installation.
- Ensure the rough opening width is appropriate for your door and the track length (typically 2x door width + 1 inch).
- Confirm door dimensions (width, thickness) and weight are within the kit's specifications.
4.2 Track Installation
- Mount the aluminum track rail securely within the top of the door frame opening. Ensure it is level and firmly attached to the header.
- Leave an access opening at one end of the track to facilitate roller installation and future maintenance.
Video 4.1: An official video demonstrating the installation process of a pocket door hardware kit, including track and roller setup. This video highlights the ease of installation and the smooth operation of the system.
4.3 Door Preparation and Roller Attachment
- Attach the door plates to the top edge of your door, typically 2-3/4 inches (70mm) from each edge, with the lock tab on the same side.
- Install the rollers into the track through the access opening.
- Lift the door and align the door plates with the adjusting bolts of the hangers (rollers). Push the bolts into the door plates. Repeat for the second hanger/door plate.
- Adjust the door height using the spanner provided, if necessary, to ensure proper clearance and smooth movement.

Image 4.1: Step-by-step diagram showing how to attach the door plate to the door and then mount the door onto the concealed sliding system's rollers.
4.4 Floor Guide and Door Stop Installation
- Install the floor guides at the bottom of the door opening to keep the door centered and prevent it from swinging.
- Position the door stop inside the track to prevent the door from fully retracting into the wall cavity, allowing for easy access.

Image 4.2: A close-up view of a floor guide, essential for maintaining door alignment and stability.
5. Operation
The EaseLife pocket door hardware is designed for smooth and quiet operation. To open or close the door, gently slide it along the track. The precision ball bearing rollers minimize friction and noise.

Image 5.1: Demonstrates the invisible design of the pocket door, showing the door in both open and closed positions, seamlessly integrating into the wall.

Image 5.2: A detailed view of the three-wheel ball bearing rollers, highlighting their design for quiet and fluid door movement.
6. Maintenance
This hardware kit is designed for low maintenance. Periodically inspect the track and rollers for any debris or obstructions. Clean the track with a dry cloth if necessary. Avoid using lubricants that may attract dust and dirt, as the ball bearings are designed for maintenance-free operation.
To remove the door for maintenance or replacement, locate the tabs on the rollers (as shown in the installation video) and flip them out. This will allow the door to be lifted off the rollers, leaving the hardware attached to the door.
7. Troubleshooting
| Problem | Possible Cause | Solution |
|---|---|---|
| Door is difficult to slide or noisy. | Debris in track, misaligned rollers, or worn rollers. | Clean track. Check roller alignment. Replace rollers if worn (contact customer support). |
| Door does not stay centered. | Floor guides are loose or improperly installed. | Ensure floor guides are securely fastened and correctly positioned. |
| Door slams into the wall when fully opened. | Door stop is missing or improperly positioned. | Install or adjust the door stop to prevent full retraction. |
8. Frequently Asked Questions (FAQ)
- Q: Is the pocket door included with this hardware kit?
- A: No, this product includes only the hardware kit. The door panel must be purchased separately.
- Q: Can I cut the track to fit my specific requirements?
- A: Yes, the track can be cut to fit your desired opening width. Ensure precise measurements for optimal performance.
- Q: How should I choose the correct door panel size?
- A: The appropriate door panel size depends on your wall structure and the pocket door frame dimensions. Refer to the specifications section for compatible door widths and thicknesses.
- Q: How do I calculate the rough opening width?
- A: A general guideline for the rough opening width is approximately 2 times the door width plus 1 inch.
- Q: Is a soft-close mechanism included?
- A: No, a soft-close mechanism is not included with this standard hardware kit.
9. Warranty and Support
EaseLife products are manufactured to high-quality standards. For warranty information or technical support, please contact EaseLife customer service through the retailer where the product was purchased or visit the official EaseLife website. Keep your purchase receipt for warranty claims.