1. Introduction
This manual provides detailed instructions for the setup, operation, maintenance, and troubleshooting of your TONOR UHF Wireless Microphones System, Model 24079. Please read this manual thoroughly before using the product to ensure proper function and longevity.
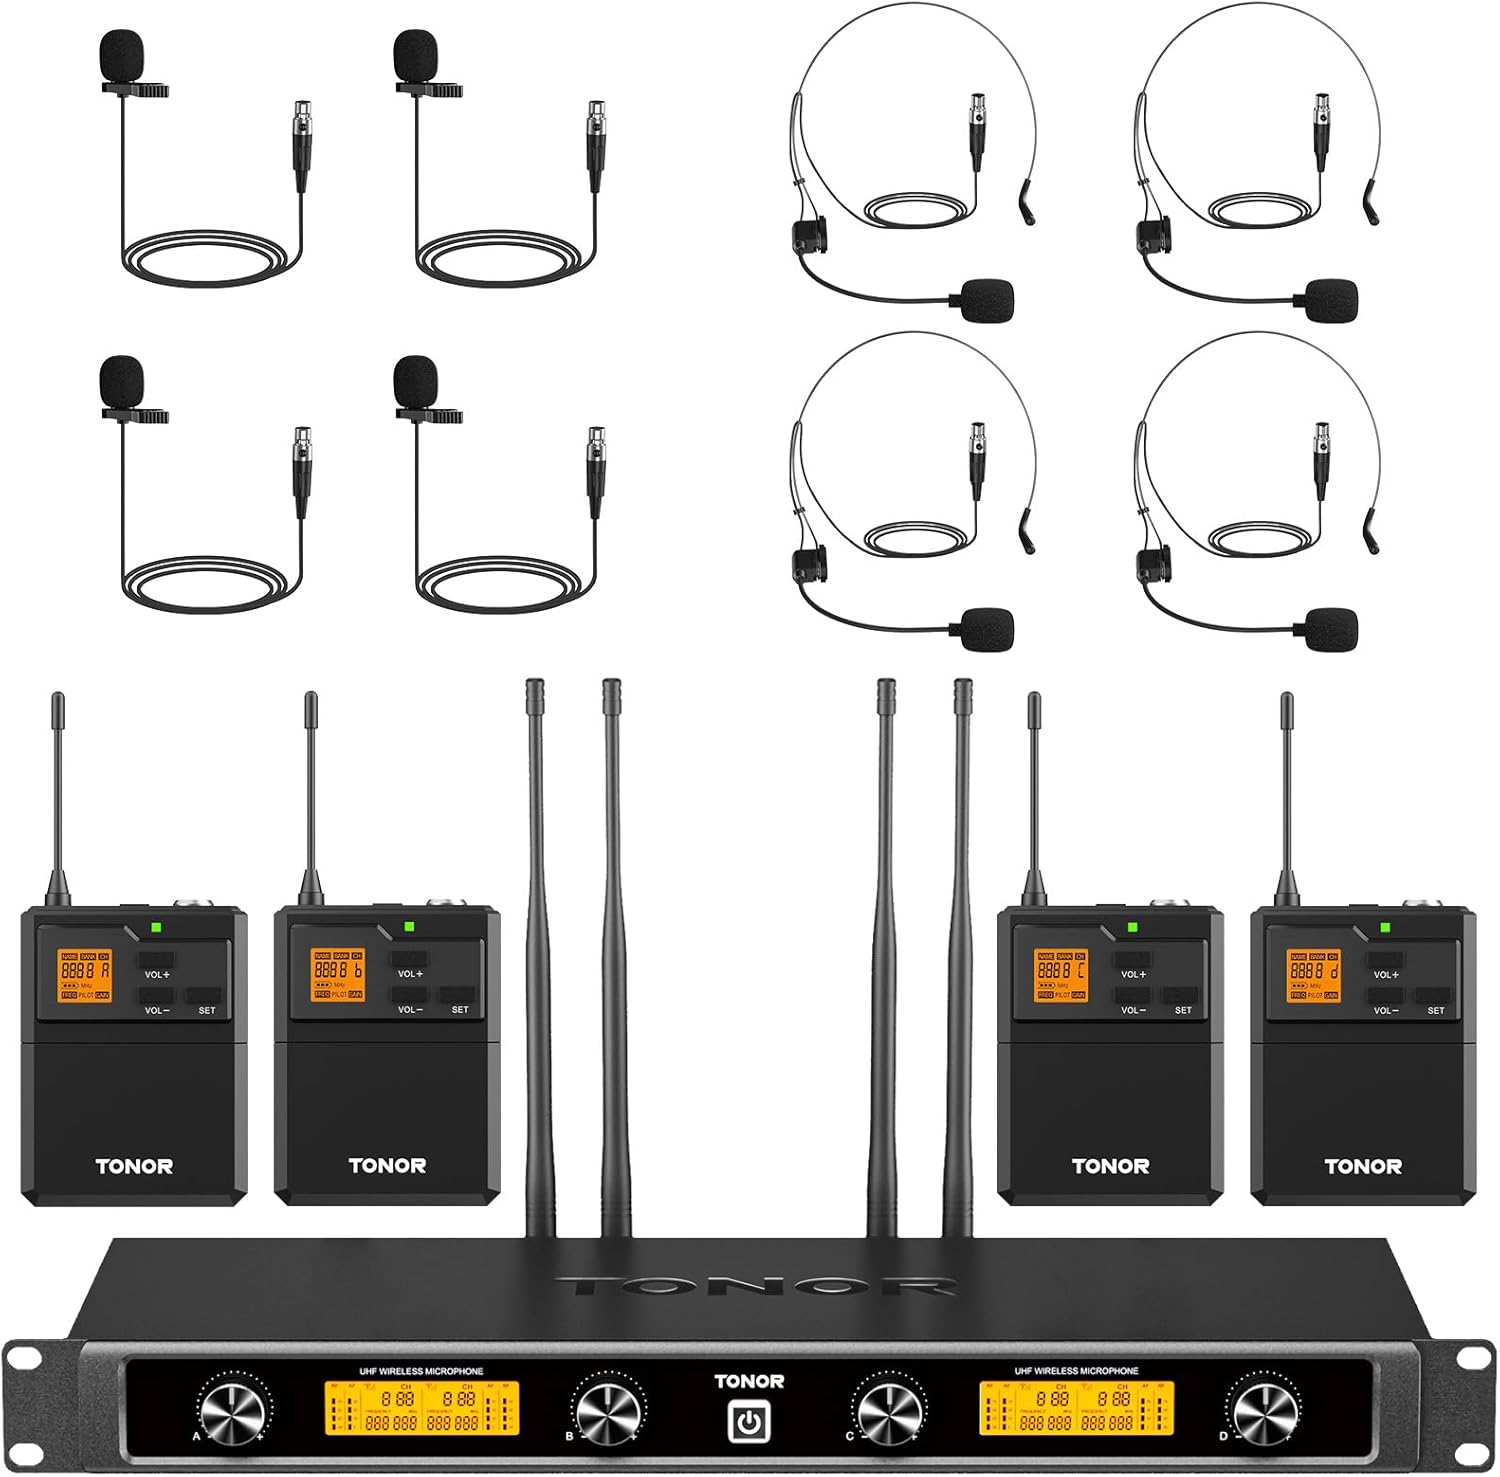
Image 1.1: Complete TONOR UHF Wireless Microphones System.
2. What's in the Box
Verify that all items listed below are included in your package:
- 4 x Bodypack Transmitters
- 4 x Headset Microphones
- 4 x Lapel Microphones
- 1 x Wireless Receiver
- 1 x 6.35mm Audio Cable
- 1 x Power Adapter
- 1 x User Manual

Image 2.1: Package Contents Overview.
3. Product Overview
3.1 UHF Wireless Receiver
The receiver unit processes audio signals from the bodypack transmitters and outputs them to an audio system. It features four removable antennas for enhanced signal reception and individual volume adjustments for each channel.

Image 3.1: UHF Wireless Receiver Components.
- Channel A/B/C/D Volume Control
- LCD Display
- Power Switch
- Antenna A/B/C/D
- 6.35mm (1/4") Audio Output Jack
- Balanced XLR Output for Channel A/B/C/D
3.2 UHF Bodypack Transmitter
Each bodypack transmitter connects to either a headset or lavalier microphone and wirelessly sends the audio signal to the receiver. It includes controls for power, mute, volume, and frequency selection.

Image 3.2: UHF Bodypack Transmitter Features.
- One-Tap On/Off/Mute Button: Controls power and mutes the microphone.
- LED Light: Green indicates power on, red indicates mute.
- Professional 3-Pin Mini XLR Jack: For connecting headset or lavalier microphones.
- LCD Display: Shows current frequency and battery level.
- Volume +/-: Adjusts microphone input volume.
- SET Button: Used for frequency selection.
- Battery Compartment: Requires 2 x AA batteries (not included).
3.3 Headset and Lavalier Microphones
The system includes both headset and lavalier (lapel) microphones, offering flexibility for various applications. Both types feature a cardioid pickup pattern for clear audio and reduced ambient noise.

Image 3.3: Headset and Lavalier Microphone Features.
4. Setup Instructions
4.1 Powering the Bodypack Transmitters
- Open the battery compartment on each bodypack transmitter.
- Insert 2 x AA batteries into each bodypack, ensuring correct polarity.
- Close the battery compartment securely.

Image 4.1: Inserting AA Batteries into Bodypack.
4.2 Connecting Microphones to Bodypacks
- Select either a headset or lavalier microphone.
- Plug the 3-pin Mini XLR connector of the chosen microphone into the corresponding jack on the bodypack transmitter. Ensure a secure connection.
4.3 Connecting the Receiver to an Audio System
The receiver can be connected to various audio devices such as mixers, speakers, or power amplifiers.
- Connect the power adapter to the receiver and plug it into a power outlet.
- Attach the four antennas to the designated ports on the receiver.
- Use the provided 6.35mm audio cable to connect the receiver's 1/4" output jack to your audio system's input. For balanced audio, use XLR cables (not included) to connect the individual XLR outputs to your mixer.

Image 4.2: Multi-Device Connection Support.
Optimum Boot Order:
Audio Mixer → Audio Amplifier → Speaker → Receiver → Microphone
Optimum Shutdown Order:
Microphone → Receiver → Speaker → Audio Amplifier → Audio Mixer
5. Operating Instructions
5.1 Powering On/Off
- Receiver: Press the power switch on the receiver's front panel to turn it on or off.
- Bodypack Transmitters: Press and hold the "POWER/MUTE" button on each bodypack to turn it on or off.
5.2 Frequency Adjustment
The system offers 10 frequency options per bodypack, totaling 40 channels, to avoid interference.
- With the bodypack transmitter powered on, short press the "SET" button to cycle through available frequencies.
- The LCD display will show the current frequency. Select a clear frequency if interference is detected.

Image 5.1: Frequency Selection on Bodypack.
5.3 Mute Function
To temporarily mute a bodypack transmitter:
- While the bodypack is on, a short press of the "POWER/MUTE" button will mute the microphone. The LED indicator will turn red.
- Press the button again to unmute. The LED indicator will turn green.
5.4 Volume Adjustment
- Bodypack Transmitters: Use the "VOL+" and "VOL-" buttons on the bodypack to adjust the input sensitivity of the microphone.
- Receiver: Use the individual volume knobs on the receiver's front panel to adjust the output level for each channel (A, B, C, D).
6. Maintenance
- Cleaning: Use a soft, dry cloth to clean the surfaces of the receiver, bodypacks, and microphones. Avoid using liquid cleaners or solvents.
- Battery Replacement: Replace AA batteries in the bodypack transmitters when the battery indicator on the LCD display shows low power. Remove batteries if the device will not be used for an extended period.
- Storage: Store the system in a cool, dry place away from direct sunlight and extreme temperatures.
- Antennas: Handle receiver antennas carefully to prevent damage. Ensure they are securely attached during operation.
7. Troubleshooting
| Problem | Possible Cause | Solution |
|---|---|---|
| No sound output. |
|
|
| Interference or static. |
|
|
| Weak or distorted sound. |
|
|
8. Specifications
| Feature | Detail |
|---|---|
| Brand | TONOR |
| Model Name | TW844 |
| Item Model Number | 24079 |
| Connectivity Technology | XLR, 6.35mm Jack |
| Microphone Form Factor | Lavalier, Headset |
| Polar Pattern | Unidirectional (Cardioid) |
| Number of Channels | 4 (10 frequency options per bodypack, total 40 channels) |
| Operation Range | Up to 295ft (90m) |
| Audio Sensitivity | 120 Decibels |
| Signal-to-Noise Ratio | 70 dB |
| Power Source (Bodypack) | 2 x AA batteries (not included) |
| Power Source (Receiver) | Corded Electric (12V DC) |
| Item Weight | 6.39 pounds (total package) |
| Package Dimensions | 20.88 x 11 x 4.5 inches |
| Color | Black |
| Recommended Uses | Speaker, Karaoke, Class, Church, Party |
9. Warranty and Support
For warranty information and technical support, please refer to the official TONOR website or contact their customer service directly. Details are typically provided on the product packaging or a dedicated support card within the box.
Manufacturer: TONOR
ASIN: B0CYPPRZD4
Date First Available: June 20, 2024


