
fmooostore M2
fmooostore 49800mAh Solar Charger Power Bank M2 - User Manual
Model: M2 | Brand: fmooostore
1. Product Overview
The fmooostore 49800mAh Solar Charger Power Bank is a high-capacity portable charging solution designed for various mobile devices. Featuring a robust, drop-proof, dust-proof, and water-resistant design with silicone protection, it is ideal for outdoor enthusiasts. This power bank offers multiple charging options including wireless charging, built-in cables (iOS, USB-C, Micro USB), and additional USB output ports, allowing simultaneous charging of up to 8 devices. It also includes a solar panel for emergency recharging and a dual LED flashlight with SOS, Strobe, and Steady modes.

Image 1.1: The fmooostore Solar Charger Power Bank, showcasing its rugged design, integrated compass, and powerful dual LED flashlights.
2. Important Safety Information
- Do not expose the power bank to extreme temperatures (above 60°C/140°F or below -10°C/14°F) or direct sunlight for prolonged periods.
- Avoid dropping, disassembling, or attempting to repair the device yourself. This may void the warranty and cause damage.
- Keep the power bank away from water, moisture, and flammable materials. While water-resistant, it is not fully waterproof and should not be submerged.
- Use only compatible charging cables and adapters.
- Keep out of reach of children.
- Dispose of the power bank responsibly according to local regulations. Do not dispose of in household waste.
3. Product Components
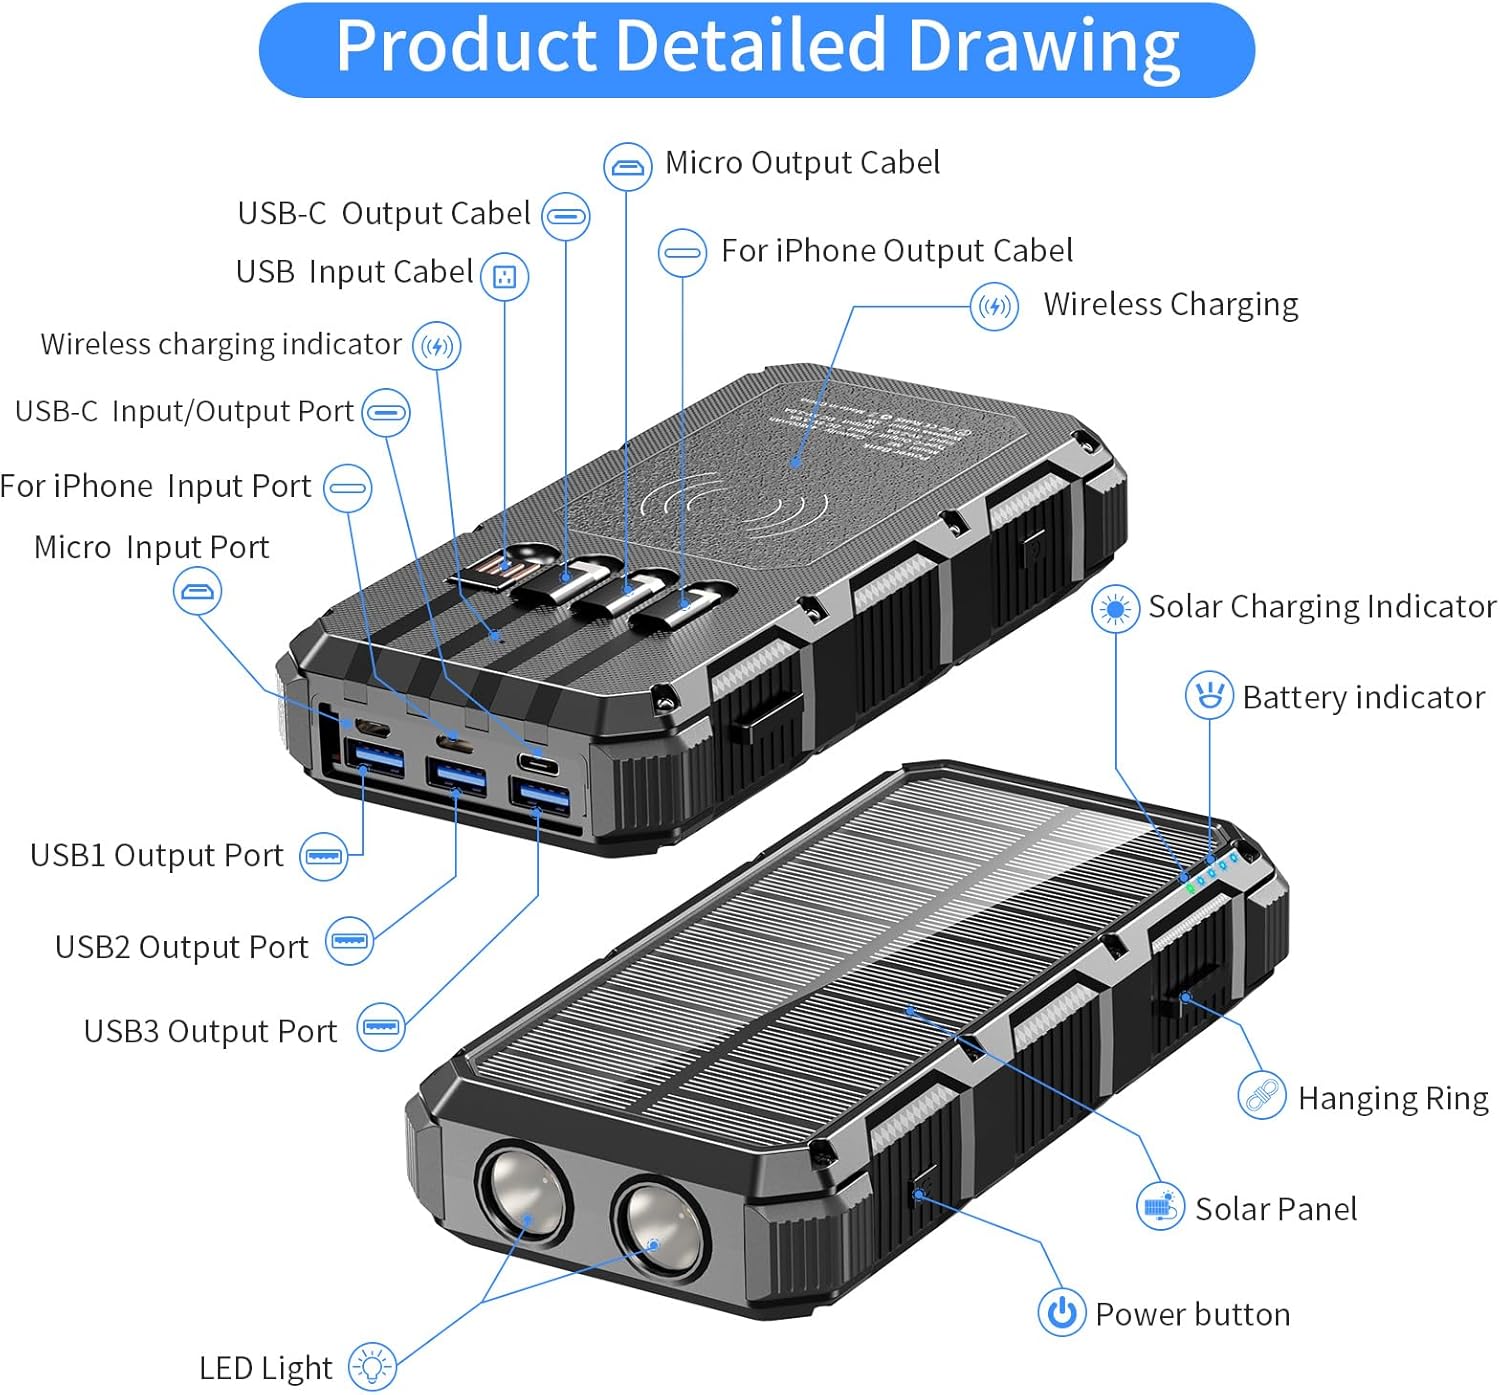
Image 3.1: Detailed diagram illustrating the various components and ports of the power bank.
- USB-C Output Cable: Built-in cable for USB-C devices.
- Micro Output Cable: Built-in cable for Micro USB devices.
- For iPhone Output Cable: Built-in cable for iOS devices.
- USB Input Cable: Built-in USB-A cable for recharging the power bank.
- Wireless Charging Area: For wireless charging compatible devices.
- Wireless Charging Indicator: Light indicating wireless charging status.
- USB-C Input/Output Port: Versatile port for both charging devices and recharging the power bank.
- For iPhone Input Port: Input port for recharging the power bank using an iOS cable.
- Micro Input Port: Input port for recharging the power bank using a Micro USB cable.
- Solar Charging Indicator: Light indicating solar charging activity.
- Battery Indicator: Displays remaining battery level.
- USB1/2/3 Output Ports: Standard USB-A ports for charging devices.
- Hanging Ring: For attaching to backpacks or gear.
- Solar Panel: For emergency and supplementary charging.
- Power Button: Activates the power bank and controls flashlight.
- LED Light: Dual bright LED flashlights.
4. Setup and First Use
4.1 Initial Charging
Before first use, it is recommended to fully charge the power bank using a wall adapter. This ensures the internal battery is calibrated and ready for optimal performance.
- Connect the built-in USB-A input cable or a separate USB-C, iOS, or Micro USB cable to the corresponding input port on the power bank.
- Connect the other end of the cable to a USB wall adapter (not included) or a computer USB port.
- The battery indicator lights will illuminate, showing the charging progress. Once all lights are solid, the power bank is fully charged.
5. Operating Instructions
5.1 Recharging the Power Bank
The power bank offers multiple ways to be recharged:

Image 5.1: The power bank can be recharged via its built-in USB-A cable, solar panel, USB-C port, iOS port, or Micro USB port.
- Via Built-in USB-A Cable: Pull out the integrated USB-A input cable and connect it to a USB wall adapter or computer.
- Via USB-C Input Port: Use a USB-C cable (not included) to connect the power bank to a USB-C wall adapter.
- Via iOS Input Port: Use an iOS cable (not included) to connect the power bank to a USB wall adapter.
- Via Micro Input Port: Use a Micro USB cable (not included) to connect the power bank to a USB wall adapter.
- Via Solar Panel: Place the power bank in direct sunlight. The solar charging indicator will light up. Note: Solar charging is primarily for emergency use and supplementary power. For faster and more efficient charging, use a wall adapter.
5.2 Charging Your Devices
The power bank supports charging up to 8 devices simultaneously.
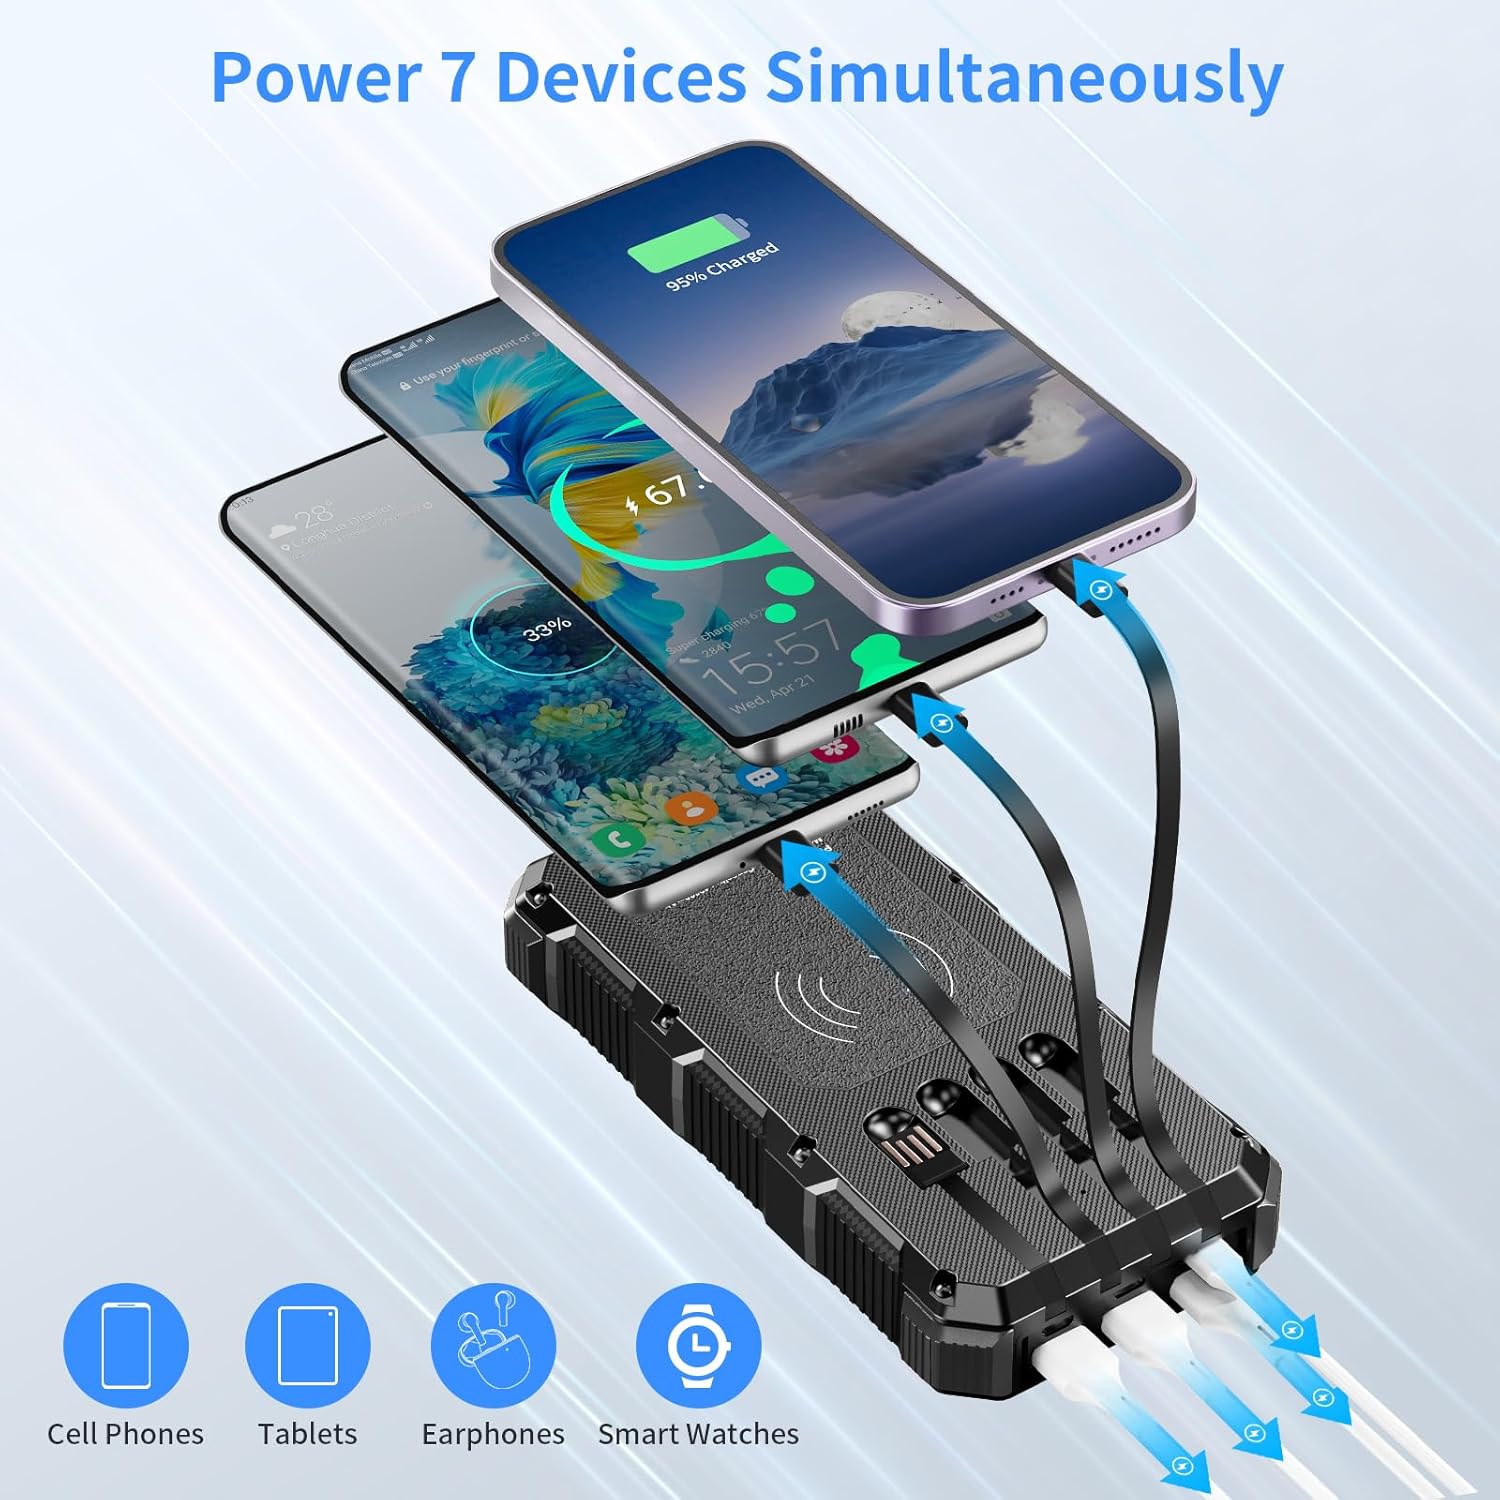
Image 5.2: The power bank's multiple output options allow for simultaneous charging of several devices.
- Using Built-in Cables: Pull out the appropriate built-in cable (iOS, USB-C, or Micro USB) and connect it directly to your device.
- Using USB Output Ports: Connect your device's charging cable to any of the three USB-A output ports or the USB-C input/output port.
- The power bank will automatically begin charging your device.
5.3 Wireless Charging
For devices with wireless charging capability:
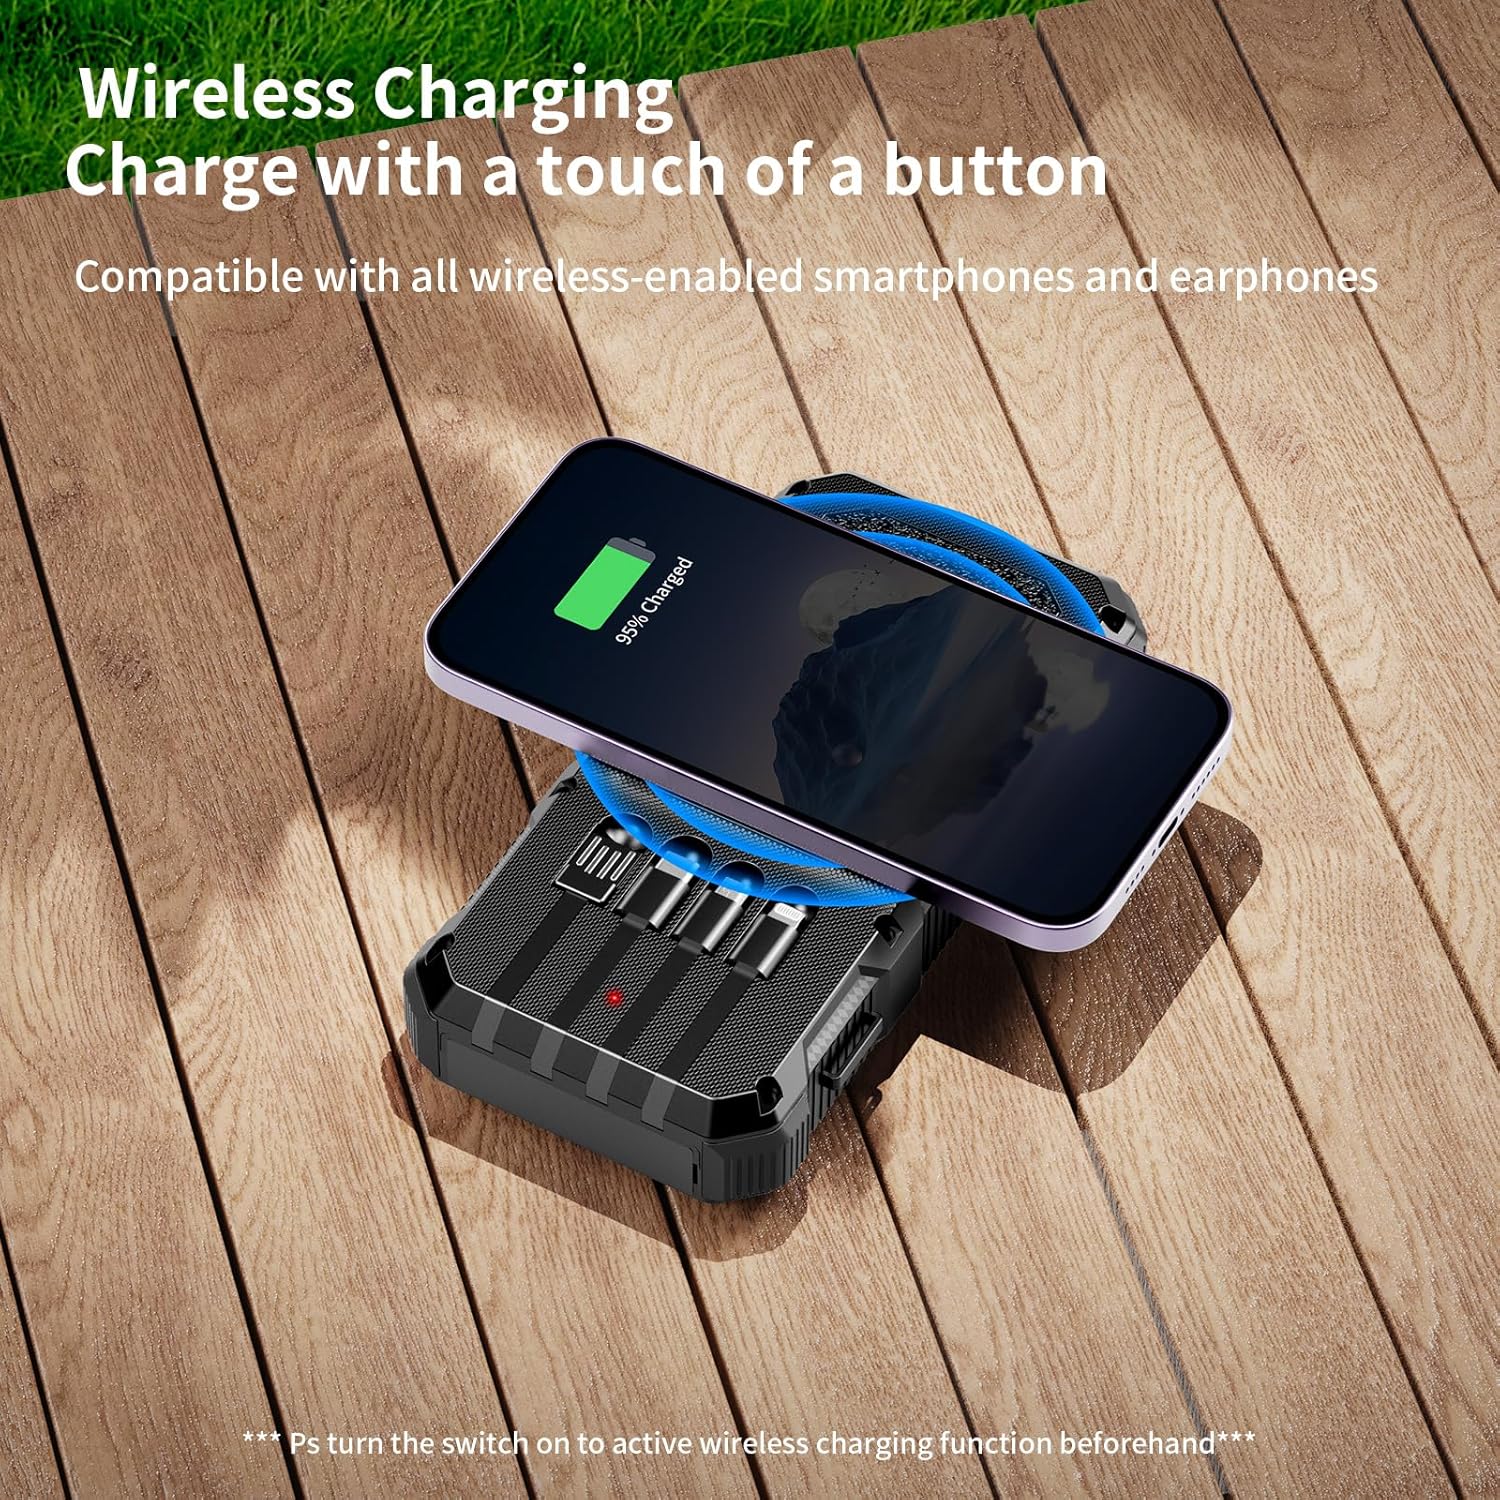
Image 5.3: Place your wireless-enabled device on the designated wireless charging area for cable-free charging.
- Ensure the power bank is turned on.
- Place your wireless-enabled device (e.g., smartphone, earbuds) onto the wireless charging area on the power bank.
- The wireless charging indicator will illuminate, and your device should begin charging.
5.4 Using the Flashlight
The power bank features dual bright LED flashlights with three modes:
- To Turn On/Off: Double-click the power button.
- To Cycle Modes: Once the flashlight is on, single-click the power button to switch between Strong, Strobe, and SOS modes.
6. Care and Maintenance
To ensure the longevity and optimal performance of your power bank:

Image 6.1: The power bank is designed with silicone protection for enhanced durability against drops, water splashes, and dust.
- Cleaning: Wipe the surface with a soft, dry cloth. Do not use harsh chemicals or abrasive cleaners.
- Storage: Store the power bank in a cool, dry place away from direct sunlight and extreme temperatures. If storing for extended periods, charge it to about 50-75% capacity every 3 months to preserve battery health.
- Protection: Although designed to be rugged, avoid unnecessary impacts or exposure to excessive water. Ensure the silicone port cover is properly sealed when not in use to maintain dust and water resistance.
7. Troubleshooting
| Problem | Possible Cause | Solution |
|---|---|---|
| Power bank not charging | Low battery; Faulty cable/adapter; Loose connection | Ensure power bank has some charge; Try a different cable/adapter; Check all connections are secure. |
| Device not charging from power bank | Power bank off; Device cable faulty; Device not compatible; Power bank battery empty | Press power button to activate; Try a different device cable; Ensure device is compatible; Recharge power bank. |
| Wireless charging not working | Device not aligned; Device not wireless charging compatible; Power bank off | Adjust device position on charging area; Verify device supports wireless charging; Ensure power bank is active. |
| Flashlight not turning on/off | Incorrect button press | Double-click the power button quickly to activate/deactivate the flashlight. |
| Solar charging indicator not lighting up | Insufficient sunlight; Panel obstructed | Place power bank in direct, strong sunlight; Ensure solar panel is clean and unobstructed. |
8. Product Specifications
| Feature | Detail |
|---|---|
| Model Number | M2 |
| Battery Capacity | 49800 Milliamp Hours (Li-Polymer) |
| Product Dimensions | 6.88 x 3.34 x 1.18 inches |
| Item Weight | 1.28 pounds |
| Input Ports | Built-in USB-A cable, USB-C, iOS, Micro USB |
| Output Ports | 3x USB-A, 1x USB-C, Built-in iOS cable, Built-in Micro USB cable, Wireless Charging |
| Special Features | LED Indicator Lights, Fast Charging (QC 3.0), Built-in Cables, Wireless Charging, Solar Panel, SOS/Strobe/Steady Flashlight Modes, Silicone Protection (Drop-proof, Dust-proof, Water-resistant), Built-in Compass, Hanging Ring |
| Color | Black |
| Manufacturer | Shenzhen Pusiou Technology Co., Ltd. |
| Country of Origin | China |
| First Available Date | September 24, 2024 |
9. Warranty and Customer Support
Your fmooostore 49800mAh Solar Charger Power Bank comes with a lifetime friendly customer service commitment. If you have any questions or encounter any issues with your product after purchase, please do not hesitate to contact us. We are dedicated to providing you with the most satisfactory solution.
Please refer to your purchase documentation or the seller's contact information for specific details on how to reach customer support.
Ask a question about this manual
Ask about setup, troubleshooting, compatibility, parts, safety, or missing instructions. Manuals+ will review the question and use this page’s manual context to help answer it.