Introduction
Thank you for choosing the farexon Electric Standing Desk. This manual provides essential information for the safe assembly, operation, and maintenance of your new adjustable height desk. Please read these instructions thoroughly before use and retain them for future reference.
Important Safety Information
WARNING: Failure to follow these safety instructions may result in injury or damage to the product.
- Ensure the desk is stable and anchored to the wall if necessary to prevent tipping.
- Do not exceed the weight limit of 220 pounds (approximately 100 kg).
- Follow the provided instructions for safe assembly and use.
- Keep children and pets away from the desk during operation.
- Do not place hands or other objects near moving parts during height adjustment.
- Disconnect power before cleaning or maintenance.
Package Contents
Before beginning assembly, please verify that all components listed below are present and undamaged. If any parts are missing or damaged, contact farexon customer support immediately.
- Desktop surface (55x24 inches)
- Electric lifting columns (legs)
- Control panel with memory buttons
- Power adapter and cables
- Lockable casters (4 units)
- Non-slip heightening foot pads (4 units)
- Headphone hooks (2 units)
- Wire collecting hole covers
- Assembly hardware (screws, bolts, etc.)
- Assembly tools
- Instruction manual

Text Description for Figure 1: This image displays all components included in the farexon Electric Standing Desk package. It shows the two-piece desktop, two lifting columns, a control box, power cables, a control panel, four casters, four non-slip foot pads, two headphone hooks, and various assembly hardware and tools, along with the instruction manual.
Setup and Assembly
Assembly of the farexon Electric Standing Desk is designed to be straightforward. Detailed instructions, all necessary accessories, and installation tools are included in the package. It is recommended that two people assemble the desk for ease and safety.
Assembly Steps:
- Unpack Components: Carefully remove all parts from the packaging. Place them on a soft, clean surface to prevent scratches. Tip: When installing the tabletop, you can pad the floor with cardboard from the box to prevent staining the light-colored tabletop.
- Attach Lifting Columns: Secure the lifting columns to the desktop using the provided screws and tools. Ensure they are aligned correctly.
- Install Feet/Casters: Decide whether to use the non-slip heightening foot pads or the lockable casters. Attach your chosen base to the bottom of the lifting columns.
- Mount Control Box and Panel: Attach the control box and the height adjustment control panel to the underside of the desktop in the designated locations.
- Connect Cables: Connect the motor cables from the lifting columns to the control box, and then connect the control panel cable to the control box. Finally, connect the power adapter to the control box and the power outlet.
- Install Accessories: Attach the headphone hooks and insert the wire collecting hole covers into the desktop grommets.
- Cable Management: Use the included cable ties or clips to neatly manage all power and control cables under the desk.
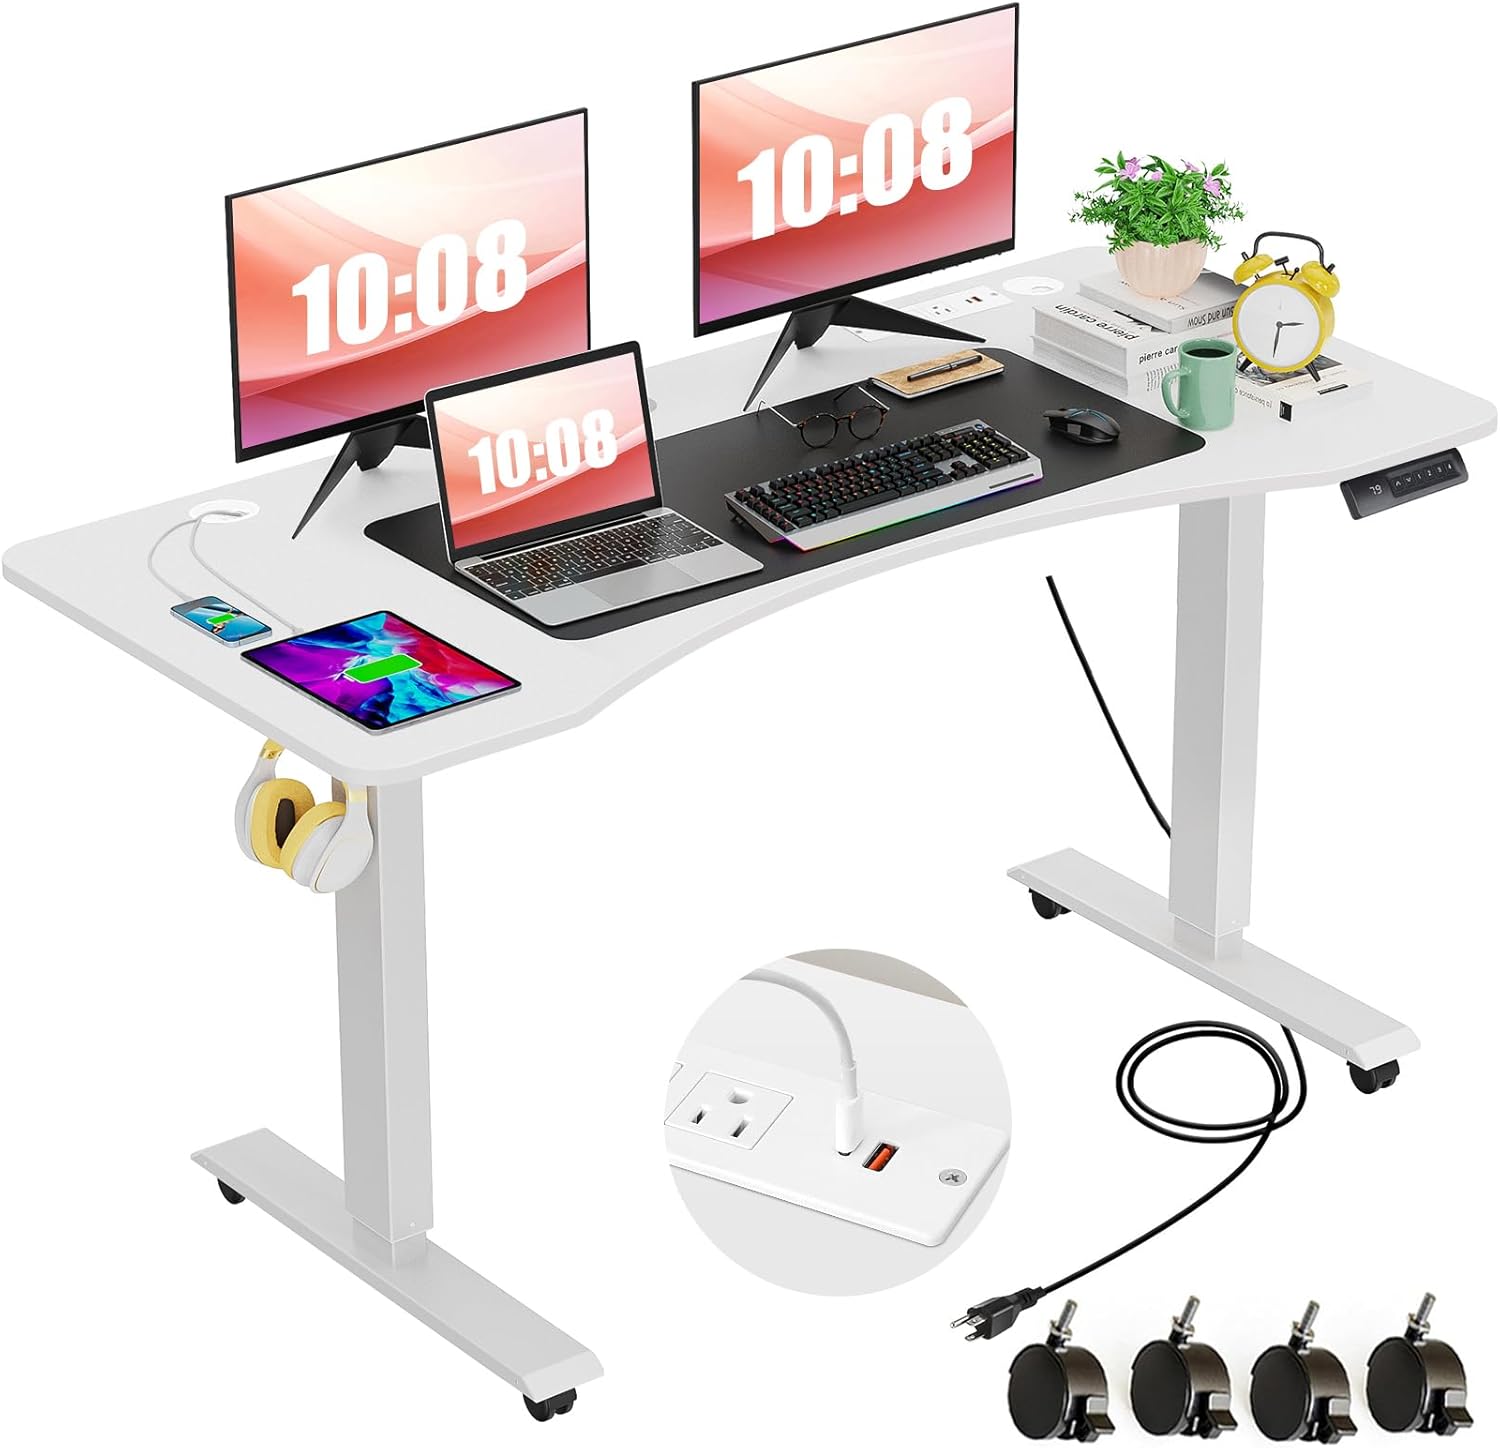
Text Description for Figure 2: This image shows the fully assembled farexon Electric Standing Desk in a white finish. The desk features two monitors, a laptop, keyboard, mouse, and other office accessories. The integrated charging station with outlets and USB ports is visible on the desktop. The desk is equipped with casters for mobility, and a headphone hook is attached to the side. The overall setup demonstrates a functional and organized workspace.
Operating Instructions
Height Adjustment
The farexon Electric Standing Desk allows for smooth height adjustment between 27.5 inches (70 cm) and 46.5 inches (118 cm). Use the Up (▲) and Down (▼) buttons on the control panel to adjust the desk to your desired height.

Text Description for Figure 3: This diagram illustrates the adjustable height range of the farexon Electric Standing Desk. It shows the minimum height of 27.5 inches (70 cm), suitable for sitting, and the maximum height of 46.5 inches (118 cm), suitable for standing. Silhouettes of individuals in sitting, short standing, and tall standing positions are shown to demonstrate the versatility of the height range.
Memory Presets
The control panel features four memory buttons (1, 2, 3, 4) to store and recall your preferred sitting and standing heights. This allows for quick and convenient transitions between positions.
- Set a Memory Position: Adjust the desk to your desired height using the Up/Down buttons. Once at the desired height, press and hold one of the memory buttons (1, 2, 3, or 4) until the LED display flashes or beeps, indicating the height has been saved.
- Recall a Memory Position: Simply press the corresponding memory button (1, 2, 3, or 4) to automatically move the desk to the saved height.

Text Description for Figure 4: This image provides a close-up view of the farexon Electric Standing Desk's control panel. It features an LED screen displaying the current height, Up (▲) and Down (▼) buttons for manual adjustment, and four numbered memory buttons (1, 2, 3, 4) for saving and recalling preferred height settings. An icon for 'Re-memory height' indicates the function of holding a button to save a position.
Integrated Charging Station
The desktop includes a recessed charging station with 3 standard plug outlets and 2 USB ports (USB-A and USB-C). This allows you to conveniently charge multiple electronic devices directly from your desk.

Text Description for Figure 5: This image shows a detailed view of the integrated power strip on the farexon Electric Standing Desk. It features three standard 125V/12A AC outlets, one 5V/2A USB-A port, and one 5V/3A, 9V/2A, 12V/1.5A USB-C port. The image also displays ETL Listed and FC certifications, indicating compliance with safety and quality standards.
Lockable Casters
The desk is equipped with four lockable casters, providing mobility and stability. To move the desk, unlock the casters. To secure the desk in place, engage the locks on all four casters.

Text Description for Figure 6: This image highlights the removable and lockable wheels of the farexon Electric Standing Desk. A close-up shows a single caster with its locking mechanism, emphasizing the ease with which the desk can be moved and then secured in position.
Additional Features
- Wire Collecting Holes: Two grommets on the desktop help manage and route cables, keeping your workspace tidy.
- Headphone Hooks: Two metal hooks are provided for convenient storage of headphones or bags.
- Waterproof & Environmental Protection Board: The tabletop is designed to be water and wear-resistant.

Text Description for Figure 7: This image displays four detailed features of the farexon Electric Standing Desk. Top left shows a wire collecting hole for cable management. Top right shows water droplets on the desk surface, indicating its waterproof and environmental protection board. Bottom left shows a metal hook designed for headphones. Bottom right shows a protective edge of the desk, highlighting its durability.
Maintenance
Regular maintenance will help prolong the life and functionality of your farexon Electric Standing Desk.
- Cleaning: Wipe the desktop surface with a soft, damp cloth. Avoid harsh chemicals or abrasive cleaners.
- Check Connections: Periodically inspect all screws and bolts to ensure they are tight. Re-tighten if necessary.
- Cable Management: Ensure cables are neatly organized and not pinched or tangled, especially during height adjustments.
- Motor Care: The industrial-grade metal frame and motor are designed for durability. Avoid overloading the desk beyond its weight capacity.
Troubleshooting
If you encounter any issues with your farexon Electric Standing Desk, please refer to the following common solutions:
- Desk not adjusting height:
- Check if the power cable is securely plugged into both the desk and the wall outlet.
- Ensure there are no obstructions preventing movement.
- If the desk has been overloaded, remove some weight and try again.
- Desk stops during adjustment (Anti-collision feature):
The desk is equipped with anti-collision technology. If it encounters an obstacle during lifting or lowering, it will automatically stop and reverse slightly to prevent damage. Remove the obstruction and try adjusting the height again.
- Control panel not responding:
- Unplug the desk from the power outlet for 10-15 seconds, then plug it back in to reset the system.
- Ensure the control panel cable is securely connected to the control box.
If these steps do not resolve the issue, please contact farexon customer support for further assistance.
Specifications
| Feature | Specification |
|---|---|
| Brand | farexon |
| Model Number | standing desk |
| Product Dimensions (D x W x H) | 44"D x 24"W x 30"H (Note: This appears to be a static dimension, actual adjustable height is below) |
| Desktop Size | 55" x 24" |
| Minimum Height | 27.5 Inches (70 cm) |
| Maximum Height | 46.5 Inches (118 cm) |
| Item Weight | 56 Pounds |
| Weight Capacity | 220 Pounds (approx. 100 kg) |
| Top Material Type | Wood (Water and wear-resistant) |
| Base Material | Metal |
| Special Features | Adjustable Height, Built-In USB Outlet, Electric, Ergonomic, Wheels, Anti-collision Technology |
| Charging Station | 3 Standard Plug Outlets, 2 USB Ports (USB-A, USB-C) |
| Assembly Required | Yes |
| Recommended People for Assembly | 2 |
| Includes All Assembly Tools | Yes |
Warranty and Support
The farexon Electric Standing Desk comes with a Limited Warranty. For specific details regarding the warranty period and coverage, please refer to the warranty card included in your package or contact farexon customer support.
farexon is committed to providing excellent after-sales service. If you have any questions, concerns, or require assistance with your product, please do not hesitate to contact our customer support team. We are dedicated to helping you resolve any issues you may encounter.
For support, please visit the farexon Store on Amazon or refer to the contact information provided in your product packaging.


