
1. Introduction
This manual provides essential information for the proper installation, operation, and maintenance of your Loboo L7S Motorcycle High and Low Beam Auxiliary Lights. Please read this manual thoroughly before installation and use to ensure optimal performance and safety. Keep this manual for future reference.

Image 1.1: Loboo L7S Auxiliary Lights. These lights feature a robust black housing and distinctive yellow lenses, designed for enhanced visibility.
2. Product Overview
The Loboo L7S auxiliary lights are designed to provide enhanced illumination for motorcycles, featuring both high and low beam functionalities. They are built to withstand challenging environmental conditions.
Key Features:
- Integrated High and Low Beam: Seamlessly switch between low beam for general riding and high beam for extended visibility.
- High Luminous Flux: Delivers up to 15,000 lumens for powerful lighting.
- Durable Construction: Features an aluminum alloy body for efficient heat dissipation and longevity.
- IP68 Waterproof Rating: Designed to operate reliably in various weather conditions, including heavy rain and dusty environments.
- Yellow Lens Covers: Improves visibility in adverse weather such as rain and fog, while also protecting the light body.
- Multiple Warning Modes: Includes time-sharing flashing, simultaneous flashing, and rotating flashing for signaling.
- Versatile Mounting: Compatible with various pipe diameters (22mm, 25mm, 28mm, 32mm, 38mm).

Image 2.1: IP68 Dustproof & Waterproof. The lights are shown partially submerged in water, demonstrating their ability to function in harsh environments.

Image 2.2: Aluminum Alloy Light Body. This image highlights the robust aluminum construction, which aids in efficient heat dissipation, crucial for LED longevity.
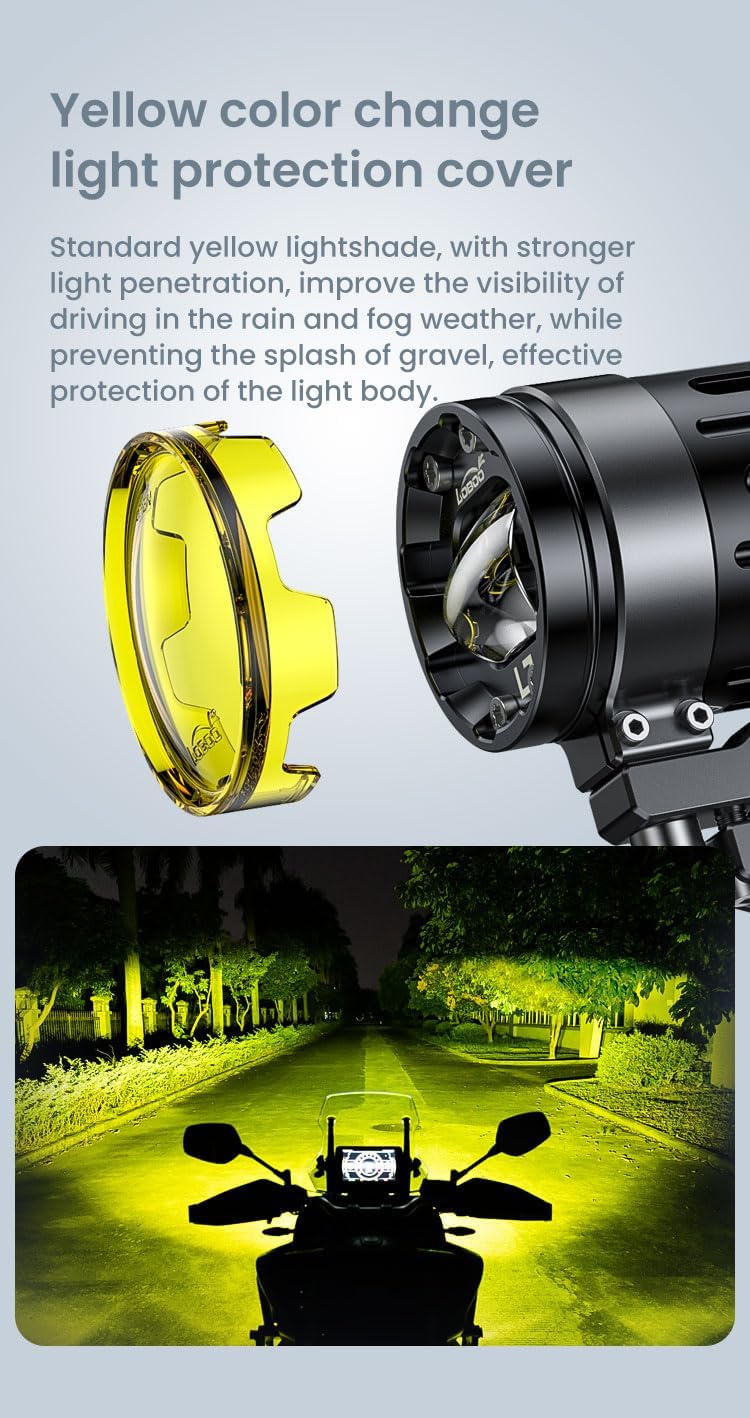
Image 2.3: Yellow Color Change Light Protection Cover. The yellow cover is shown being installed, and an example demonstrates how the yellow light improves visibility in fog.
3. Setup and Installation
3.1 Package Contents
Before beginning installation, verify that all components are present:

Image 3.1: Package Contents. This image displays all items included: two auxiliary lights, a wheel switch, mounting clamps with bushings, various screws, a hex key, screw adhesive, gloves, cable ties, and the complete wiring harness.
- Auxiliary Lights (2 units)
- Wheel Switch
- Clamps (2 units)
- Clamp Bushings (various sizes for 22mm, 25mm, 28mm, 32mm, 38mm pipe diameters)
- Screws and Hex Key
- Screw Adhesive
- Gloves
- Cable Ties
- Wiring Harness (including fuse box, control cable, ACC, positive, negative, and warning light signal cable)
3.2 Mounting the Lights
- Select the appropriate clamp bushings for your motorcycle's pipe diameter (22mm, 25mm, 28mm, 32mm, or 38mm).
- Attach the clamps to the desired mounting location on your motorcycle's crash bars or other suitable pipes. Ensure the mounting location provides a clear path for the light beam and does not obstruct other controls or components.
- Secure the auxiliary lights to the clamps using the provided screws. Apply screw adhesive to prevent loosening due to vibration.
- Adjust the angle of the lights to achieve the desired beam pattern.

Image 3.2: Applicable to Multiple Sizes. This image illustrates the versatility of the mounting clamps, which can accommodate various pipe diameters using different bushings.
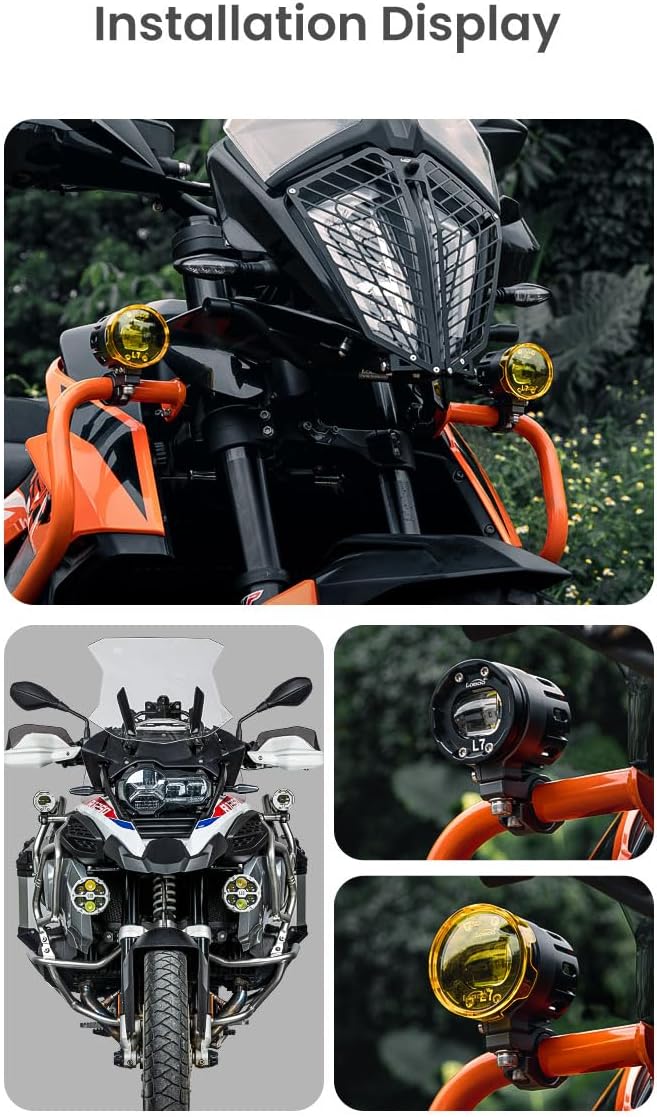
Image 3.3: Installation Display. This composite image shows the lights mounted on different motorcycle models, providing examples of typical installation setups.
3.3 Wiring Instructions
Follow the wiring diagram carefully. Incorrect wiring can damage the lights or your motorcycle's electrical system.
- Connect the positive (+) wire from the wiring harness to your motorcycle's positive battery terminal.
- Connect the negative (-) wire from the wiring harness to your motorcycle's negative battery terminal or a suitable ground point on the chassis.
- Connect the ACC wire to a switched power source on your motorcycle (e.g., ignition switch) so the lights turn off with the ignition.
- Connect the control cable from the lights to the wheel switch.
- Connect the warning light signal cable if you intend to use the warning light functions.
- Route all cables securely using the provided cable ties, ensuring they are away from hot engine parts, moving components, and sharp edges.
- Ensure the fuse box is easily accessible for maintenance.
4. Operating Instructions
The Loboo L7S lights offer multiple lighting modes controlled by the wheel switch.
4.1 Switching Modes
Use the wheel switch to cycle through the available lighting modes:
- Low Beam Mode: Provides a focused beam with a clear tangent line to avoid dazzling oncoming traffic.
- High & Low Beam Mode: Activates both high and low beams simultaneously for maximum illumination and extended lighting distance.
- Warning Light Modes: Three distinct flashing patterns for signaling purposes.

Image 4.1: High and Low Beam in One Integrated Unit. This image illustrates the different lighting modes, including low beam, combined high and low beam, and the three warning light patterns.
4.2 Warning Light Functions
The warning light modes are designed to enhance your visibility and signal your presence, especially in low-light conditions or emergencies.
- Time-sharing flashing: Lights flash alternately.
- Simultaneous flashing: Both lights flash together.
5. Maintenance
Regular maintenance ensures the longevity and optimal performance of your Loboo L7S auxiliary lights.
- Cleaning: Periodically clean the lenses and housing with a soft cloth and mild soap solution. Avoid abrasive cleaners that could scratch the lens.
- Inspection: Regularly check all mounting hardware for tightness. Inspect wiring for any signs of wear, fraying, or damage.
- Waterproof Seals: While the lights are IP68 rated, avoid directing high-pressure water jets directly at the seals during washing.
- Fuse Replacement: If the lights stop working, check the fuse in the wiring harness. Replace it with a fuse of the same rating if blown.
6. Troubleshooting
If you encounter issues with your Loboo L7S auxiliary lights, refer to the following common troubleshooting steps:
- Lights not turning on:
- Check all wiring connections for proper contact.
- Verify the fuse in the wiring harness is intact.
- Ensure the motorcycle's battery has sufficient charge.
- Confirm the ACC wire is connected to a live switched power source.
- Lights flickering or dim:
- Inspect wiring for loose connections or corrosion.
- Check the battery voltage.
- One light not working:
- Check the individual connection to the non-working light.
- Ensure the light unit itself is not damaged.
If these steps do not resolve the issue, contact Loboo customer support for further assistance.
7. Specifications
Detailed technical specifications for the Loboo L7S auxiliary lights:

Image 7.1: Product Parameter Table. This table provides a summary of the key technical specifications for the L7S lights.
| Parameter | Value |
|---|---|
| Product Name | High & Low Beam Auxiliary Light |
| Model | L7S |
| Input Voltage | 12-15V |
| Dustproof & Waterproof Grade | IP68 |
| Light Body Material | Aluminum Alloy |
| Color Temperature (White Light) | 6000K |
| Color Temperature (Yellow Light) | 3000K |
| Total Luminous Flux | 15000 lumens (MAX) |
| Modes | Low Beam, High & Low Beam, Warning Modes |
| Power (Low Beam) | 20-80W |
| Power (High & Low Beam) | 48-150W |
| Housing Color | Black |
| Lens Color | Yellow (with clear option) |
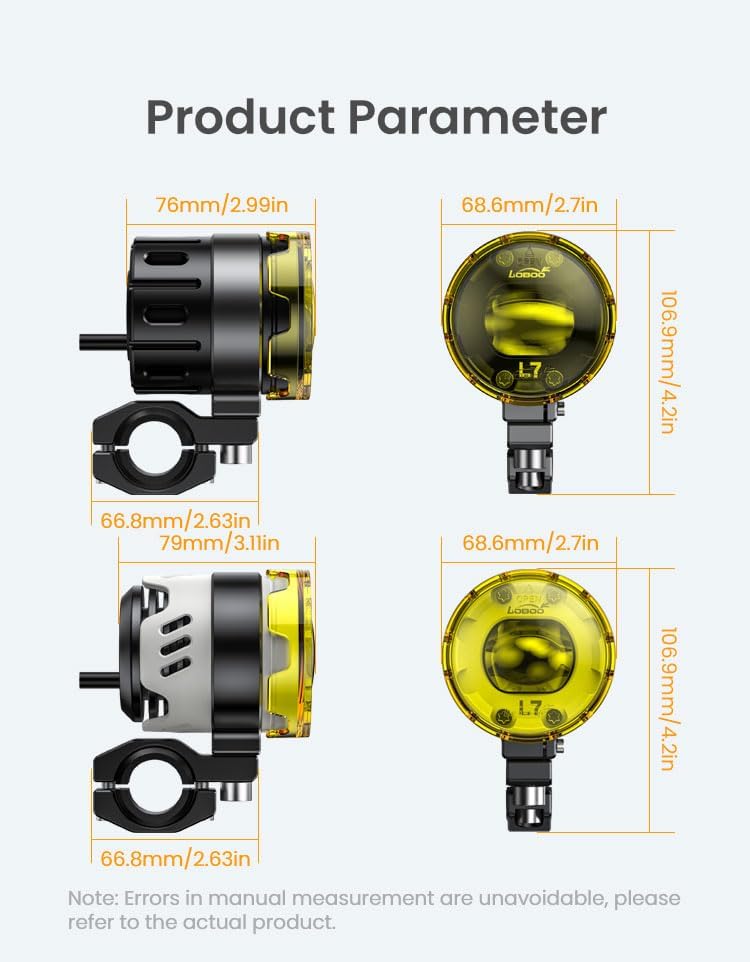
Image 7.2: Product Dimensions. This diagram provides precise measurements of the light units.
8. Warranty and Support
For warranty information and customer support, please refer to the official Loboo website or contact your retailer. Keep your purchase receipt as proof of purchase.
For further assistance, you may visit the Loboo store on Amazon: Loboo Store