
1. Product Overview
The GYPNS SX244DA Lateral Assembly with Center Pipe is a replacement component designed for various Hayward Pro Series sand filters. This assembly plays a crucial role in the filtration process of your pool or spa, ensuring clean water by effectively separating impurities from the water.
The lateral assembly facilitates the flow of dirty water through the sand filter layer. Impurities are trapped by the sand, and clean water then passes through the pivot laterals into the central pipe, returning to the pool. Replacing a damaged or worn lateral assembly is essential for maintaining efficient filtration.

2. Product Specifications
- Model Number: SX244DA
- Product Dimensions: 0.1 x 0.1 x 0.1 inches (Note: These dimensions may represent packaging or internal component size, not the full assembled unit.)
- Item Weight: 2.07 pounds
- Manufacturer: GYPNS

3. Compatibility
This lateral assembly is compatible with the following Hayward Pro Series sand filters and related components:
- Hayward Pro Series Sand Filters: S310T2, S270T2, S360T2, S210T, S220T, S230T, S244T, S244TC, S270T
- Hayward Automatic Skimmers and Inlet/Outlet Fittings: SP1091ES, SP10852OM, SP10841R, SP1097, SP1411
Please verify your specific model number before purchasing to ensure compatibility.

4. Installation Instructions
Proper installation of the lateral assembly is crucial for effective sand filter operation. Follow these steps carefully:
- Prepare the Filter: Before beginning, ensure your sand filter system is turned off and depressurized. Drain the water from the filter tank.
- Remove Old Sand: Carefully remove the filter sand from the tank. This may require specialized tools or a wet/dry vacuum.
- Remove Old Assembly: Once the sand is removed, locate and carefully remove the old or damaged center pipe lateral assembly kit from the filter tank.
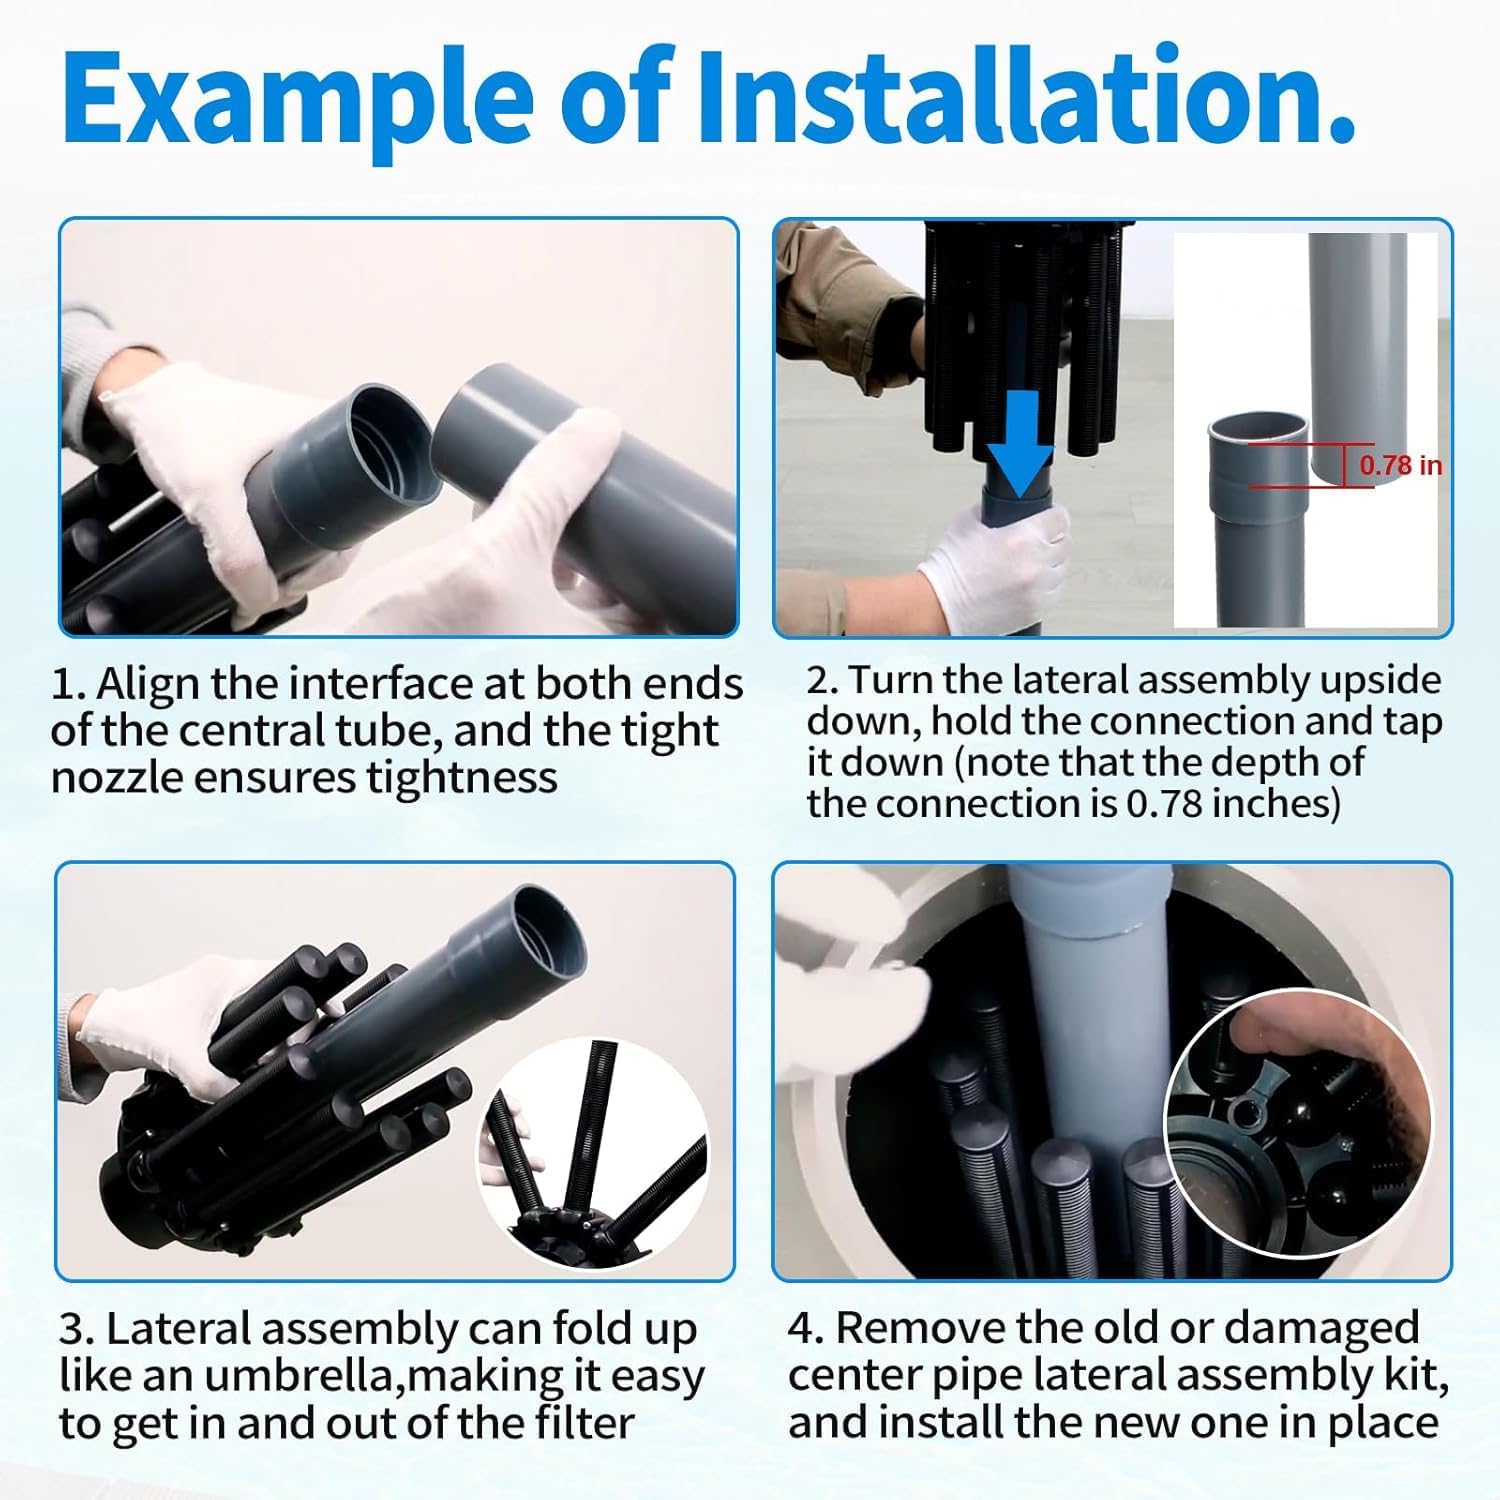
- Prepare New Assembly: The new lateral assembly is designed to fold up like an umbrella, which simplifies insertion and removal from the filter tank. Gently fold the laterals inward for easier handling.
- Insert New Assembly: Carefully lower the folded lateral assembly into the filter tank. Once inside, allow the laterals to expand into their operational position.
- Connect Center Pipe: Align the interface at both ends of the central pipe. The connection can be secured by gently tapping it into place. The tight nozzle ensures a secure connection. Note that the depth of the connection is approximately 0.78 inches.
- Add New Sand: Once the new lateral assembly is securely in place, carefully add new filter sand back into the tank, ensuring the laterals remain undisturbed.
- Reassemble and Test: Reassemble the filter tank according to your filter's manufacturer instructions. Prime the pump and check for leaks before resuming normal operation.

5. Operation and Function
Once installed, the lateral assembly operates passively as part of your sand filter system. Its primary function is to evenly distribute water across the sand bed during filtration and to collect filtered water from the bottom of the tank, directing it back to the pool. The design ensures that impurities are effectively trapped by the sand, preventing them from re-entering the pool water.

6. Maintenance
The lateral assembly itself requires minimal direct maintenance beyond ensuring it is correctly installed and free from damage. Regular maintenance of your sand filter system is key to the longevity and performance of the lateral assembly:
- Backwashing: Perform regular backwashing of your sand filter as recommended by your filter manufacturer to clean the sand bed and prevent clogging.
- Sand Replacement: Replace the filter sand every 3-5 years, or as needed, to maintain optimal filtration efficiency. Inspect the lateral assembly for any signs of wear or damage during sand replacement.
- Inspection: Periodically inspect the lateral assembly for cracks, breaks, or blockages, especially if you notice a decrease in filtration performance or sand returning to the pool.
7. Troubleshooting
If you experience issues with your sand filter after installing or using the lateral assembly, consider the following:
- Sand in Pool: If sand is returning to your pool, this often indicates a problem with the lateral assembly. Possible causes include:
- A cracked or broken lateral finger.
- An improperly seated lateral assembly or central pipe connection.
- Damage to the central pipe itself.
- Poor Filtration: If the water clarity is poor despite proper backwashing, check the following:
- Ensure the lateral assembly is correctly installed and not obstructed.
- Verify the filter sand is clean and not channeling.
- Confirm the filter's multi-port valve is set to the correct position.
- Low Water Flow: Reduced water flow can be caused by a clogged filter bed (requiring backwash) or obstructions within the lateral assembly or central pipe.
8. Support
For any questions regarding the GYPNS SX244DA Lateral Assembly or its compatibility and installation, please contact the manufacturer or your product retailer for assistance. Always refer to your specific sand filter's manual for detailed instructions on filter operation and maintenance.