
1. Introduction
This manual provides detailed instructions for the safe and effective operation, maintenance, and troubleshooting of your VANPO 3/4-Inch Drive Digital Torque Wrench. Please read this manual thoroughly before using the tool to ensure proper function and to prevent damage or injury.
1.1 Safety Information
- Always wear appropriate personal protective equipment, such as safety glasses, when operating the torque wrench.
- Ensure the workpiece is securely fastened before applying torque.
- Do not exceed the maximum torque capacity of the wrench (32-626 ft-lbs./42.5-850Nm).
- Avoid dropping the wrench or subjecting it to severe impacts, as this can affect its accuracy.
- Keep the wrench clean and dry. Store it in its protective case when not in use.
- This tool is designed for professional and DIY use in automotive, truck, and heavy-duty applications.
2. Product Overview
The VANPO Digital Torque Wrench is a precision instrument designed for accurate torque application. It features a digital display, multiple measurement modes, and a reversible ratchet head for versatile use.

Figure 2.1: VANPO 3/4-Inch Drive Digital Torque Wrench with its protective storage case.
2.1 Key Components and Features
- Digital Display: Provides clear, real-time torque readings and mode indicators.
- Control Panel: Buttons for power, mode selection, unit switching, and value adjustment.
- Reversible Ratchet Head: Allows for torque application in both clockwise and counterclockwise directions.
- Buzzer & LED Indicator: Provides audible and visual alerts when target torque is approached and reached.
- Durable Construction: Made from Chromium Molybdenum Steel and ABS Plastic for heavy-duty use.

Figure 2.2: Detailed view of the control panel with M (Select Preset Mode), C (ON/OFF), U (Multi Function Buttons: Unit Switch/Set), and Up/Down arrows (Plus/Minus Torque Value).

Figure 2.3: The reversible ratchet head allows for torque application in both clockwise (CW) and counter-clockwise (CCW) directions with ±2% accuracy.
3. Setup
3.1 Battery Installation
The torque wrench requires two AA batteries (included). Follow these steps for installation:
- Locate the battery cover at the end of the handle.
- Use a coin or a flat-head screwdriver to open the battery cover by rotating it counter-clockwise.
- Insert two AA batteries, ensuring correct polarity (+/-).
- Close the battery cover by aligning the small black and red triangles on one line and rotating clockwise until secure.
- Press the 'C' (ON/OFF) button to power on the wrench.

Figure 3.1: Steps for battery installation: 1. Open the battery cover. 2. Put in AA batteries. 3. Close the battery cover. 4. Press the C button to use.
4. Operating Instructions
4.1 Power On/Off
- To power on, press the 'C' button.
- To power off, press and hold the 'C' button for 3 seconds.
4.2 Measurement Modes
The wrench offers two primary measurement modes: Peak Mode and Track Mode.
- Peak Mode: Displays the maximum torque value achieved during the application. This data is automatically saved.
- Track Mode: Displays real-time torque values as force is applied.

Figure 4.1: The digital display can show real-time torque in Track Mode or record the maximum torque in Peak Mode.
4.3 Unit Switching
The wrench supports four measurement units: kg-cm, Nm, in-lb, and ft-lb.
- Press the 'U' button to cycle through the available units.

Figure 4.2: The wrench supports multiple measurement units for versatility.
4.4 Torque Value Preset and Storage
You can preset up to six torque values (M1 to M6) for frequently repeated applications. The wrench can store up to 600 sets of data.
- Press the 'M' button to select a preset mode (M1-M6).
- Use the Up (∧) and Down (∨) arrow buttons to adjust the desired torque value.
- Each preset mode allows you to choose between Track or Peak Mode.

Figure 4.3: Setting a specific torque value using the control buttons.
4.5 Reminder Mode
The wrench provides alerts as you approach the preset torque value:
- At 85% of the target torque, the buzzer will sound and LEDs will illuminate.
- At 90% of the target torque, the buzzer will sound more frequently and more LEDs will illuminate.
- At 100% of the target torque, the buzzer will sound continuously, and all red LEDs will illuminate. This helps prevent over-tightening and screw damage.

Figure 4.4: The digital display provides clear readings, and the integrated buzzer and LED indicators provide alerts for precise torque application.
4.6 Saving Mode (Lock/Unlock & Auto Sleep)
- Lock/Unlock: Press and hold the 'M' key for 3 seconds to lock the buttons and prevent accidental operation. Repeat to unlock.
- Auto Sleep: To conserve battery life, the screen backlight will turn off after approximately 3 minutes of inactivity. The wrench will automatically enter sleep mode after 5 minutes of inactivity.

Figure 4.5: The display indicates 'LoCt' when locked and 'UnLt' when unlocked.
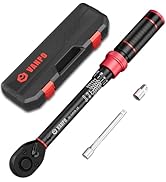
Figure 4.6: Auto Sleep Function: The screen dims after 3 minutes and enters sleep mode after 5 minutes of inactivity.
5. Maintenance
5.1 Cleaning
- Wipe the wrench clean with a soft, dry cloth after each use.
- Do not use abrasive cleaners or solvents, as they may damage the finish or electronic components.
5.2 Storage
- Always store the digital torque wrench in its original protective case to prevent damage.
- Store in a dry environment, away from extreme temperatures and direct sunlight.
- Remove batteries if the wrench will not be used for an extended period to prevent leakage.
6. Troubleshooting
| Problem | Possible Cause | Solution |
|---|---|---|
| Display not turning on. | Low or dead batteries; incorrect battery installation. | Replace batteries; ensure correct polarity. |
| Inaccurate readings. | Wrench dropped or impacted; calibration required. | Contact customer support for recalibration or service. |
| Buzzer/LED not working. | Feature disabled (if applicable); internal malfunction. | Check settings; contact customer support. |
| Buttons unresponsive. | Wrench is in lock mode; internal malfunction. | Press and hold 'M' to unlock; contact customer support. |
7. Specifications
| Specification | Detail |
|---|---|
| Brand | VANPO |
| Model Number | VP045-1 |
| Drive Size | 3/4-Inch |
| Torque Range | 32-626 ft-lbs. / 42.5-850 Nm |
| Accuracy | ±2% (Clockwise & Counterclockwise) |
| Measurement Modes | Peak Mode, Track Mode |
| Data Storage | Up to 600 sets |
| Preset Values | Up to 6 sets (M1-M6) |
| Power Source | 2 AA Batteries (included) |
| Material | Chromium Molybdenum Steel, ABS Plastic |
| Item Weight | 14.85 pounds (6.75 Kilograms) |
| Package Dimensions | 55.2 x 7.3 x 3.6 inches |
8. Warranty and Support
For warranty information, technical support, or service inquiries, please refer to the warranty card included with your product or contact VANPO customer service directly through their official website or the retailer where the product was purchased.
Keep your purchase receipt as proof of purchase for any warranty claims.