1. Introduction
This manual provides instructions for the proper installation, operation, and maintenance of the Everbilt 3-inch Gray Cast Iron Swivel Plate Caster. This caster is designed for heavy-duty applications, offering robust support and mobility for various equipment.
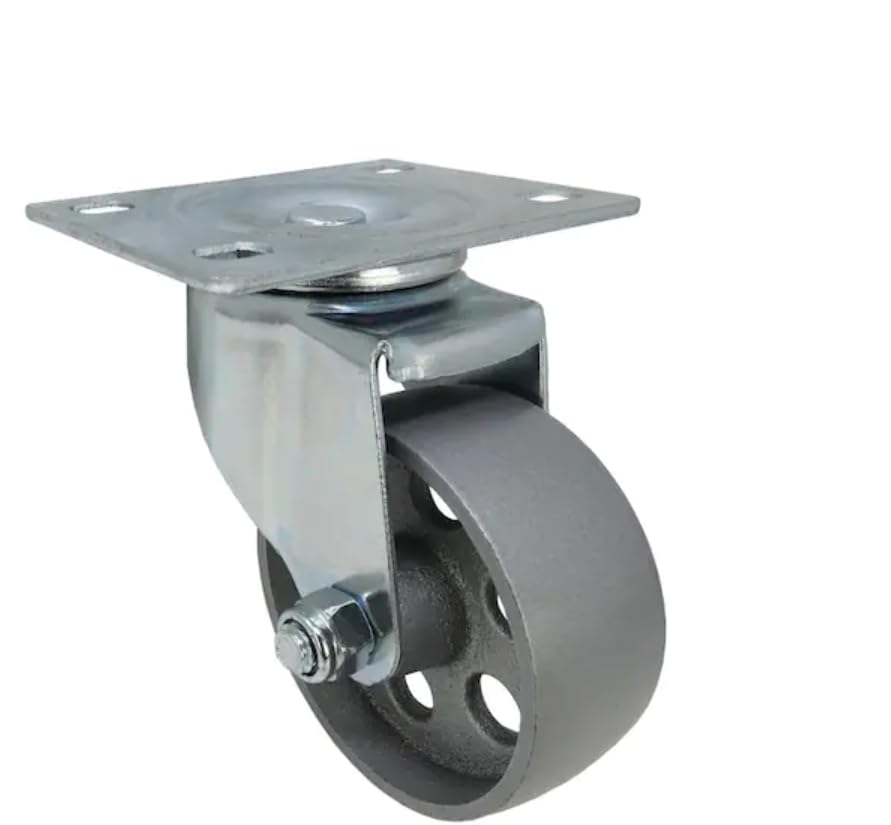
Image 1.1: Everbilt 3-inch Gray Cast Iron Swivel Plate Caster. This image displays the complete caster assembly, featuring a gray cast iron wheel, a galvanized steel swivel housing, and a square top plate for mounting.
2. Product Features
- Load Rating: Steel swivel plate caster with a 300 lb. load rating per caster.
- Wheel Material: 3-inch diameter gray cast iron wheel.
- Temperature Range: Operates effectively in extreme temperatures from -40 degrees F to 500 degrees F.
- Operation: Provides quiet operation over hard surfaces such as wood, tile, and concrete.
- Versatility: Suitable for use on carts, dollies, shelving, and furniture.
- Mobility: Cast iron construction ensures easy mobility in various temperature conditions.
- Dimensions: Overall dimensions are approximately 4.25 inches (H) x 3 inches (W) x 3.3 inches (D).

Image 2.1: Everbilt Swivel Plate Caster Features. This graphic highlights key features such as 3-inch cast iron wheel, 300 lbs load capacity, easy mobility, quiet operation, and floor protection.
3. Specifications
| Specification | Detail |
|---|---|
| Item Weight | 2.2 Pounds |
| Brand | Everbilt |
| Material | Cast Iron (wheel), Steel (housing) |
| Mounting Type | Plate Mount |
| Color | Gray |
| Wheel Diameter | 3 inches |
| Load Rating | 300 lbs per caster |
| Operating Temperature | -40°F to 500°F |
Dimensional Drawings

Image 3.1: Caster Side and Front Dimensions. This diagram illustrates the overall height (4 1/4"), wheel diameter (3"), and wheel width (1 1/4"), along with the 300 lbs load capacity.
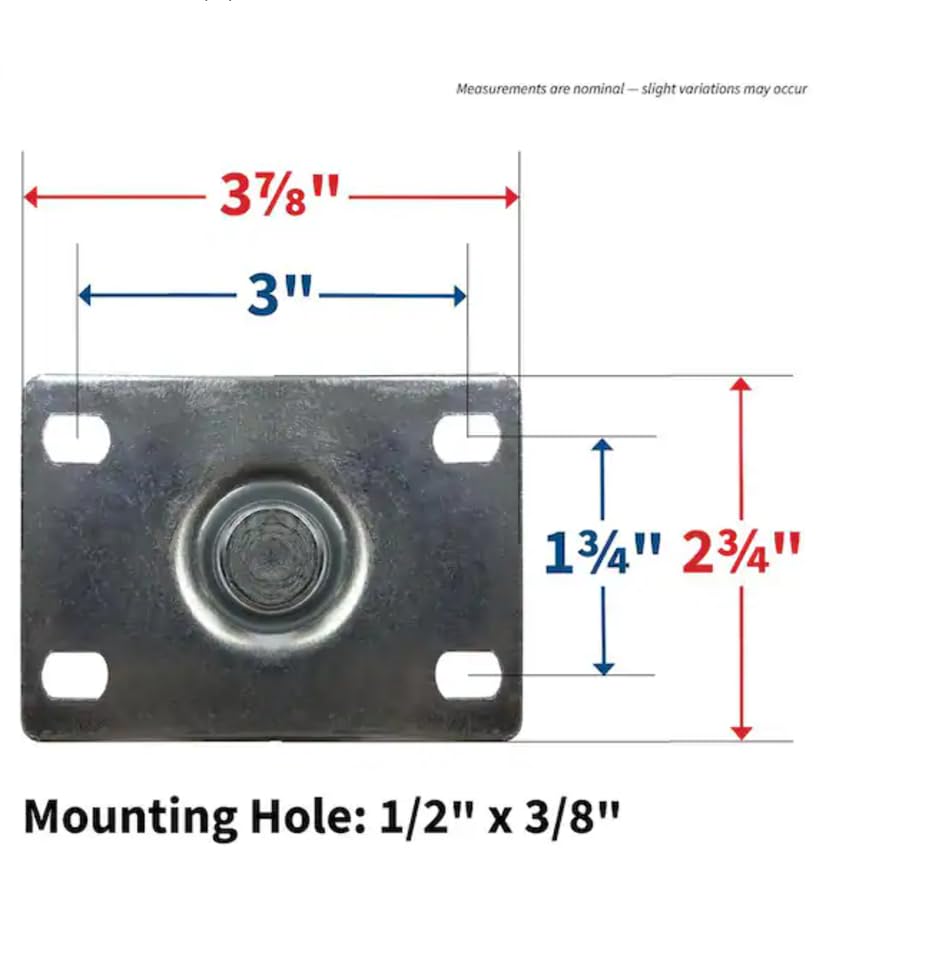
Image 3.2: Mounting Plate Dimensions. This diagram shows the top plate dimensions (3 7/8" x 3") and the mounting hole spacing (1 3/4" x 2 3/4") with 1/2" x 3/8" mounting holes.
4. Setup and Installation
Proper installation is crucial for the safe and effective operation of your Everbilt caster. Ensure the mounting surface is strong enough to support the combined weight of the caster, the item it is attached to, and its load.
Required Tools:
- Drill
- Appropriate drill bits for pilot holes
- Wrench or socket set (for bolts/nuts)
- Measuring tape or ruler
- Marking tool (pencil/marker)
- Mounting hardware (bolts, nuts, washers - not included)
Installation Steps:
- Position the Caster: Place the caster's mounting plate on the desired installation location on the item (e.g., cart, workbench leg).
- Mark Mounting Holes: Use a marking tool to accurately mark the positions of the four mounting holes through the caster plate onto the surface.
- Drill Pilot Holes: Remove the caster and drill pilot holes at the marked locations. Ensure the drill bit size is appropriate for your chosen mounting hardware.
- Secure the Caster: Align the caster plate with the drilled holes. Insert appropriate bolts through the caster plate and the mounting surface. Secure with washers and nuts from the underside, tightening firmly.
- Verify Stability: After installation, ensure the caster is securely attached and does not wobble.

Image 4.1: Caster Installation Example. This image shows a caster being mounted to a wooden surface using a drill and screws, demonstrating the typical installation process.
5. Operating Instructions
The Everbilt swivel plate caster is designed for straightforward operation. Once installed, the caster allows for easy movement and directional changes of the attached item.
- Movement: Apply gentle force to move the item. The swivel mechanism allows for 360-degree rotation, facilitating movement in any direction.
- Load Capacity: Do not exceed the stated load rating of 300 lbs per caster. Overloading can lead to premature wear, damage, or failure. If using multiple casters, distribute the load evenly.
- Surface Considerations: While suitable for various hard surfaces, be mindful of uneven terrain or obstacles that could impede movement or damage the caster wheel.
6. Maintenance
Regular maintenance helps ensure the longevity and optimal performance of your caster.
- Cleaning: Periodically clean the caster wheel and swivel assembly to remove dirt, debris, and dust that can accumulate and hinder smooth operation. Use a damp cloth; avoid harsh chemicals.
- Inspection: Regularly inspect the wheel for signs of wear, cracks, or damage. Check the swivel mechanism for smooth rotation and ensure all mounting hardware remains tight.
- Lubrication: The swivel bearing may benefit from occasional lubrication with a general-purpose grease to maintain smooth movement, especially in dusty or wet environments.
- Hardware: Re-tighten any loose mounting bolts or nuts as needed to prevent the caster from detaching or wobbling.
7. Troubleshooting
If you encounter issues with your Everbilt caster, consider the following common solutions:
- Caster is Sticking or Hard to Swivel:
- Check for debris (e.g., string, hair, dirt) wrapped around the wheel axle or within the swivel mechanism. Clean thoroughly.
- Apply a small amount of lubricant to the swivel bearing.
- Excessive Noise During Movement:
- Inspect the wheel for damage or flat spots.
- Ensure the mounting hardware is tight. Loose connections can cause rattling.
- Lubricate the swivel bearing if it's a grinding noise.
- Caster Wobbles or Feels Loose:
- Tighten all mounting bolts and nuts securely.
- Inspect the mounting surface for damage or weakness.
8. Warranty and Support
Specific warranty details for the Everbilt 3-inch Gray Cast Iron Swivel Plate Caster are not provided within this product information. For warranty claims or technical support, please refer to the original purchase documentation or contact Everbilt customer service directly.
Manufacturer: Home Depot
Date First Available: March 14, 2024


