
AIKE AK1006
AIKE Wall Mount Liquid Soap Dispenser Instruction Manual
Model: AK1006 | Brand: AIKE
Product Overview
The AIKE Wall Mount Liquid Soap Dispenser, model AK1006, is engineered for commercial and high-traffic environments. Its robust construction and large capacity minimize the need for frequent refills, ensuring continuous availability of soap. The dispenser is designed for ease of use and secure operation.

Image: Front view of the AIKE Wall Mount Liquid Soap Dispenser in silver.
What's Included (Packing List)
Please verify that all components are present in the package before proceeding with installation.
- Soap Dispenser x 1
- Key x 1
- User Manual x 1
- Screw x 4
- Nail-Free Sticker x 1
- Expansion Anchor x 4

Image: Contents of the AIKE soap dispenser package, including the dispenser, key, manual, screws, nail-free sticker, and expansion anchors.
Installation Guide
The AIKE soap dispenser offers two installation methods: drilled mounting for maximum security and adhesive mounting for convenience.
Drilled Installation
- Remove the container and mark the holes: Open the dispenser and remove the internal soap container. Hold the dispenser against the wall at the desired height and use a pencil to mark the positions for drilling.
- Drill holes and insert expansion anchors: Use an appropriate drill bit to drill holes at the marked positions. Insert the provided expansion anchors into the drilled holes.
- Hang the dispenser and fix with screws: Align the dispenser with the drilled holes and secure it to the wall using the provided screws. Ensure it is firmly attached.
- Reinstall the container and lock the dispenser: Place the soap container back into the dispenser. Close the dispenser and use the key to lock it securely.
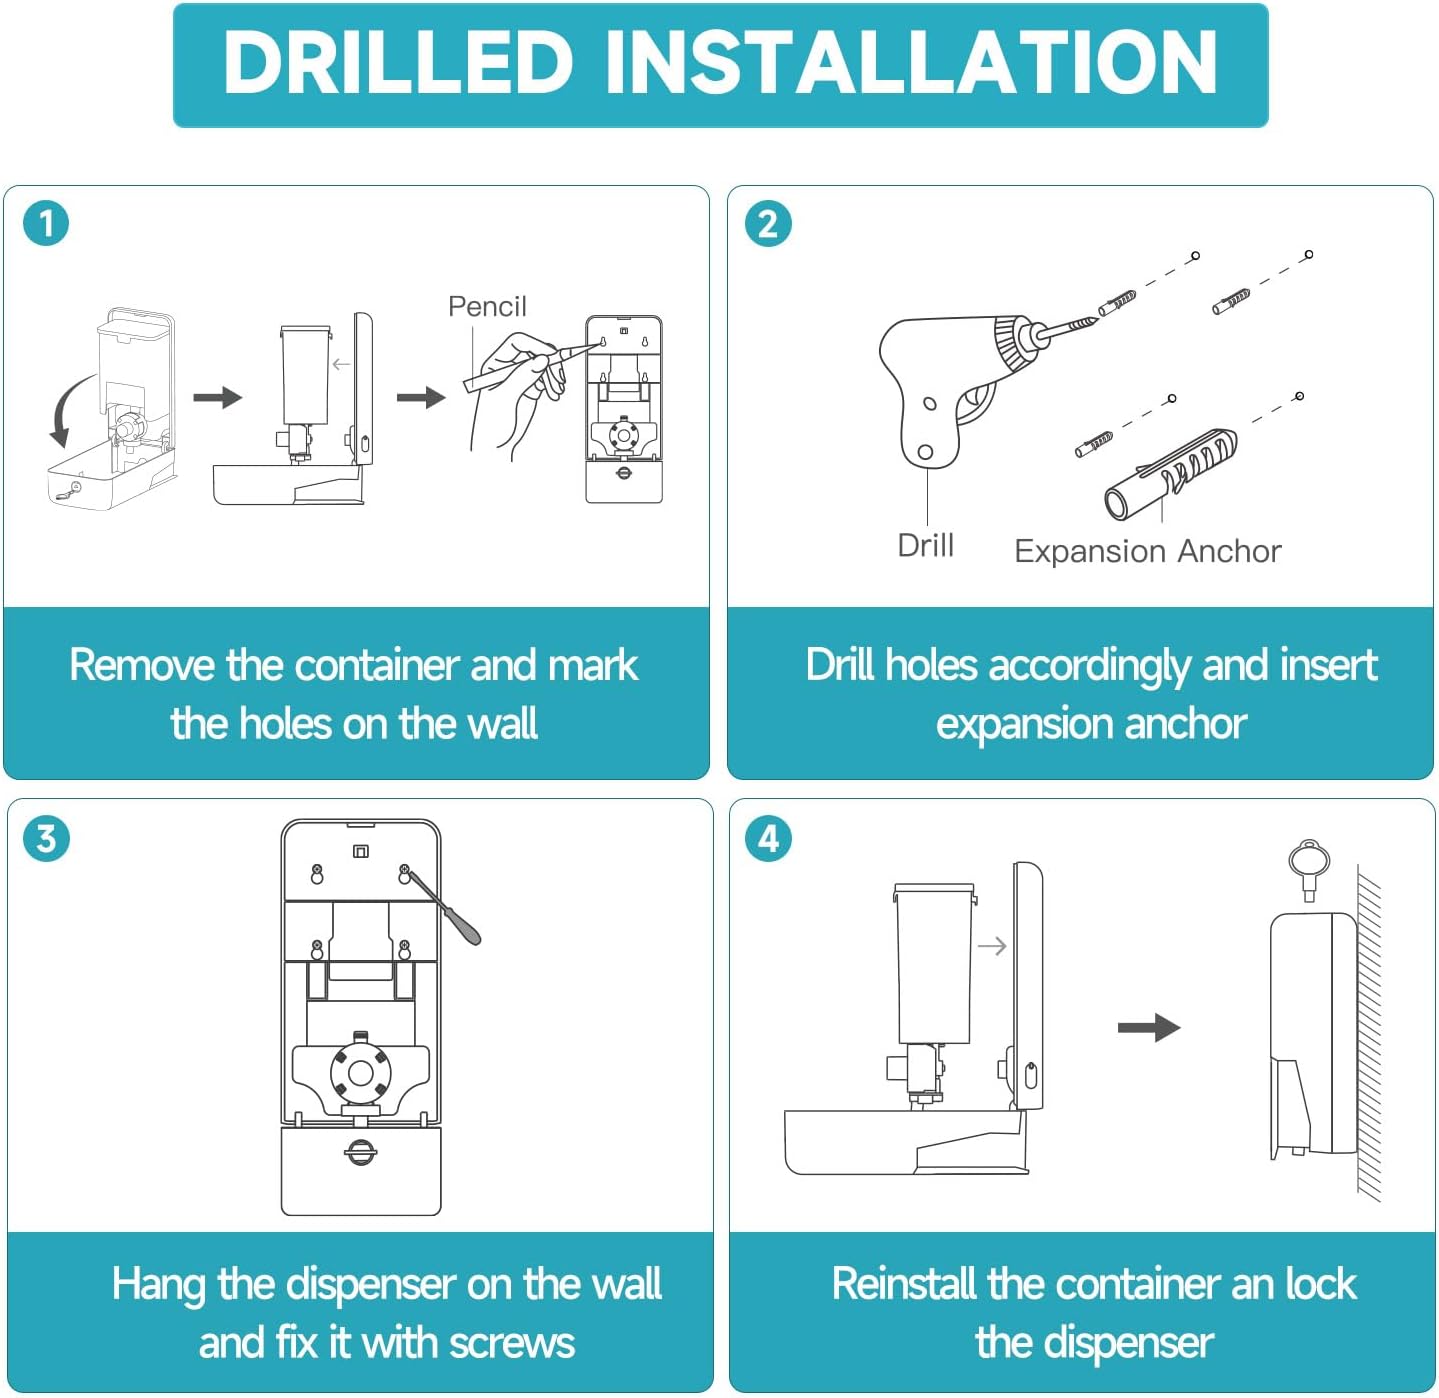
Image: Visual guide for drilled installation, showing steps from marking to securing the dispenser.
Adhesive Installation
- Prepare the wall surface: Ensure the wall surface is clean, dry, and free from any dust, oil, or stains.
- Remove protective film: Peel off the protective film from the back of the adhesive mounting plate.
- Press firmly to secure: Press the adhesive plate firmly against the prepared wall surface. Apply pressure evenly to eliminate air bubbles and ensure a strong bond.
- Wait and secure the dispenser: Allow the adhesive to cure for a recommended period (typically 24 hours) before installing the dispenser onto the adhesive plate. This ensures maximum adhesion.
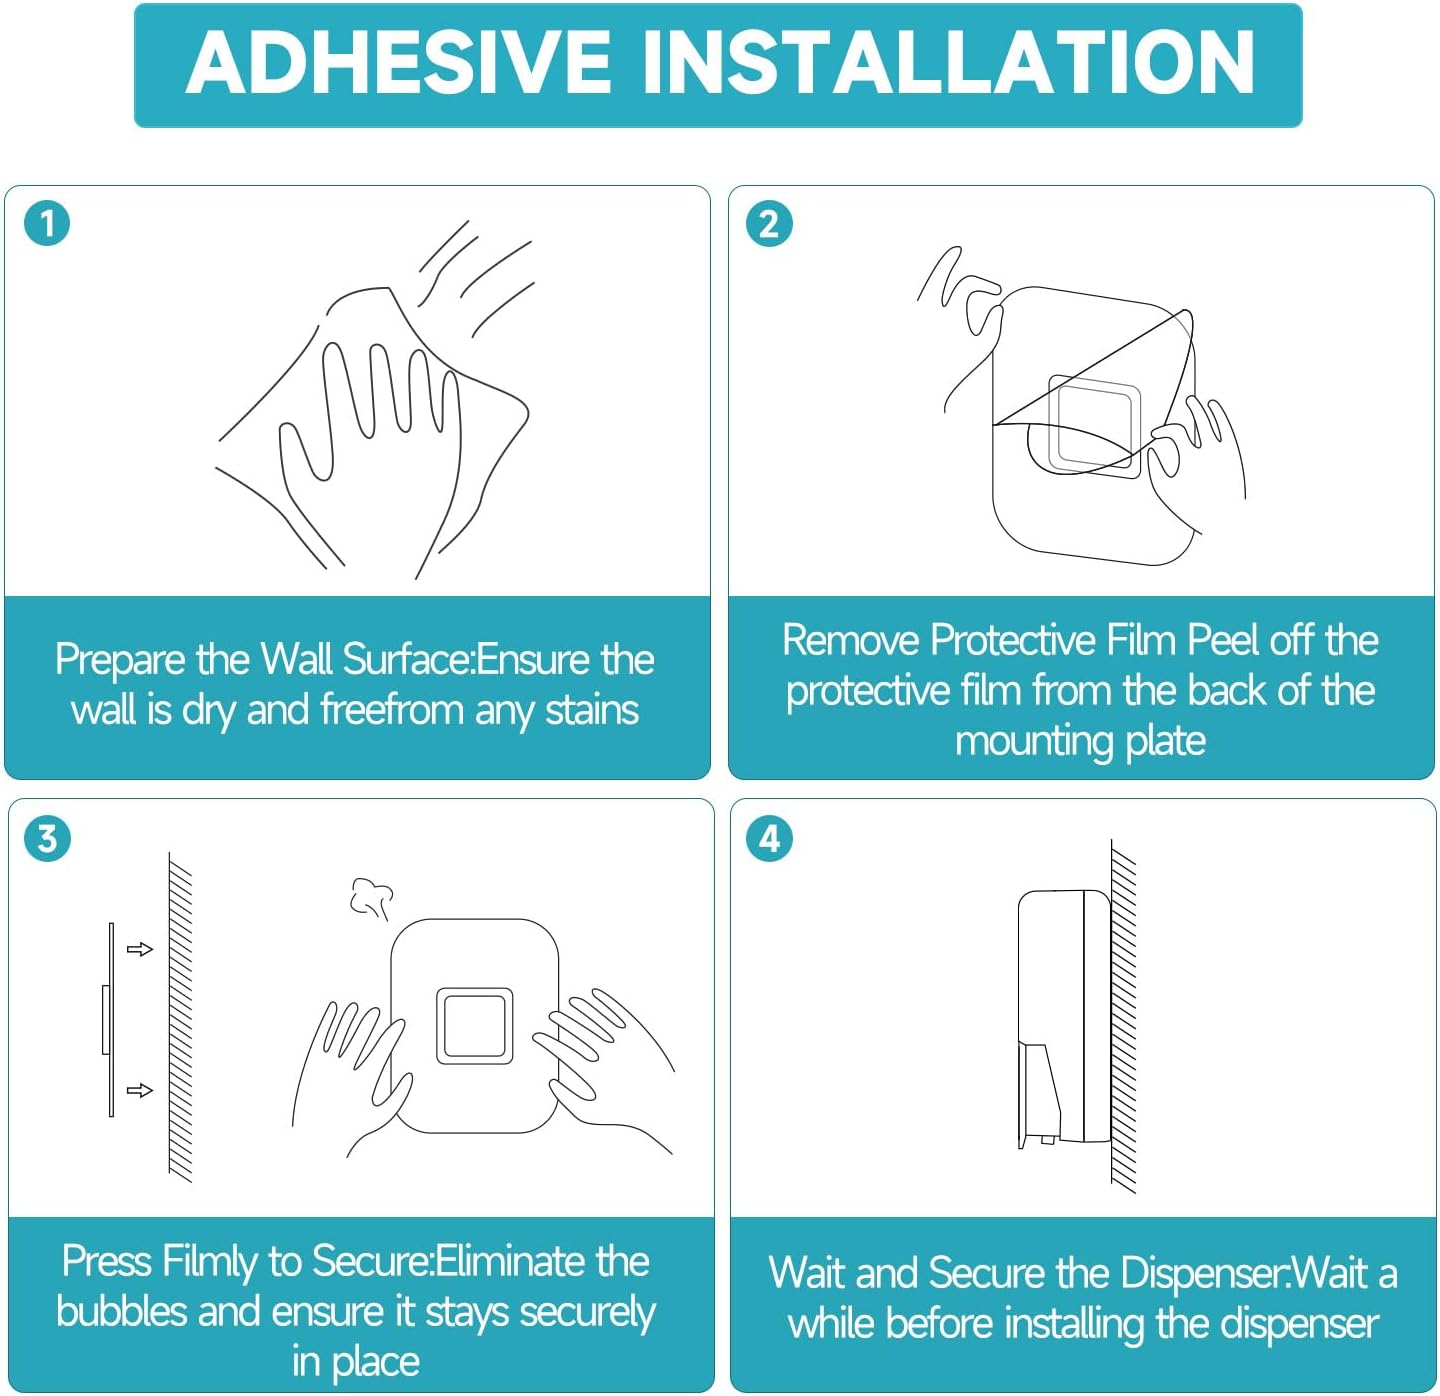
Image: Visual guide for adhesive installation, showing steps from surface preparation to mounting the dispenser.
Operation
To dispense soap, simply place your hand under the dispenser's nozzle and press the large push panel. The manual pump mechanism will deliver a measured amount of liquid soap.

Image: A hand demonstrating how to press the large button for soap dispensing.
Maintenance
Refilling the Dispenser
The AIKE dispenser features a 27-ounce (800ml) large capacity reservoir, reducing the frequency of refills. To refill:
- Unlock the top cover using the provided key.
- Carefully lift the cover to expose the internal reservoir.
- Pour liquid soap directly into the reservoir, ensuring not to overfill.
- Close the cover and lock it securely.

Image: Internal view of the dispenser highlighting its 27 fl. oz. large capacity for liquid soap.
Cleaning and Care
Regular cleaning will ensure optimal performance and hygiene. The dispenser's fingerprint-resistant and stain-resistant coating simplifies maintenance.
- Wipe the exterior with a soft, damp cloth and mild soap. Avoid abrasive cleaners.
- For the internal pump, if clogging occurs, the replaceable pump allows for easy maintenance or replacement, extending the product's lifespan.

Image: Close-up views illustrating the lock design, fingerprint-resistant coating, and replaceable pump mechanism.
Troubleshooting
| Problem | Possible Cause | Solution |
|---|---|---|
| Dispenser not dispensing soap. | Reservoir is empty. | Refill the soap reservoir. |
| Dispenser not dispensing soap. | Pump is clogged. | Clean the pump mechanism. If severely clogged or damaged, consider replacing the pump. |
| Dispenser is loose on the wall. | Screws are loose (drilled installation). | Tighten the mounting screws. |
| Dispenser is loose on the wall. | Adhesive not fully cured or surface not clean (adhesive installation). | Ensure wall surface is clean and dry before applying adhesive. Allow sufficient curing time (24 hours) before mounting the dispenser. Reapply new adhesive if necessary. |
| Soap leaks from dispenser. | Reservoir cap not sealed properly or pump assembly is loose. | Ensure the reservoir cap is tightly closed and the pump assembly is correctly seated. |
Specifications
| Feature | Detail |
|---|---|
| Model Number | AK1006 |
| Brand | AIKE |
| Color | Silver |
| Material | Plastic (ABS Polycarbonate) |
| Liquid Volume Capacity | 27 fl. oz. (800 ml) |
| Product Dimensions (L x W x H) | 4.84" x 3.86" x 9.45" |
| Item Weight | 1.37 pounds |
| Installation Type | Wall Mount (Adhesive or Drilled) |
Warranty and Support
AIKE provides a 1-year manufacturer's warranty for this product. This warranty covers defects in materials and workmanship under normal use.
For any concerns, questions, or support needs regarding your AIKE Wall Mount Liquid Soap Dispenser, please feel free to reach out to our customer support team. Contact information can typically be found on the product packaging or the official AIKE website.
AIKE is committed to addressing any issues you may encounter and ensuring your satisfaction with our products.
Ask a question about this manual
Ask about setup, troubleshooting, compatibility, parts, safety, or missing instructions. Manuals+ will review the question and use this page’s manual context to help answer it.