
1. Introduction
The OWON HDS25 is a compact, multi-functional handheld device integrating a 2-channel oscilloscope and a 20,000-count multimeter. Designed for portability and versatility, it features a 3.5-inch LCD display, USB Type-C connectivity for charging and data transfer, and supports SCPI commands for remote control. This manual provides essential information for the safe and effective operation, maintenance, and troubleshooting of your HDS25 device.
2. Product Overview
2.1 Key Features
- 3-in-1 Functionality: Combines a 2-channel oscilloscope and a 20,000-count True RMS multimeter.
- Oscilloscope: 25MHz bandwidth, 250MSa/s real-time sample rate, 8K record length.
- Multimeter: Measures AC/DC voltage, AC/DC current, resistance, capacitance, diode, and continuity.
- Display: 3.5-inch high-resolution LCD.
- Connectivity: USB Type-C for charging and PC communication, supports SCPI commands.
- Portability: Compact design with approximately 4 hours of continuous battery operation.
2.2 Device Components
The following image illustrates the main components of the OWON HDS25 device:
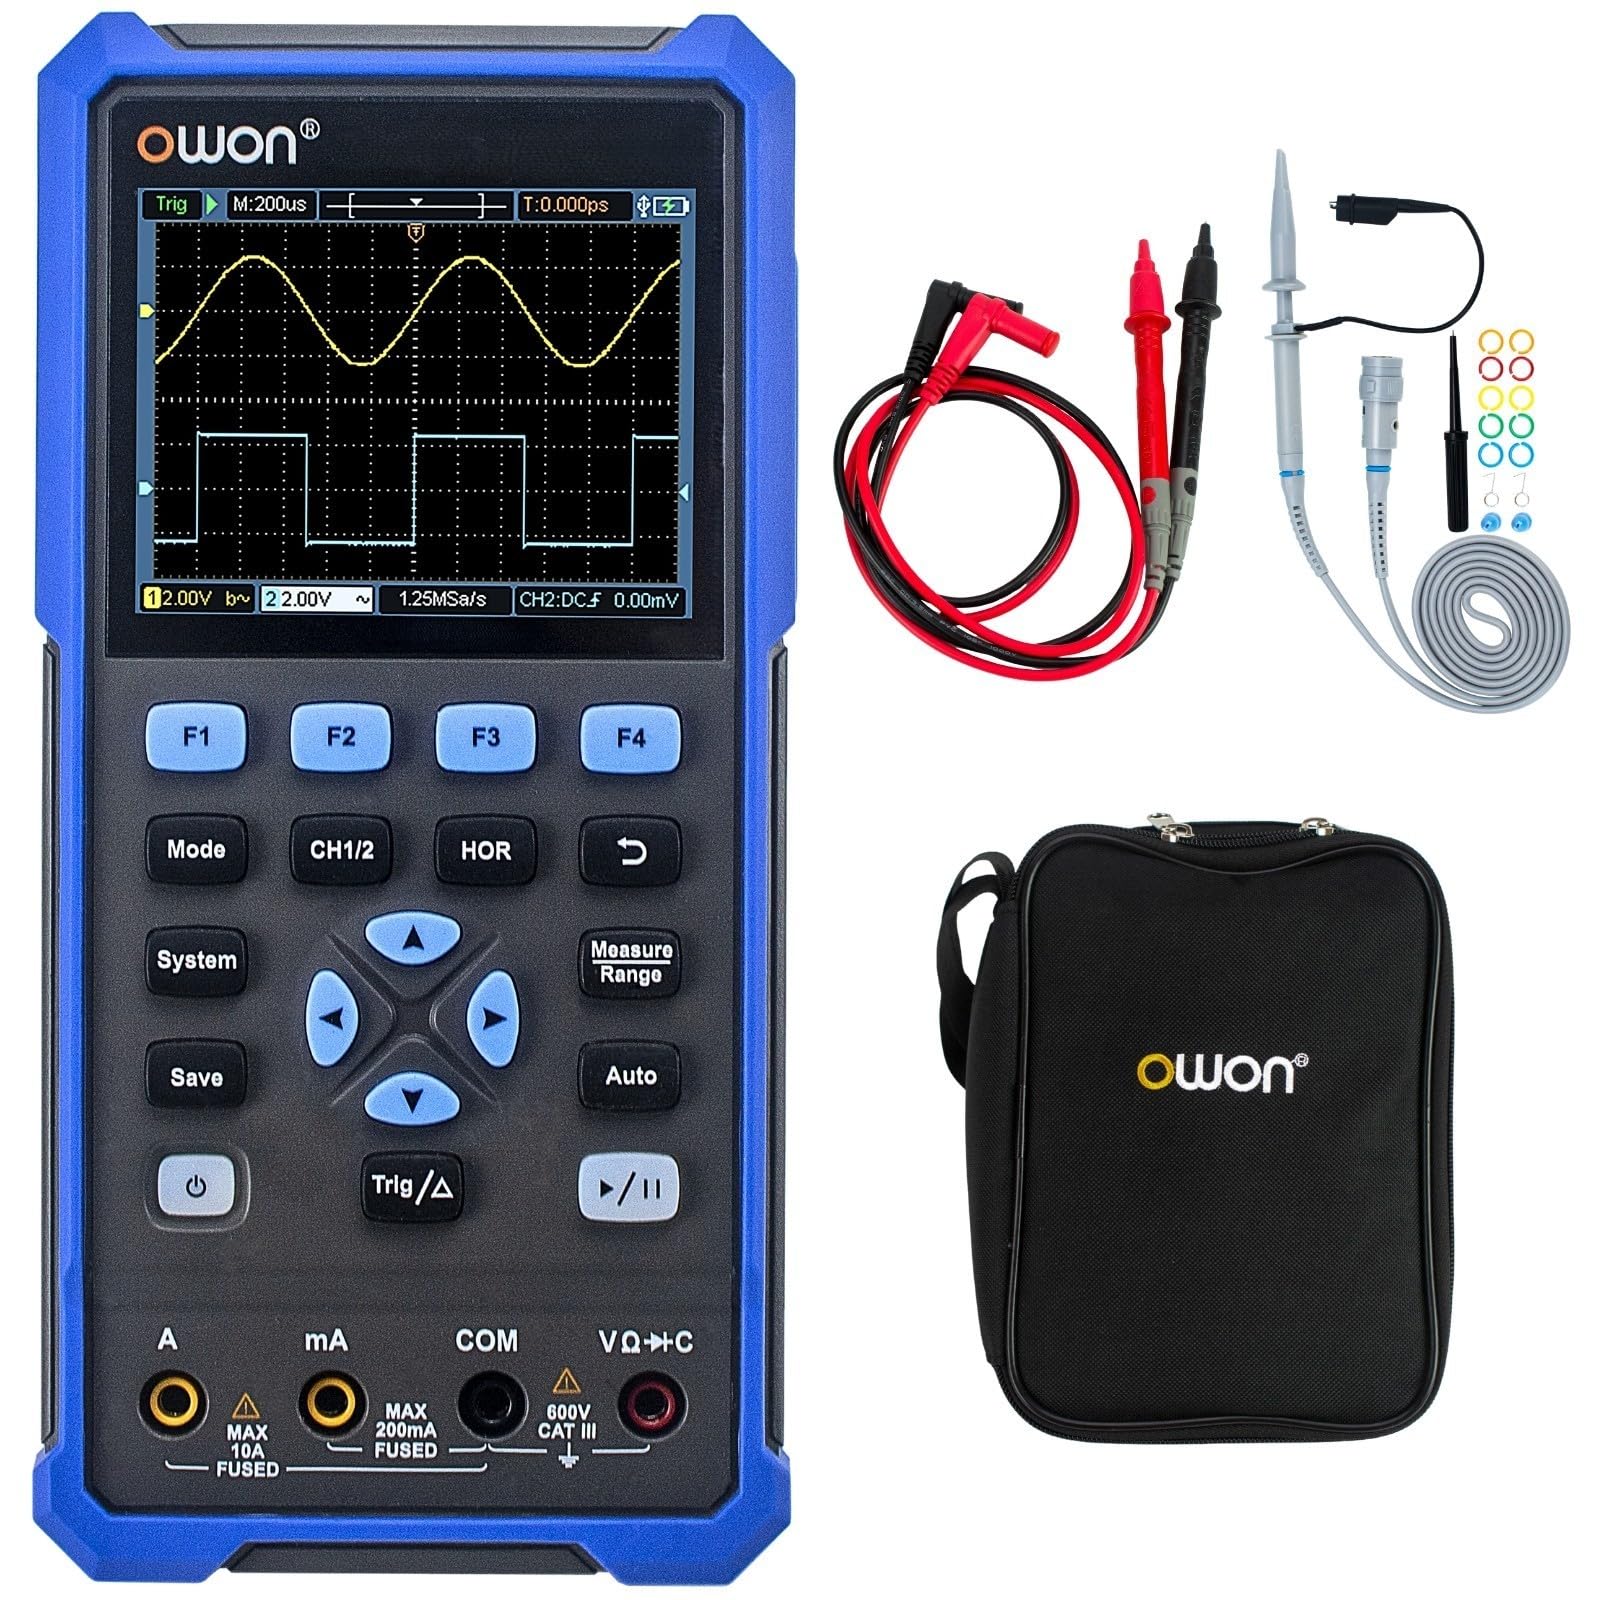
The device features a central 3.5-inch LCD screen for waveform display and measurement readings. Below the screen are function buttons (F1-F4), mode selection buttons (Mode, CH1/2, HOR, System, Save, Auto, Trig/Δ, Power, Play/Pause), and a directional pad for navigation. At the bottom, there are input jacks for current (A, mA), common ground (COM), and voltage/resistance/capacitance (VΩ+C) measurements.

2.3 Included Accessories
- USB Type-C Cable
- Oscilloscope Probes (2)
- Probe Adjustment Tool
- Multimeter Test Leads
- Protective Bag

3. Setup
3.1 Charging the Device
Before initial use, fully charge the device using the provided USB Type-C cable and a compatible power adapter (not included). The charging indicator on the device will show the charging status.
3.2 Connecting Probes and Leads
- Oscilloscope Probes: Connect the BNC connector of the oscilloscope probes to the CH1 and CH2 input ports on the top of the device. Ensure a secure connection.
- Multimeter Test Leads: For multimeter functions, insert the red test lead into the VΩ+C jack and the black test lead into the COM jack. For current measurements, use the A or mA jacks as appropriate.
3.3 Powering On/Off
Press and hold the Power button (usually marked with a circle and vertical line symbol) to turn the device on or off.
4. Operating Instructions
4.1 General Navigation
- Use the Mode button to switch between Oscilloscope and Multimeter modes.
- The directional pad (up, down, left, right) is used to navigate menus and adjust parameters.
- Buttons F1 to F4 correspond to on-screen menu options.
- The System button accesses system settings.
- The Save button allows saving waveforms or measurement data.
4.2 Oscilloscope Mode
In Oscilloscope mode, the device displays real-time waveforms. Use the following controls:
- CH1/2: Selects the active channel or displays both.
- HOR (Horizontal): Adjusts the time base (horizontal scale) of the waveform.
- Vertical Scale: Use the directional pad (up/down) to adjust the voltage scale for the selected channel.
- Trig/Δ (Trigger): Configures trigger settings (edge, level, mode) to stabilize the waveform display.
- Auto: Automatically adjusts vertical, horizontal, and trigger settings for a stable waveform display.
- Play/Pause: Freezes or resumes the waveform acquisition.
4.3 Multimeter Mode
In Multimeter mode, the device functions as a digital multimeter. Use the directional pad to select the desired measurement function (Voltage, Current, Resistance, etc.). Ensure the test leads are connected to the correct input jacks for the selected measurement type.
- Voltage Measurement (V): Connect leads in parallel with the circuit.
- Current Measurement (A/mA): Connect leads in series with the circuit. Ensure correct jack selection (A or mA) based on expected current.
- Resistance Measurement (Ω): Connect leads across the component when power is off.
- Continuity/Diode: For checking circuit continuity or diode function.
- Capacitance Measurement (F): Connect leads across the capacitor when power is off.
5. Maintenance
5.1 Cleaning
Wipe the device exterior with a soft, damp cloth. Do not use abrasive cleaners or solvents. Ensure the device is powered off and disconnected from all power sources and measurement circuits before cleaning.
5.2 Battery Care
To prolong battery life, avoid fully discharging the battery frequently. Charge the device regularly, especially if it will be stored for an extended period. Store the device in a cool, dry place.
5.3 Storage
When not in use, store the HDS25 in its protective bag in a clean, dry environment away from direct sunlight, extreme temperatures, and high humidity.
6. Troubleshooting
If you encounter issues with your OWON HDS25, refer to the following common problems and solutions:
| Problem | Possible Cause | Solution |
|---|---|---|
| Device does not power on. | Low battery or faulty power button. | Charge the device for at least 30 minutes. If still unresponsive, contact support. |
| No waveform displayed in Oscilloscope mode. | Incorrect probe connection, wrong vertical/horizontal scale, or trigger settings. | Ensure probes are securely connected. Press the Auto button. Adjust vertical (voltage) and horizontal (time) scales. Check trigger level. |
| Multimeter readings are inaccurate or zero. | Incorrect lead connection, wrong measurement function selected, or open circuit. | Verify test leads are in the correct jacks for the selected function. Ensure proper connection to the circuit. Check for open circuits. |
| Device freezes or becomes unresponsive. | Software glitch. | Perform a soft reset by holding the power button until the device turns off, then restart. If the issue persists, contact support. |
7. Specifications
| Feature | Specification |
|---|---|
| Model | HDS25 |
| Bandwidth | 25 MHz |
| Channels | 2 |
| Sample Rate | 250 MSa/s |
| Record Length | 8K |
| Multimeter Counts | 20,000 |
| Display | 3.5-inch LCD |
| Connectivity | USB Type-C (charging & data) |
| Battery Life | Approx. 4 hours |
| Certifications | CE, RoHS, UL |
| Included Items | USB cable, probes, probe adjustment tool, multimeter leads, bag |
8. Warranty and Support
8.1 Warranty Information
The OWON HDS25 comes with a 3-year manufacturer's warranty for the main unit and a 1-year warranty for included accessories. Please retain your proof of purchase for warranty claims.
8.2 Customer Support
For technical assistance, troubleshooting, or warranty inquiries, please contact OWON customer support. You can also find the latest user manual and support resources on the official OWON website (owon.co.jp) or on the product page where you purchased the device.


