
Introduction
This manual provides essential information for the safe and efficient operation of your GCSOAR 15A MPPT Solar Charge Controller TD2107. This controller is designed for 12V or 24V battery systems, with a maximum PV input of 75V and a maximum input power of 200W for 12V batteries or 400W for 24V batteries. It features a built-in WiFi module for remote monitoring and parameter setting via the iConnect APP.
Safety Information
Important Safety Precautions:
- Connect the solar system in the order of 1. battery → 2. load → 3. PV array.
- Disconnect the solar system in the reverse order of 3. PV array → 2. load → 1. battery.
- Ensure correct polarity for all connections to prevent damage.
- The controller provides full system protection against reverse polarity, battery overcharging, battery over-discharging, overload, short-circuiting, overheating, and reverse current.
- The die-cast aluminum design ensures excellent heat dissipation.
- The insulated shell prevents accidents and keeps your solar system safe in high temperatures.
- Always refer to the complete installation instructions for detailed safety guidelines.
Package Contents
- 1x GCSOAR 15A MPPT Solar Charge Controller TD2107
- 1x User Manual
- 1x Temperature Line
Product Features
- MPPT Technology: High tracking efficiency of up to 99% and peak conversion efficiency of 98%.
- Battery Compatibility: Compatible with 12V/24V auto-detect for sealed lead-acid, GEL, and flooded batteries. Lithium batteries require manual selection (12V or 24V) and customizable parameters.
- 4-Stage Charging: Bulk, Absorption, Float, and Equalization for Lead Acid Batteries; Bulk and Absorption for Lithium batteries, plus Lithium Reactivation.
- Built-in WiFi Module: Remote monitoring and parameter setting via the iConnect APP (2.4G router wireless network access required).
- Comprehensive Protection: Against reverse polarity, battery overcharging, battery over-discharging, overload, short-circuiting, overheating, and reverse current.
- Durable Design: Die-cast aluminum for excellent heat dissipation.
Setup and Installation
Proper installation is crucial for the safe and efficient operation of your solar charge controller. Follow these steps carefully.
Connection Order
Always connect the battery first, then the load, and finally the solar panel. Disconnect in the reverse order.
- Connect the battery to the controller.
- Connect the load to the controller.
- Connect the PV array (solar panel) to the controller.
Visual Guide: Wiring Diagram
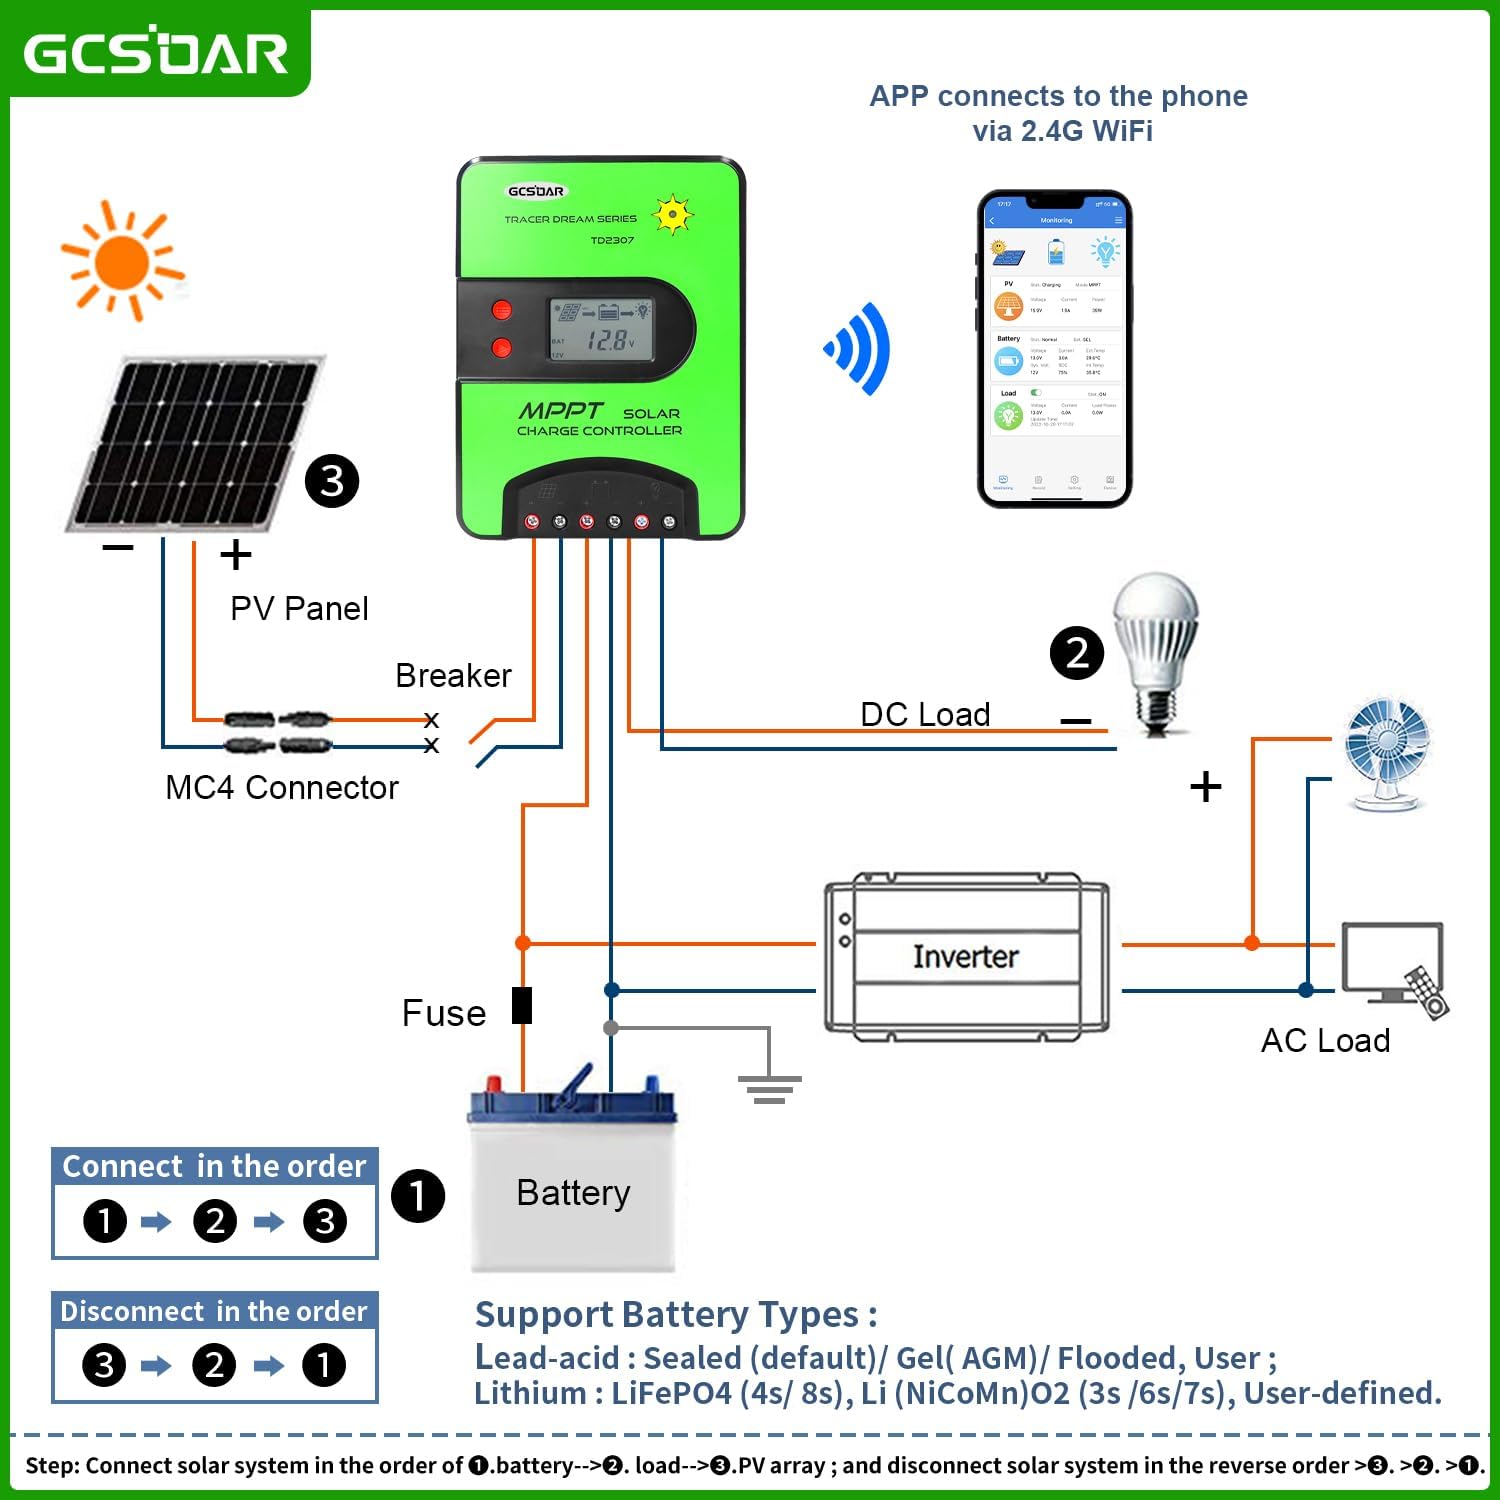
This diagram illustrates the correct connection sequence for the solar charge controller, battery, PV panel, and DC/AC loads. Ensure all connections are secure and observe polarity.
Installation Video
This video provides an unboxing and connection guide for a GCSOAR MPPT Solar Charge Controller, demonstrating the physical setup of the device, including connecting the battery and solar panel.
Operating Instructions
The GCSOAR TD2107 controller features a simple display and button interface for local operation, and a built-in WiFi module for remote monitoring and control via the iConnect APP.
Local Display Operation
The controller's display cycles through various parameters. Use the "MENU" button to enter the menu interface and navigate. Press the "OK" button to confirm selections and the "↩" button to exit from any interface.

The main display of the GCSOAR 15A MPPT Solar Charge Controller, showing battery voltage and charging status. The image also shows a smartphone displaying the remote monitoring app.
Remote Monitoring via iConnect APP
The controller includes a built-in WiFi module for remote monitoring and parameter setting.
- Download APP: Search for "iConnect" in your Android or iOS app store. You can also scan the QR code in the manual or visit the official website for download links and video tutorials.
- Connect to WiFi: Ensure your controller is within range of a 2.4G WiFi router.
- Pair Device: Follow the in-app instructions to add your controller. This typically involves registering an account, adding a new site, selecting the gateway type (EPEVER WIFI 2.4G RJ45 D), scanning the gateway SN, and selecting the product series (Tracer-AN).
- Network Configuration: Enter your home WiFi name and password in the app.
- Monitor and Control: Once connected, you can view real-time data, energy information, and control the load output remotely.
APP Interface Overview

A screenshot of the iConnect mobile application interface, displaying real-time monitoring data for PV, battery, and load information.
APP Connection Video
This video demonstrates how to connect the GCSOAR MPPT charge controller to the mobile application via the built-in WiFi adapter, showing the steps for registration, device addition, and network configuration.
Parameter Settings
The controller allows for customization of various parameters to optimize performance for your specific battery type and system requirements.
Setting Battery Type
To set the battery type:
- At the main interface, press and hold the "OK" button for 5 seconds.
- Then, press the "OK" button briefly and wait for "SEL" to flash to enter the setting status.
- Use the up/down arrows to select the suitable battery type (Sealed, GEL, Flooded, LiFePO4, etc.).
- Press and hold "OK" for 5 seconds to confirm the setting.

A screenshot from the iConnect mobile application illustrating the battery type selection menu, allowing users to choose between various battery chemistries like Sealed, GEL, Flooded, and different LiFePO4 configurations.
Customizing Parameters via APP
The iConnect APP provides a "Parameter Settings" section where you can adjust:
- Battery Parameter Settings (e.g., Boost Charge Voltage, Float Charge Voltage, LVD, LVR).
- Load Configuration.
- Device Parameter Settings.
- Basic Parameter Settings.
For Lithium batteries, manual selection of system voltage (12V or 24V) and custom parameter adjustment is required.
Parameter Setting Video
This video demonstrates how to set parameters on the GCSOAR MPPT Solar Charge Controller using the mobile application, including battery type selection and voltage adjustments.
Specifications
| Feature | Value |
|---|---|
| Model | TD2107 |
| Battery System Voltage | 12V/24V Auto |
| PV Max Input Voltage | 75V |
| Max Input Power (12V Battery) | 200W |
| Max Input Power (24V Battery) | 400W |
| Max Charging Current | 15A |
| Max Discharging Current | 15A |
| USB Output | DC 5V 2A |
| Charging Type | MPPT |
| Working Temperature | -20°C to +50°C |
| Waterproof Grade | IP32 |
| Dimensions | 165x123x46mm |
| Item Weight | 1.6 pounds (0.73 kg) |
Detailed electrical parameters for the GCSOAR TD2107 MPPT Solar Charge Controller.
Maintenance
To ensure optimal performance and longevity of your GCSOAR MPPT Solar Charge Controller, regular maintenance is recommended.
- Cleanliness: Keep the controller clean and free from dust and debris. Ensure proper airflow around the heat sink.
- Connections: Periodically check all wiring connections for tightness and corrosion. Loose connections can cause overheating and damage.
- Environment: Ensure the controller is installed in a well-ventilated area, away from direct sunlight, moisture, and corrosive environments.
- Firmware Updates: Check the iConnect APP or manufacturer's website for any available firmware updates to ensure your controller has the latest features and bug fixes.
Troubleshooting
If you encounter issues with your GCSOAR MPPT Solar Charge Controller, refer to the following common troubleshooting tips:
- No Power/Display: Check battery connections and ensure the battery voltage is within the operating range.
- No Charging: Verify solar panel connections and ensure there is sufficient sunlight. Check PV voltage and current readings on the display or APP.
- Load Not Working: Check load connections. Ensure the load is not exceeding the controller's rated current. Check load status on the display or APP.
- APP Connectivity Issues: Ensure your phone is connected to a 2.4G WiFi network. Verify the controller's WiFi module is active and correctly configured in the APP. If issues persist, try restarting the controller and your phone.
- Error Codes: Refer to the user manual for specific error codes displayed on the controller or APP and their corresponding solutions.
For further assistance, consult the full user manual or contact GCSOAR customer support.
Support
For detailed technical support, additional resources, or warranty information, please refer to the comprehensive user manual included with your product. You can also visit the official GCSOAR website or contact their customer service.
Official Website for APP download and video tutorials: ldsolarpv.com/jszc
GCSOAR has assistance centers in Chicago (USA), Munich (Germany), Toronto (Canada), and Melbourne (Australia) for technical assistance.
For warranty claims, please retain your proof of purchase.